android布局知识符文(layout)
一。当ScrollView里的元素想填满ScrollView时,使用"fill_parent"是不管用的,必需为ScrollView设置: android:fillViewport="true"。
当ScrollView没有fillVeewport=“true”时, 里面的元素(比如LinearLayout)会按照wrap_content来计算
<strong><span style="font-family:Courier New;"><span style="font-size:12px;"><ScrollView xmlns:android="http://schemas.android.com/apk/res/android"
    android:layout_width="match_parent"
    android:layout_height="match_parent"
    </span><span style="font-size:18px;color:#ff0000;">android:fillViewport="true"</span><span style="font-size:12px;">>
    <RelativeLayout xmlns:android="http://schemas.android.com/apk/res/android"
        android:layout_width="match_parent"
        android:layout_height="match_parent"
        android:paddingTop="@dimen/setup_fragment_padding_top"
        android:paddingLeft="@dimen/setup_fragment_padding_left"
        android:paddingRight="@dimen/setup_fragment_padding_right"
        >
        <!-- Frame on the left containing the (common) setup info -->
        <!-- TODO need phone-sized UX here -->
        <FrameLayout
            android:id="@+id/common"
            android:layout_below="@+id/top_divider"
            android:layout_alignParentLeft="true"
            android:layout_alignParentRight="true"
            android:layout_width="match_parent"
            android:layout_height="wrap_content"
            android:layout_weight="1"
            >
            <include
                layout="@layout/account_setup_basics_common"
                />
        </FrameLayout>
        <!-- Buttons below -->
        <!-- In order to show these buttons above the IME keyboard, we need to special case the to
        padding to a smaller height. -->
        <LinearLayout
            android:layout_width="match_parent"
            android:layout_height="wrap_content"
            android:layout_below="@+id/common"
            android:orientation="horizontal"
            android:paddingTop="16dip"
            android:paddingBottom="@dimen/settings_buttons_padding_bottom"
            >
            <Button
                android:id="@+id/manual_setup"
                style="@style/accountSetupButton"
                android:layout_width="0dip"
                android:layout_weight="1"
                android:text="@string/account_setup_basics_manual_setup_action" />
            <Button
                android:id="@+id/next"
                style="@style/accountSetupButton"
                android:layout_width="0dip"
                android:layout_weight="1"
                android:text="@string/next_action" />
        </LinearLayout>
    </RelativeLayout>
</ScrollView></span></span></strong>
二。 Android的系统自带的文字外观设置及实际显示效果图
android:textAppearancexml布局里面设置文字的外观:
如 android:textAppearance="@style/accountSetupInfoText"
可设置的值如下:textAppearanceButton/
textAppearanceInverse/
textAppearanceLarge/
textAppearanceLargeInverse/
textAppearanceMedium/
textAppearanceSmallInverse/
textAppearanceMediumInverse/
textAppearanceSmall/
今天解决了一个Android平台下的焦点问题。发现其中关键问题的所在是Android的touchMode。从JavaSwing平台过来的人,都会关注setFocusable()和requestFocus()方法,但是在Android的View中还有另外的两个个方法,setFocusableInTouchMode()和requestFocusFromTouch()方法。这个两个方法就是解决Android上的焦点获取问题的关键。
同时在View类中,还有一个isInTouchMode(),可以帮助我们在监听Focuse事件时判断是否执行click(). 代码如下:
- ImageButton.OnFocusChangeListener mFocusChangeListener = new ImageButton.OnFocusChangeListener(){
- public void onFocusChange(View v, boolean hasFocus) {
- Log.d("FocuseChange", "Focuse has changed.");
- if (hasFocus) {
- // 如果是touchmode就执行click,否则就会只是选中。
- v.setBackgroundDrawable(getResources().getDrawable(R.drawable.));
- if (v.isInTouchMode()){
- ((ImageButton)v).performClick();
- }
- } else {
- v.setBackgroundDrawable(getResources().getDrawable(R.));
- v.getBackground().setAlpha(100);
- }
- }
- };
系统框架将处理日常的焦点移动来响应用户的输入,它包刮改变焦点(当界面是被移除,隐藏,或者作为一个新的View变为可用状态),通过isFocusable()这个方法我们可以知道view是否具有接受焦点的资格,也可以通过setFocusable().来设置view接受焦点的资格,对应在触摸模式下,你可以调用isFocusableInTouchMode().来获知是否有焦点来响应点触,也可以通过setFocusableInTouchMode().来设置是否有焦点来响应点触的资格.
系统框架控制焦点移动到另一个组件的算法是在某一方向上邻近的组件,在极个别情况下,默认的算法可能不符合开发者的预想要求,在这种情况下,你可以覆写下列XML属性的布局文件:nextFocusDown ,nextFocusLeft,nextFocusRight ,和nextFocusUp设置他们的值来明确焦点从当前界面移动下个界面的Id。例如:
<LinearLayout
android:orientation="vertical"
... >
<Button android:id="@+id/top"
android:nextFocusUp="@+id/bottom"
... />
<Button android:id="@+id/bottom"
android:nextFocusDown="@+id/top"
... />
</LinearLayout>
一般来说,在这个垂直布局,浏览的焦点会从第一个按钮开始,不会是从第二个或者其他的,现在topButtont已经通过nextFocusUp (反之亦然)确定了bottom.
通常如果你想宣布用户界面具有焦点的资格 (如果这个界面在传统上是没有的),可以在xml布局里去加上的android:focusable的属性,并设置它的值,您也可以宣布在触摸模式下具有焦点的资格,同样也只在xml里添android:focusableInTouchMode.的属性,并设置它的值. 当用户请求在某个界面聚集焦点时,会调用requestFocus().这个方法。监听到焦点活动(获得焦点或失去焦点都会被通知),会调用onFocusChange(),这个方法。虽然帖子比较短,但是我感觉这个例子还是非常有用的,希望对开发者有一些帮助。想继续交流的可以回帖。
步骤3 创建自定义的控件焦点顺序
下面,我们尝试创建自定义的控件焦点顺序,即同时允许在上面的界面中,当用户按键时,以顺时针或逆时针进行控件切换,如下图:
也就是说,允许用户当按“Down”或“Right”键时,切换顺序是顺时针方向,比如假设当前在键12上,按“Down”或“Right”键时,会切换到键1,而按“Up”或”Left”时,会切换到键11,如此类推。要实现这点,可以在每个按钮中进行设置如下四个属性:
android:nextFocusUp- 定义当点up键时,哪个控件将获得焦点
android:nextFocusDown-定义当点down键时,哪个控件将获得焦点
android:nextFocusLeft-定义当点left键时,哪个控件将获得焦点
android:nextFocusRight--定义当点right键时,哪个控件将获得焦点
下面是其代码:
- <?xml version="1.0" encoding="utf-8"?>
- <RelativeLayout
- xmlns:android="http://schemas.android.com/apk/res/android"
- android:layout_width="fill_parent"
- android:layout_height="fill_parent">
- <Button
- style="@style/clockFaceNum"
- android:text="12"
- android:id="@+id/button12"
- android:layout_alignParentTop="true"
- android:layout_centerHorizontal="true"
- android:nextFocusUp="@+id/button11"
- android:nextFocusLeft="@+id/button11"
- android:nextFocusRight="@+id/button1"
- android:nextFocusDown="@+id/button1">
- </Button>
- <Button
- style="@style/clockFaceNum"
- android:text="11"
- android:id="@+id/button11"
- android:layout_below="@+id/button12"
- android:layout_toLeftOf="@+id/button12"
- android:nextFocusUp="@+id/button10"
- android:nextFocusLeft="@+id/button10"
- android:nextFocusRight="@+id/button12"
- android:nextFocusDown="@+id/button12">
- </Button>
- <Button
- style="@style/clockFaceNum"
- android:text="1"
- android:id="@+id/button1"
- android:layout_below="@+id/button12"
- android:layout_toRightOf="@+id/button12"
- android:nextFocusUp="@+id/button12"
- android:nextFocusLeft="@+id/button12"
- android:nextFocusRight="@+id/button2"
- android:nextFocusDown="@+id/button2">
- </Button>
- <Button
- style="@style/clockFaceNum"
- android:text="10"
- android:id="@+id/button10"
- android:layout_below="@+id/button11"
- android:layout_toLeftOf="@+id/button11"
- android:nextFocusUp="@+id/button9"
- android:nextFocusLeft="@+id/button9"
- android:nextFocusRight="@+id/button11"
- android:nextFocusDown="@+id/button11">
- </Button>
- <Button
- style="@style/clockFaceNum"
- android:text="2"
- android:id="@+id/button2"
- android:layout_below="@+id/button1"
- android:layout_toRightOf="@+id/button1"
- android:nextFocusUp="@+id/button1"
- android:nextFocusLeft="@+id/button1"
- android:nextFocusRight="@+id/button3"
- android:nextFocusDown="@+id/button3">
- </Button>
- <Button
- style="@style/clockFaceNum"
- android:text="9"
- android:id="@+id/button9"
- android:layout_below="@+id/button10"
- android:layout_toLeftOf="@+id/button10"
- android:nextFocusUp="@+id/button8"
- android:nextFocusLeft="@+id/button8"
- android:nextFocusRight="@+id/button10"
- android:nextFocusDown="@+id/button10">
- </Button>
- <Button
- style="@style/clockFaceNum"
- android:text="3"
- android:id="@+id/button3"
- android:layout_below="@+id/button2"
- android:layout_toRightOf="@+id/button2"
- android:nextFocusUp="@+id/button2"
- android:nextFocusLeft="@+id/button2"
- android:nextFocusRight="@+id/button4"
- android:nextFocusDown="@+id/button4">
- </Button>
- <Button
- style="@style/clockFaceNum"
- android:text="8"
- android:id="@+id/button8"
- android:layout_below="@+id/button9"
- android:layout_toRightOf="@+id/button9"
- android:nextFocusUp="@+id/button7"
- android:nextFocusLeft="@+id/button7"
- android:nextFocusRight="@+id/button9"
- android:nextFocusDown="@+id/button9">
- </Button>
- <Button
- style="@style/clockFaceNum"
- android:text="4"
- android:id="@+id/button4"
- android:layout_below="@+id/button3"
- android:layout_toLeftOf="@+id/button3"
- android:nextFocusUp="@+id/button3"
- android:nextFocusLeft="@+id/button3"
- android:nextFocusRight="@+id/button5"
- android:nextFocusDown="@+id/button5">
- </Button>
- <Button
- style="@style/clockFaceNum"
- android:text="7"
- android:id="@+id/button7"
- android:layout_below="@+id/button8"
- android:layout_toRightOf="@+id/button8"
- android:nextFocusUp="@+id/button6"
- android:nextFocusLeft="@+id/button6"
- android:nextFocusRight="@+id/button8"
- android:nextFocusDown="@+id/button8">
- </Button>
- <Button
- style="@style/clockFaceNum"
- android:text="5"
- android:id="@+id/button5"
- android:layout_below="@+id/button4"
- android:layout_toLeftOf="@+id/button4"
- android:nextFocusUp="@+id/button4"
- android:nextFocusLeft="@+id/button4"
- android:nextFocusRight="@+id/button6"
- android:nextFocusDown="@+id/button6">
- </Button>
- <Button
- style="@style/clockFaceNum"
- android:text="6"
- android:id="@+id/button6"
- android:layout_below="@+id/button5"
- android:layout_centerHorizontal="true"
- android:nextFocusUp="@+id/button5"
- android:nextFocusLeft="@+id/button5"
- android:nextFocusRight="@+id/button7"
- android:nextFocusDown="@+id/button7">
- </Button>
- </RelativeLayout>
下图中是假定在键12开始按down键时的焦点切换顺序:
步骤4 设置界面的初始控件焦点
在每个页面加载时,可以设置界面中初始的控件焦点,以方便用户的定位操作,只需要在控件中加入即可。比如:
- <Button
- style="@style/clockFaceNum"
- android:text="12"
- android:id="@+id/button12"
- android:layout_alignParentTop="true"
- android:layout_centerHorizontal="true"
- android:nextFocusUp="@+id/button11"
- android:nextFocusLeft="@+id/button11"
- android:nextFocusRight="@+id/button1"
- android:nextFocusDown="@+id/button1">
- <requestFocus />
- </Button>
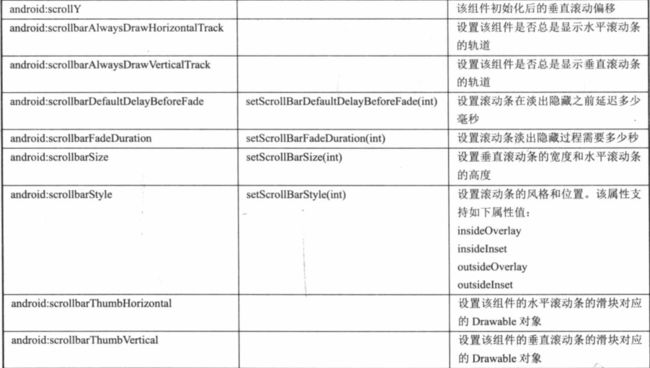
View属性
、
LinearLayout属性:
TableLayout:
FrameLayout:
RelativeLayout:
GridLayout:
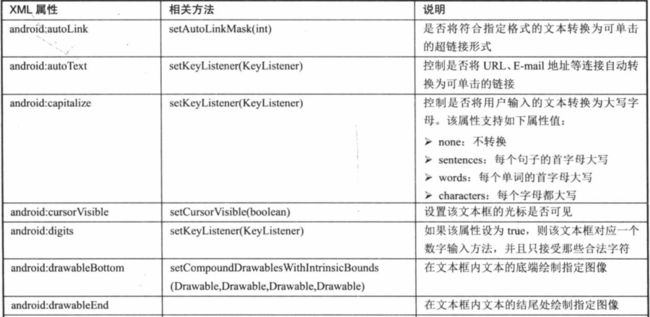
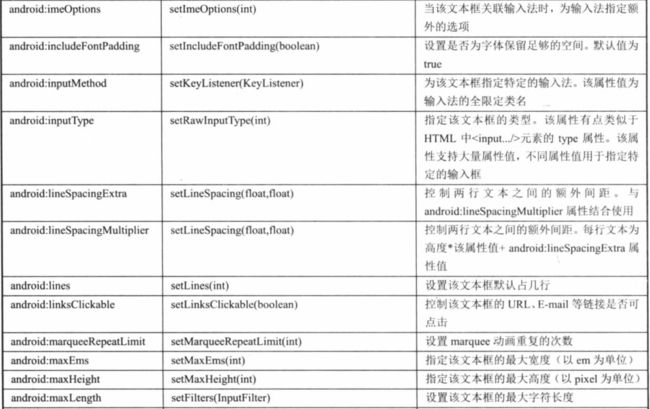
TextView:
ToggleButton:
switch:


