Spring源码之动态AOP自定义标签
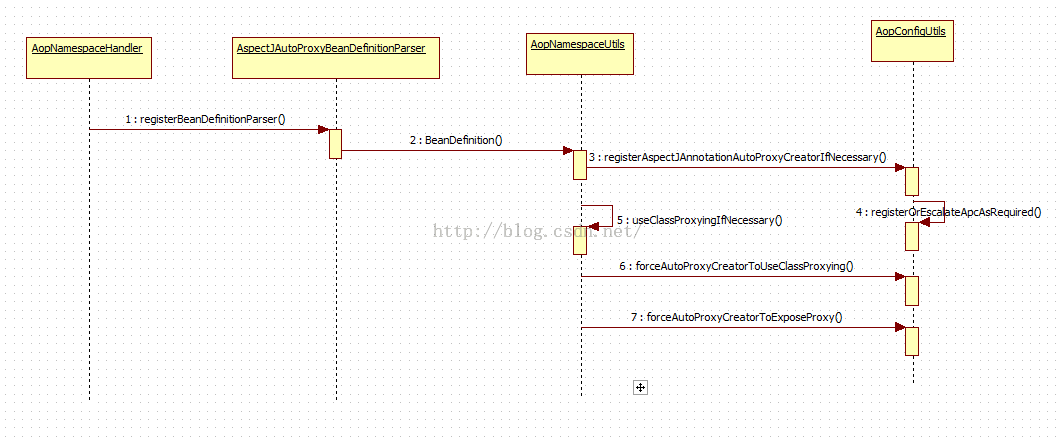
相信读者用过Spring的AOP自定义标签,也就是在bean.xml的文件中添加<aop:aspect-autoproxy/>,注解了这句话后,Spring就会支持注解AOP。那么Spring是如何去处理呢?接下来笔者就带领读者去了解Spring的动态AOP自定义标签的源码。下面我们先来看Spring的时序图,这面主要给出了主要调用的类以其方法。然后我们再来进一步了解各个类和方法。(相关资源可到这里下载:http://pan.baidu.com/s/1sjSo9a9)
1. AopNamespaceHandler
通过时序图,我们可以看到,最先调用的方法是AopNamespaceHandler。在这个类中,一旦解析到”aspect-autoproxy”注解时就会使用解析器AspectJAutoProxyBeanDefinitionParser进行解析。
public void init() {
		// In 2.0 XSD as well as in 2.1 XSD.
		registerBeanDefinitionParser("config", new ConfigBeanDefinitionParser());
		<strong>registerBeanDefinitionParser("aspectj-autoproxy", new AspectJAutoProxyBeanDefinitionParser());</strong>
		registerBeanDefinitionDecorator("scoped-proxy", new ScopedProxyBeanDefinitionDecorator());

		// Only in 2.0 XSD: moved to context namespace as of 2.1
		registerBeanDefinitionParser("spring-configured", new SpringConfiguredBeanDefinitionParser());
	}
2. AspectJAutoProxyBeanDefinitionParser
在调用解析器AspectJAutoProxyBeanDefinitionParser类后,我们跟踪代码进行这个类,会发现,这个类是实现接口BeanDefinitionParser,所以会去调用方法BeanDefinition()。在BeanDefinition()方法中,主要做的事情就是:注册AnnotationAwareAspectJAutoProxyCreator和对于注解中子类的处理。
public BeanDefinition parse(Element element, ParserContext parserContext) {
	//注解AnnotationAwareAspectJAutoProxyCreator
	<strong>AopNamespaceUtils.registerAspectJAnnotationAutoProxyCreatorIfNecessary(parserContext, element);</strong>
		//对于注解中子类的处理
		extendBeanDefinition(element, parserContext);
		return null;
	}
3. AopNamespaceUtils
继承我们的代码跟踪,我们进入到AopNamespaceUtils的类中,查看registerAspectJAnnotationAutoProxyCreatorIfNecessary类,其实这个是我们所关心的,也是关键逻辑的实现。这里要实现的两件事。
1) 注册或升级AnnotationAwareAspectJAutoProxyCreator:beaName设置为org.Springframework.aop.config.internalAutoProxyCreator的BeanDefinition。
2) 对proxy-target-class 以及expose-proxy属性的处理。
3) 注册组件并通知,便于监听器做进一步处理。
public static void registerAspectJAnnotationAutoProxyCreatorIfNecessary(
			ParserContext parserContext, Element sourceElement) {
        //注册或升级AnnotationAwareAspectJAutoProxyCreator,定义beanName为org.Springframework.aop.config.internalAutoProxyCreator的BeanDefinition
		<strong>BeanDefinition beanDefinition = AopConfigUtils.registerAspectJAnnotationAutoProxyCreatorIfNecessary(
				parserContext.getRegistry(), parserContext.extractSource(sourceElement));</strong>
		//对于proxy-target-class以及expose-proxy属性的处理
		<strong>useClassProxyingIfNecessary(parserContext.getRegistry(), sourceElement);</strong>
		//其中beanDefintion的className为AnnotationAwareAspectJAutoProxyCreator
		registerComponentIfNecessary(beanDefinition, parserContext);
	}
3.1注册或升级AnnotationAwareAspectJAutoProxyCreator
我们都知道Spring可以根据@Point注解定义的切点来自动代理匹配。所以这个功能主要实现的地方就在这个类中。这里要做的事就是:
1) 如果已经存在了自动代理创建器且存在的自动代理创建代理器与现在的不一致,那么需要根据优先级来判断使用哪一个
2) 改变bean所对应的className属性
3) 如果已经存在自动代理创建器,并且与将要创建的一致,那么无需再此创建
private static BeanDefinition registerOrEscalateApcAsRequired(Class<?> cls, BeanDefinitionRegistry registry, Object source) {
		Assert.notNull(registry, "BeanDefinitionRegistry must not be null");
		//1)	如果已经存在了自动代理创建器且存在的自动代理创建代理器与现在的不一致,那么需要根据优先级来判断使用哪一个
		if (registry.containsBeanDefinition(AUTO_PROXY_CREATOR_BEAN_NAME)) {
			BeanDefinition apcDefinition = registry.getBeanDefinition(AUTO_PROXY_CREATOR_BEAN_NAME);
			if (!cls.getName().equals(apcDefinition.getBeanClassName())) {
				int currentPriority = findPriorityForClass(apcDefinition.getBeanClassName());
				int requiredPriority = findPriorityForClass(cls);
				if (currentPriority < requiredPriority) {
					//2)	改变bean所对应的className属性
					apcDefinition.setBeanClassName(cls.getName());
				}
			}
			//3)	如果已经存在自动代理创建器,并且与将要创建的一致,那么无需再此创建
			return null;
		}
3.2 对proxy-target-class 以及expose-proxy属性的处理
可能读者对于什么是proxy-target-class和expose-proxy不太清楚。下面我们先来介绍一下这两位大神。
1) proxy-target-class:是SpringAOP使用的JDK代理和CGHLIB代理。如果被代理的目标对象实现了至少一个接口,则会使用JDK动态代理。若没有实现就使用CGLIB代理。
2) expose-proxy:有时候目标对象内部的自我调试将无法实施切面中增强,所以我们可以在Spring配置文件中使用:<aop:aspect-autoproxy expose-proxy=”true”/>
private static void useClassProxyingIfNecessary(BeanDefinitionRegistry registry, Element sourceElement) {
		if (sourceElement != null) {
			boolean proxyTargetClass = Boolean.valueOf(sourceElement.getAttribute(PROXY_TARGET_CLASS_ATTRIBUTE));
			if (proxyTargetClass) {
				//对proxy-target-class属性的处理
				AopConfigUtils.forceAutoProxyCreatorToUseClassProxying(registry);
			}
			boolean exposeProxy = Boolean.valueOf(sourceElement.getAttribute(EXPOSE_PROXY_ATTRIBUTE));
			if (exposeProxy) {
				//对expose-proxy属性的处理
				AopConfigUtils.forceAutoProxyCreatorToExposeProxy(registry);
			}
		}
	}
3.4总结
对于Spring的动态AOP自定义标签,相信都不会陌生。所以在本章的讲解中,并没有过多的说明它的使用。我们只要了角在定义了AOP的标签后,其Spring的后端代码是如何去解析,及调用了哪些方法。从上面的讲解中,我们似乎也看出端倪,如果读者想进一步了解的话可以自己打Debug跟踪去看。
