IOS开发—CALayer介绍
CALayer简介
一、简单介绍
CALayer是定义在QuartzCore框架中的;CGContext是定义在CoreGraphics框架中的。UIView之所以能显示,是因为它内部有一个图层属性:
@property(nonatomic,readonly,retain) CALayer *layer;
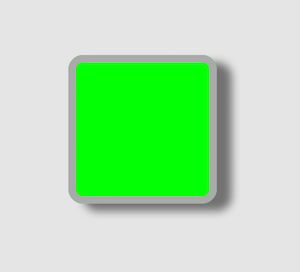
UIView在创建的时候,内部会自动创建一个(CALayer对象),通过操作这个layer对象,可以对视图的一些界面属性进行调整:阴影、圆角大小、边框宽度、边框颜色等。
二、layer常规操作
1.设置阴影、圆角大小、边框宽度、边框颜色等
#import "ViewController.h"

@interface ViewController ()
@property (nonatomic ,strong) UIView *myView;
@end

@implementation ViewController
- (void)viewDidLoad {
    [super viewDidLoad];

    self.myView = [[UIView alloc]initWithFrame:CGRectMake(100, 100, 100, 100)];
    self.myView.backgroundColor = [UIColor greenColor];
    [self.view addSubview:self.myView];
    //阴影
    self.myView.layer.shadowColor = [UIColor blackColor].CGColor;
    self.myView.layer.shadowOffset = CGSizeMake(10, 5);
    self.myView.layer.shadowOpacity = 0.5;
    //圆角大小
    self.myView.layer.cornerRadius = 10.0;
    //边框宽度
    self.myView.layer.borderWidth = 5.0;
    //边框颜色
    self.myView.layer.borderColor = [UIColor lightGrayColor].CGColor;
}
@end
2.视图形变
1.通过UIView设置(2D)
self.myView.transform = CGAffineTransformMakeTranslation(50, 50);2.通过layer设置(3D)
self.myView.layer.transform = CATransform3DMakeTranslation(50, 50, 50);
3.边缘裁剪
对于一个UIView对象,可以对其添加subView。
#import "ViewController.h"

@interface ViewController ()
@property (nonatomic ,strong) UIView *myView;
@end

@implementation ViewController

- (void)viewDidLoad {
    [super viewDidLoad];

    self.myView = [[UIView alloc]initWithFrame:CGRectMake(100, 100, 100, 100)];
    self.myView.backgroundColor = [UIColor greenColor];
    [self.view addSubview:self.myView];
    //阴影
    self.myView.layer.shadowColor = [UIColor blackColor].CGColor;
    self.myView.layer.shadowOffset = CGSizeMake(10, 5);
    self.myView.layer.shadowOpacity = 0.5;
    //圆角大小
    self.myView.layer.cornerRadius = 10.0;
    //边框宽度
    self.myView.layer.borderWidth = 5.0;
    //边框颜色
    self.myView.layer.borderColor = [UIColor lightGrayColor].CGColor;

    UIView *otherView = [[UIView alloc]initWithFrame:CGRectMake(-10, -10, 50, 50)];
    otherView.backgroundColor = [UIColor purpleColor];
    [self.myView addSubview:otherView];
}
@end
可以看到部分视图超出了主视图边界,有两种方法裁剪掉超出的部分
- self.myView.clipsToBounds = YES; 对view设置
- self.myView.layer.masksToBounds = YES; 对layer设置(推荐)
#import "ViewController.h"

@interface ViewController ()
@property (nonatomic ,strong) UIView *myView;
@end

@implementation ViewController

- (void)viewDidLoad {
    [super viewDidLoad];

    self.myView = [[UIView alloc]initWithFrame:CGRectMake(100, 100, 100, 100)];
    self.myView.backgroundColor = [UIColor greenColor];
    [self.view addSubview:self.myView];
    //阴影
    self.myView.layer.shadowColor = [UIColor blackColor].CGColor;
    self.myView.layer.shadowOffset = CGSizeMake(10, 5);
    self.myView.layer.shadowOpacity = 0.5;
    //圆角大小
    self.myView.layer.cornerRadius = 10.0;
    //边框宽度
    self.myView.layer.borderWidth = 5.0;
    //边框颜色
    self.myView.layer.borderColor = [UIColor lightGrayColor].CGColor;

    UIView *otherView = [[UIView alloc]initWithFrame:CGRectMake(-10, -10, 50, 50)];
    otherView.backgroundColor = [UIColor purpleColor];
    [self.myView addSubview:otherView];

    //对view设置
// self.myView.clipsToBounds = YES;
    //对layer设置(推荐)
    self.myView.layer.masksToBounds = YES;
}
@end
超出部分被裁剪。事实上,layer对象作为视图的主层存在,具有绝对的最高主权。我们可以添加主层以外的层,即子层。可以创建CALayer对象直接添加(将在下面介绍),也可以添加subview,这个subview的layer是作为主视图的sublayer存在的。凡是不在主层layer范围内的层,都将被裁剪。
注意:裁剪之后layer的阴影将无法显示
隐式动画
CALayer对象存在隐式动画。什么是隐式动画?即修改CALayer对象的某些属性时,会伴随动画过渡。这些属性被称为Animatable property(可动画属性)。如何查看属性是否支持隐式动画,可查看头文件中对该属性的介绍。当然也可以查看官方文档
#import "ViewController.h"

@interface ViewController ()
@property (nonatomic ,strong) UIView *myView;
@property (nonatomic, strong) CALayer *myLayer;
@end

@implementation ViewController

- (void)viewDidLoad {
    [super viewDidLoad];

    self.myView = [[UIView alloc]initWithFrame:CGRectMake(100, 100, 200, 200)];
    self.myView.backgroundColor = [UIColor greenColor];
    [self.view addSubview:self.myView];

    NSLog(@"start--%@",self.myView.layer.sublayers);

    //创建layer对象
    self.myLayer = [CALayer layer];
    //设置颜色
    self.myLayer.backgroundColor = [UIColor orangeColor].CGColor;
    //设置长宽
    self.myLayer.bounds = (CGRect){0,0,100,100};
    //设置位置(锚点相对于view的相对坐标)
    self.myLayer.position = CGPointMake(0,0);
    //设置锚点(即x,y均0~1,默认为(0.5,0.5),习惯上设置成(0,0),)
    self.myLayer.anchorPoint = CGPointZero;
    //将新创建的layer添加到指定界面上
    [self.myView.layer addSublayer:self.myLayer];

    NSLog(@"end--%@",self.myView.layer.sublayers);
}

- (void)touchesBegan:(NSSet *)touches withEvent:(UIEvent *)event{
    self.myLayer.bounds = (CGRect){0,0,50,50};
}
@end
创建图层
图层的创建
创建图层的步骤:
- 创建layer对象
- 设置layer的颜色(设置了颜色才能显示)
- 将layer添加到界面上(最为view的sublayer)
#import "ViewController.h"

@interface ViewController ()
@property (nonatomic ,strong) UIView *myView;
@property (nonatomic, strong) CALayer *myLayer;
@end

@implementation ViewController

- (void)viewDidLoad {
    [super viewDidLoad];

    self.myView = [[UIView alloc]initWithFrame:CGRectMake(100, 100, 200, 200)];
    self.myView.backgroundColor = [UIColor greenColor];
    [self.view addSubview:self.myView];

    //创建layer对象
    self.myLayer = [CALayer layer];
    //设置颜色
    self.myLayer.backgroundColor = [UIColor orangeColor].CGColor;
    //设置长宽
    self.myLayer.bounds = (CGRect){0,0,100,100};
    //设置位置(锚点相对于view的相对坐标)
    self.myLayer.position = CGPointMake(0,0);
    //设置锚点(即x,y均0~1,默认为(0.5,0.5),习惯上设置成(0,0),)
    self.myLayer.anchorPoint = CGPointZero;
    //将新创建的layer添加到指定界面上
    [self.myView.layer addSublayer:self.myLayer];
}
@end
注意:如果一个控件是另一个控件的子视图,那么这个控件的layer是另一个控件layer的sublayer。
UIView和CALayer的选择
可以看到,CALayer可以实现和UIView同样的目的,达到同样的效果。CALayer属于QuartzCore框架,可以在ios和mac OSX上跨平台使用,而UIView属于UIKit框架,只能在ios上使用。另外一个不同在于,UIView可以处理触摸事件,而CALayer不能处理,因此如果需要处理触摸事件,只能用UIView。不然的话,两个选择都可以考虑。
- UIView可以通过subviews属性访问所有的子视图,类似地,CALayer也可以通过sublayers属性访问所有的子层
- UIView可以通过superview属性访问父视图,类似地,CALayer也可以通过superlayer属性访问父层
自定义Layer
方法一、创建自定义Layer类
UIView可以重写DrawRect:方法自定义绘制视图,CALayer也有类似的方法:
创建一个继承自CALayer的自定义layer类,并在.m文件中重写drawInContext:方法,在该方法中绘制自定义图案。DrawRect:会在view显示出来的时候自动调用一次,而drawInContext:方法不会被自动调用,必需通过对layer发送setNeedsDisplay消息手动调用。
LXXLayer.m
#import "LXXLayer.h"
#import <UIKit/UIKit.h>

@implementation LXXLayer

- (void)drawInContext:(CGContextRef)ctx{ CGContextMoveToPoint(ctx, 10, 20); CGContextAddLineToPoint(ctx, 100, 20); CGContextSetStrokeColorWithColor(ctx, [UIColor greenColor].CGColor); CGContextSetLineWidth(ctx, 10); CGContextSetLineCap(ctx, kCGLineCapRound); CGContextStrokePath(ctx); } @end
ViewController.m
#import "ViewController.h"
#import "LXXLayer.h"

@interface ViewController ()
@property (nonatomic, strong) LXXLayer *customLayer;
@end

@implementation ViewController

- (void)viewDidLoad {
    [super viewDidLoad];

    self.customLayer = [LXXLayer layer];
    self.customLayer.backgroundColor = [UIColor orangeColor].CGColor;
    self.customLayer.bounds = CGRectMake(0, 0, 200, 200);
    self.customLayer.position = CGPointMake(100, 100);
    self.customLayer.anchorPoint = CGPointZero;
    [self.view.layer addSublayer:self.customLayer];

    //触发.m文件中的displayLayer:绘制自定义图案
    [self.customLayer setNeedsDisplay];
}
说明:在UIView中绘制图形,获取的上下文就是这个view对应的layer的上下文。在渲染的时候,就是把图形渲染到对应的layer上。在执行渲染操作的时候,本质上它的内部相当于执行了 [self.layer drawInContext:ctx];
方法二、通过设置代理
CALayer对象有个属性delegate,设置delegate后让delegate实现drawLayer:inContext:方法,再手动发送setNeedsDisplay消息,就会触发drawLayer:inContext:方法,实现自定义图案的绘制。
#import "ViewController.h"
#import "LXXLayer.h"

@interface ViewController ()
@property (nonatomic, strong) CALayer *myLayer;
@end

@implementation ViewController

- (void)viewDidLoad {
    [super viewDidLoad];

    self.myLayer = [CALayer layer];
    self.myLayer.backgroundColor = [UIColor orangeColor].CGColor;
    self.myLayer.bounds = CGRectMake(0, 0, 200, 200);
    self.myLayer.position = CGPointMake(100, 100);
    self.myLayer.anchorPoint = CGPointZero;
    //设置代理
    self.myLayer.delegate = self;
    [self.view.layer addSublayer:self.myLayer];

    //触发drawLayer:inContext:方法
    [self.myLayer setNeedsDisplay];
}

- (void)viewWillDisappear:(BOOL)animated{
    [super viewWillDisappear:animated];
    self.myLayer.delegate = nil;
}

- (void)drawLayer:(CALayer *)layer inContext:(CGContextRef)ctx{
    CGContextMoveToPoint(ctx, 50, 90);
    CGContextAddLineToPoint(ctx, 100, 20);
    CGContextSetStrokeColorWithColor(ctx, [UIColor greenColor].CGColor);
    CGContextSetLineWidth(ctx, 10);
    CGContextSetLineCap(ctx, kCGLineCapRound);
    CGContextStrokePath(ctx);
}
@end说明:可以看到在设置delegate的时候并没有要求我们遵循协议,说明这个协议方法是定义在NSObject协议中的。
注意:如果对视图控制器设置代理,在视图控制器disappear之前必需将delegate设置为nil,否则会存在内存释放不正常的问题,甚至导致程序crash。
补充说明
(1)无论采取哪种方法来自定义层,都必须调用layer的setNeedsDisplay方法才能正常绘图。
(2)详细现实过程:
对于自定义UIView而言,当UIView需要显示时,它内部的层会准备好一个CGContextRef(图形上下文),然后调用delegate(这里就是UIView,UIView是自身主layer的隐式代理)的drawLayer:inContext:方法(每个UIView都已隐式实现这个方法),并且传入已经准备好的CGContextRef对象。而UIView在drawLayer:inContext:方法中又会调用自己的drawRect:方法。平时在drawRect:中通过UIGraphicsGetCurrentContext()获取的就是由层传入的CGContextRef对象,在drawRect:中完成的所有绘图都会填入层的CGContextRef中,然后被拷贝至屏幕。


