8. commom layout customization
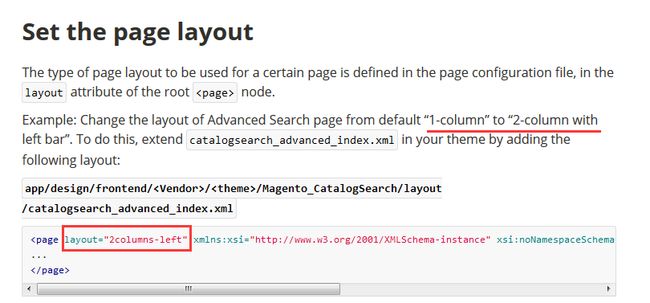
1.Set the page layout
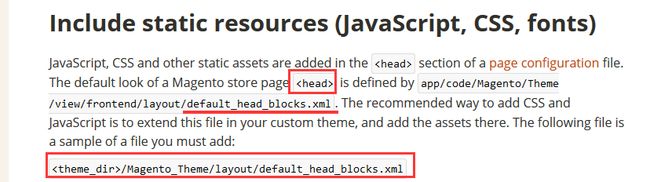
2.Include static resources (JavaScript, CSS, fonts)
<page xmlns:xsi="http://www.w3.org/2001/XMLSchema-instance" xsi:noNamespaceSchemaLocation="urn:magento:framework:View/Layout/etc/page_configuration.xsd">
    <head>
        <!-- Add local resources -->
        <css src="css/my-styles.css"/>

        <!-- The following two ways to add local JavaScript files are equal -->
        <script src="Magento_Catalog::js/sample1.js"/> <link src="js/sample.js"/> <!-- Add external resources --> <css src="https://maxcdn.bootstrapcdn.com/bootstrap/3.3.4/css/bootstrap-theme.min.css" src_type="url" /> <script src="https://maxcdn.bootstrapcdn.com/bootstrap/3.3.4/js/bootstrap.min.js" src_type="url" /> <link src="http://fonts.googleapis.com/css?family=Montserrat" src_type="url" /> </head> </page>
3.Adding conditional comments
Conditional comments are meant to give special instructions for Internet Explorer. In the terms of adding assets, you can add CSS files to be included for a specific version of Internet Explorer. A sample follows:
<head>
        <css src="css/ie-9.css" ie_condition="IE 9" />
    </head>
</page>
This adds an IE conditional comment in the generated HTML, like in the following example:
<!--[if IE 9]> <link rel="stylesheet" type="text/css" media="all" href="<your_store_web_address>/pub/static/frontend/OrangeCo/orange/en_US/css/ie-9.css" /> <![endif]-->In this example, orange is a custom theme created by the OrangeCo vendor.
4.Remove static resources (JavaScript, CSS, fonts)

<page xmlns:xsi="http://www.w3.org/2001/XMLSchema-instance" xsi:noNamespaceSchemaLocation="urn:magento:framework:View/Layout/etc/page_configuration.xsd">
   <head>
        <!-- Remove local resources -->
        <remove src="css/styles-m.css" />
        <remove src="my-js.js"/>
        <remove src="Magento_Catalog::js/compare.js" />

    <!-- Remove external resources -->
        <remove src="https://maxcdn.bootstrapcdn.com/bootstrap/3.3.4/css/bootstrap-theme.min.css"/>
        <remove src="https://maxcdn.bootstrapcdn.com/bootstrap/3.3.4/js/bootstrap.min.js"/>
        <remove src="http://fonts.googleapis.com/css?family=Montserrat" />
   </head>
Note, that if a static asset is added with a module path (for example Magento_Catalog::js/sample.js) in the initial layout, you need to specify the module path as well when removing the asset.
5.Create a container
Use the following sample to create (declare) a container:
<container name="some.container" as="someContainer" label="Some Container" htmlTag="div" htmlClass="some-container" />6.Reference a container
To update a container use the < referenceContainer> instruction.
Example: add links to the page header panel.
<referenceContainer name="header.panel">
        <block class="Magento\Framework\View\Element\Html\Links" name="header.links">
            <arguments>
                <argument name="css_class" xsi:type="string">header links</argument>
            </arguments>
        </block>
</referenceContainer>
7.Create a block
Blocks are created (declared) using the < block> instruction.
Example: add a block with a product SKU information.
<block class="Magento\Catalog\Block\Product\View\Description" name="product.info.sku" template="product/view/attribute.phtml" after="product.info.type">
    <arguments>
        <argument name="at_call" xsi:type="string">getSku</argument>
        <argument name="at_code" xsi:type="string">sku</argument>
        <argument name="css_class" xsi:type="string">sku</argument>
    </arguments>
</block>
8.Reference a block
To update a block use the < referenceBlock> instruction.
Example: pass the image to the logo block.
<referenceBlock name="logo">
        <arguments>
            <argument name="logo_file" xsi:type="string">images/logo.png</argument>
        </arguments>
</referenceBlock>
9.Set the template used by a block
To set the template for a block, pass it using the < argument> instruction.
Example: change template of the page title block:
<referenceBlock name="page.main.title">
        <arguments>
            <argument name="template" xsi:type="string">Namespace_Module::title_new.phtml</argument>
        </arguments>
 </referenceBlock>
The path to the template is specified relatively to the view/< area>/templates/ directory of the module. The < area> corresponds to the area for which the layout file is used.
10.Modify block arguments
To modify block arguments, use the < referenceBlock> instruction.
Example: change the value of the existing block argument and add a new argument.
Initial block declaration:
...
<block class="Namespace_Module_Block_Type" name="block.example">
    <arguments>
        <argument name="label" xsi:type="string">Block Label</argument>
    </arguments>
</block>
...
Extending layout:
...
<referenceBlock name="block.example">
    <arguments>
        <!-- Modified block argument -->
        <argument name="label" xsi:type="string">New Block Label</argument>
        <!- Newly added block argument -->
        <argument name="custom_label" xsi:type="string">Custom Block Label</argument>
    </arguments>
</referenceBlock>
...
11.Use block object methods to set block properties
There are two ways to access block object methods:
using the <argument> instruction for <block> or <referenceBlock>
using the <action> instruction. This way is not recommended, but can be used for calling those methods, which are not refactored yet to be accessed through <argument>.
Example 1: Set a CSS class and add an attribute for the product page using < argument>.
Extending layout:
<referenceBlock name="page.main.title">
        <arguments>
            <argument name="css_class" xsi:type="string">product</argument>
            <argument name="add_base_attribute" xsi:type="string">itemprop="name"</argument>
        </arguments>
    </referenceBlock>
Example 2: Set a page title using < action>.
...
<referenceBlock name="page.main.title">
<action method="setPageTitle">
<argument translate="true" name="title" xsi:type="string">Catalog Advanced Search</argument>
</action>
</referenceBlock>
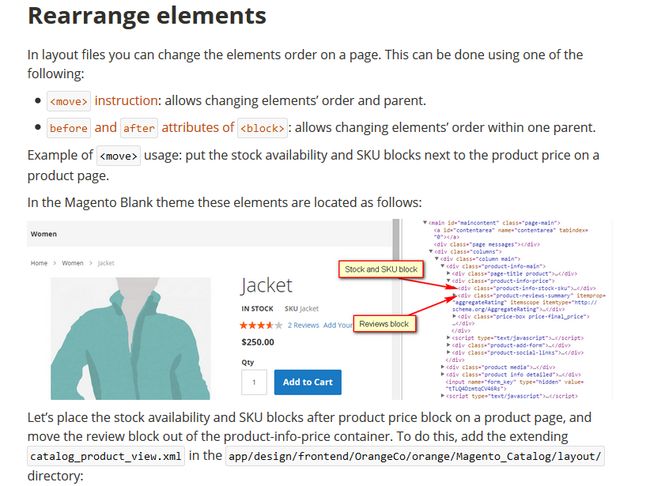
...12.Rearrange elements
<page layout="1column" xmlns:xsi="http://www.w3.org/2001/XMLSchema-instance" xsi:noNamespaceSchemaLocation="urn:magento:framework:View/Layout/etc/page_configuration.xsd">
    <body>
        <move element="product.info.stock.sku" destination="product.info.price" after="product.price.final"/>
        <move element="product.info.review" destination="product.info.main" before="product.info.price"/>
    </body>
</page>
This would make the product page look like following:
13.Remove elements

<page xmlns:xsi="http://www.w3.org/2001/XMLSchema-instance" xsi:noNamespaceSchemaLocation="urn:magento:framework:View/Layout/etc/page_configuration.xsd">
    <body>
...
        <referenceContainer name="sidebar.additional">
            <block class="Magento\Catalog\Block\Product\Compare\Sidebar" name="catalog.compare.sidebar" template="product/compare/sidebar.phtml"/>
        </referenceContainer>
...
    </body>
</page>
To remove the block, add the extending default.xml in your theme: < theme_dir>/Magento_Catalog/layout/default.xml
In this file, reference the element having added the remove attribute:
<page xmlns:xsi="http://www.w3.org/2001/XMLSchema-instance" xsi:noNamespaceSchemaLocation="urn:magento:framework:View/Layout/etc/page_configuration.xsd">
    <body>
...
        <referenceBlock name="catalog.compare.sidebar" remove="true" />
...
    </body>
</page>
Replace elements
To replace an element, remove it and add a new one.
http://devdocs.magento.com/guides/v2.0/frontend-dev-guide/layouts/xml-manage.html