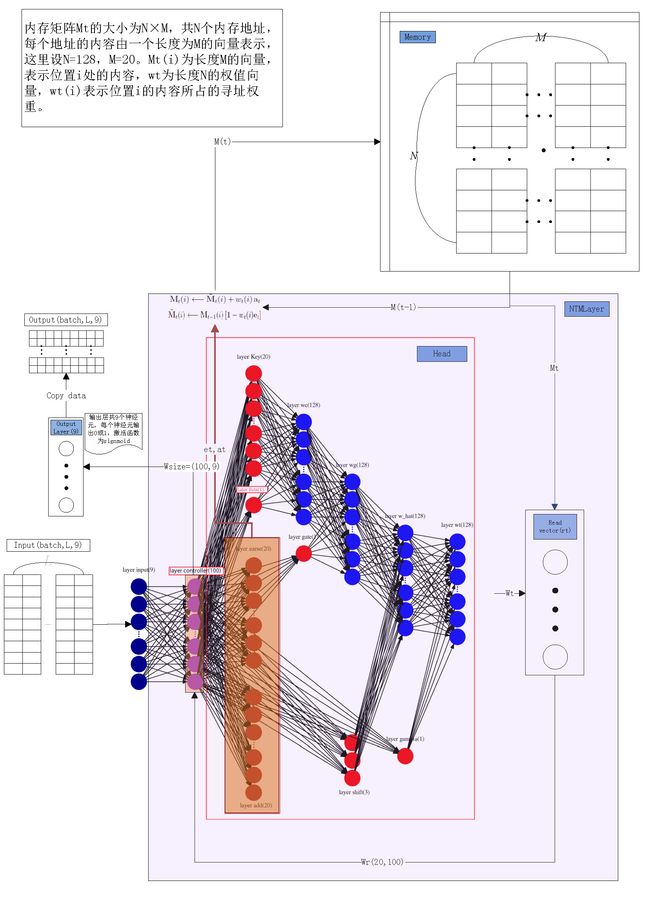
Neural Turing Machines-NTM系列(三)ntm-lasagne源码分析
Neural Turing Machines-NTM系列(三)ntm-lasagne源码分析
在NTM系列文章(二)中,我们已经成功运行了一个ntm工程的源代码。在这一章中,将对它的源码实现进行分析。
1.网络结构
1.1 模块结构图
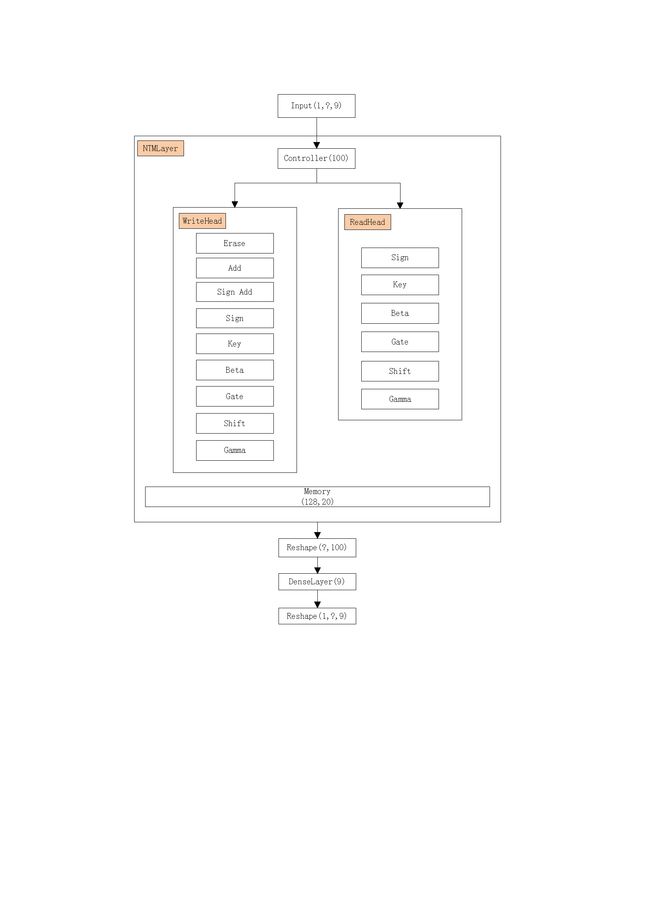
在图中可以看到,输入的数据在经过NTM的处理之后,输出经过NTM操作后的,跟之前大小相同的数据块。来看下CopyTask的完整输出图:
图中右侧的Input是输入数据,Output是目标数据,Prediction是通过NTM网络预测出来的输出数据,可以看出预测数据与目标数据只在区域上大致相同,具体到每个白色的块差距较大。(这里只迭代训练了100次)
训练次数可以在这里调整(task-copy.py):
![]()
其中的参数max_iter就是训练时的迭代次数,size是输入的数据宽度(即上图中Input/Output小矩形的“高”-1,多出来的维度用作结束标记)
输入数据如下,从上到下对应上图中的从左到右,最后一行是结束标志,只有最后一个元素为1:
array( [[
[ 0., 1., 1., 0., 1., 1., 1., 1., 0.],
[ 0., 1., 1., 0., 0., 1., 0., 0., 0.],
[ 0., 0., 1., 0., 1., 1., 1., 0., 0.],
[ 1., 1., 1., 1., 1., 1., 1., 0., 0.],
[ 0., 0., 0., 0., 0, 0., 0., 0., 1.],
[ 0., 0., 0., 0., 0, 0., 0., 0., 0.],
[ 0., 0., 0., 0., 0, 0., 0., 0., 0.],
[ 0., 0., 0., 0., 0, 0., 0., 0., 0.],
[ 0., 0., 0., 0., 0, 0., 0., 0., 0.],
[ 0., 0., 0., 0., 0, 0., 0., 0., 0.],
]]
目标数据和预测数据的格式相似,就不详细介绍了。需要注意的是,由于输出层使用的是sigmoid函数,所以预测数据的范围在0和1之间。
1.2 Head对象内部的计算流
上图对应的实现在ntm-lasagne/ntm/heads.py中的Head基类中的get_output_for函数
    def get_output_for(self, h_t, w_tm1, M_t, **kwargs):
        if self.sign is not None:
            sign_t = self.sign.get_output_for(h_t, **kwargs)
        else:
            sign_t = 1.
        k_t = self.key.get_output_for(h_t, **kwargs)
        beta_t = self.beta.get_output_for(h_t, **kwargs)
        g_t = self.gate.get_output_for(h_t, **kwargs)
        s_t = self.shift.get_output_for(h_t, **kwargs)
        gamma_t = self.gamma.get_output_for(h_t, **kwargs)

        # Content Adressing (3.3.1)
        beta_t = T.addbroadcast(beta_t, 1)
        betaK = beta_t * similarities.cosine_similarity(sign_t * k_t, M_t)
        w_c = lasagne.nonlinearities.softmax(betaK)

        # Interpolation (3.3.2)
        g_t = T.addbroadcast(g_t, 1)
        w_g = g_t * w_c + (1. - g_t) * w_tm1

        # Convolutional Shift (3.3.2)
        w_g_padded = w_g.dimshuffle(0, 'x', 'x', 1)
        conv_filter = s_t.dimshuffle(0, 'x', 'x', 1)
        pad = (self.num_shifts // 2, (self.num_shifts - 1) // 2)
        w_g_padded = padding.pad(w_g_padded, [pad], batch_ndim=3)
        convolution = T.nnet.conv2d(w_g_padded, conv_filter,
            input_shape=(self.input_shape[0], 1, 1, self.memory_shape[0] + pad[0] + pad[1]),
            filter_shape=(self.input_shape[0], 1, 1, self.num_shifts),
            subsample=(1, 1),
            border_mode='valid')
        w_tilde = convolution[:, 0, 0, :]

        # Sharpening (3.3.2)
        gamma_t = T.addbroadcast(gamma_t, 1)
        w = T.pow(w_tilde + 1e-6, gamma_t)
        w /= T.sum(w)

        return w
其中的传入参数解释如下:
h_t:controller的隐层输出;
w_tm1:前一时刻的输出值,即 wt−1 ;
M_t:Memory矩阵
1.3 NTMLayer结构图
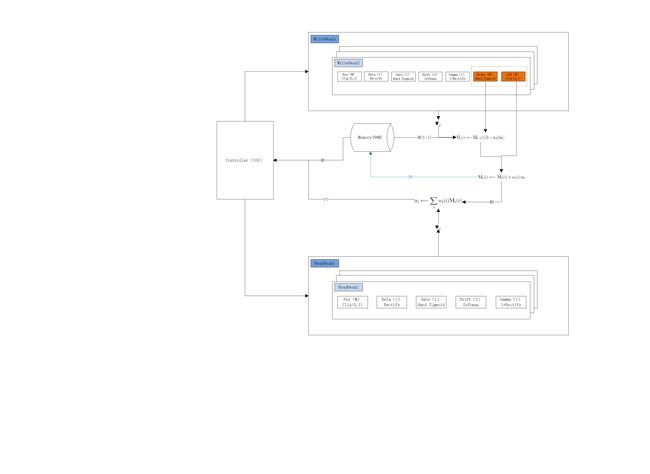
NTM层的数据处理实现在ntm-lasagne/ntm/layers.py中的NTMLayer.get_output_for函数中:
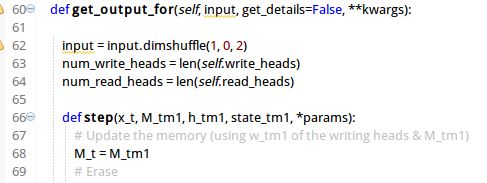
注意到其中还有一个内部函数step,这个函数中实现了每一次数据输入后NTM网络要进行的操作逻辑。
其中的参数解释如下:
x_t:当前的网络输入,即1.1中输入矩阵中的一行;
M_tm1:前一时刻的Memory矩阵,即 Mt−1
h_tm1:前一时刻的controller隐层输出
state_tm1:前一时刻的controller隐层状态,当controller为前馈网络时,等于前一时刻的输出
params:存放write heads和read heads上一时刻的输出即 wt−1 ,顺序如下:
[write_head1_w,write_head2_w,…,write_headn1_w,read_head1_w,read_head2_w,…,read_headn2_w]
1.每次网络接收到输入后,会进入step迭代函数,先走write(erase+add)流程,更新Memory,然后再执行read操作,生成 rt 向量。这部分代码如下:
最后的r_t就是读取出来的 rt 向量,注意这里有个比较特殊的参数W_hid_to_sign_add,这是一个开关参数,类似于LSTM中的“门”。这个参数默认为None。
2.read vector生成后,将作为输入参数被传入Controller:

3.step函数结束,返回值为一list,代码如下:
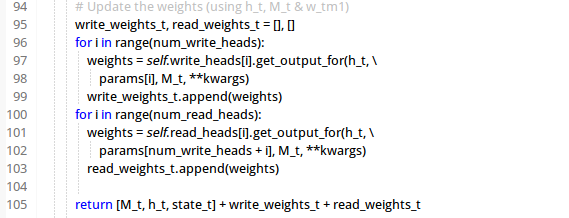
list中的元素依次为:[M_t, h_t, state_t + write_weights_t + read_weights_t]
step函数通过 theano.scan来进行迭代调用,每次的输入即为当前的input及上一时刻的list值
4.最后NTMLayer.get_out_for函数的返回值为:
hid_out = hids[1],正好对应了Controller隐层最近一次的输出值。
1.4 NTM网络结构图
2.公式及主要Class说明
αt=σalpha(htWalpha+balpha)
kt=σkey(htWkey+bkey)
βt=σbeta(htWbeta+bbeta)
gt=σgate(htWgate+bgate)
st=σshift(htWshift+bshift)
γt=σgamma(htWgamma+bgamma)
wct=softmax(βt∗K(αt∗kt,Mt))
wgt=gt∗wct+(1−gt)∗wt−1
w̃ t=st∗wgt
wt∝w̃ γtt
NTMLayer:父类为 lasagne.layers.Layer
功能:Neural Turing Machine的框架层
字段:memory:即Memory
controller:控制器,父类为Layer,默认100个节点
controller.hid_init:隐层的状态集合,大小为:(1,100)
heads:读写取Head集合
write_heads:写入Head集合
read_heads:读取Head集合
函数:get_output_for:在给定的输入input下,返回对应的输出值
Head:父类为lasagne.layers.Layer
功能:读写头的基类
字段:sign:DenseLayer(全连接网络),输出为 αt ,激活函数为ClippedLinear(-1,1),节点数:20;
key:DenseLayer,输出为 kt ,激活函数为ClippedLinear(0,1),节点数:20,输入层为controller;
beta:DenseLayer,输出为 βt ,激活函数为rectify,节点数:1,输入层为controller;
gate:DenseLayer,输出为 gt ,激活函数为hard_sigmoid,节点数:1,输入层为controller;
shift:DenseLayer,输出为 st ,激活函数为softmax,节点数:3(等于num_shifts,默认为3),输入层为controller,最终将输出3个概率值,分别对应 st(−1),st(0),st(1) ,s_{t}长度为N,除softmax输出的3个位置非0之外,其余位置为0;
gamma:DenseLayer,输出为 γt ,激活函数为1+rectify,节点数:1,输入层为controller;
num_shifts:卷积shifts的操作宽度(奇数),当宽度为n时,移位向量为:[-n/2,…,-1,0,1,…,n/2],比如,当n=3时,为:[-1,0,1]
weights_init:输出为OneHot 1×128 的权值向量,其初始值为除第一个元素为1之外,其余元素为0.
gate:DenseLayer,输出为 eraset ,激活函数为hard_sigmoid,节点数:20,输入层为controller;
add:DenseLayer,输出为 addt ,激活函数为ClippedLinear(0,1),节点数:20,输入层为controller;
rectify: f(x)=max(0,x)
sign_add:DenseLayer,输出为 signAddt ,激活函数为ClippedLinear(-1,1),节点数:20,输入层为controller;
rectify: f(x)=max(0,x)
softmax: f(x)=exj∑Kk=1exk
hard_sigmoid:
ClippedLinear(a,b):
3.copy-task实验
(待续)
参考文章:
http://blog.csdn.net/niuwei22007/article/details/49208643
https://medium.com/snips-ai/ntm-lasagne-a-library-for-neural-turing-machines-in-lasagne-2cdce6837315
http://lasagne.readthedocs.org/en/latest/user/tutorial.html
http://matplotlib.org/api/pyplot_api.html#matplotlib.pyplot.imshow
