EF CodeOnly/CodeFirst设计模式实例演示
我们都知道EF有三种设计模式:DBFirst、ModelFirst、CodeFirst。前两种设置模式比较好理解、学习。具体学习可参考本人的另外两篇博文()。今天咱们主要来共同学习一下最不常用的设计模式:CodeFirst。
CodeFirst,中文大概意思,代码先行。那么这种设计模式相对于前两种设计模式而言有什么特别的地方呢?
DBFirst:就是先设计数据库,根据数据库生成实体类
ModleFirst:先设计表实体。通过映射生成数据库。(注意,这也是一种设计数据库的方法,而且相对于我们之前设计数据库的方式更直观。)
那么,CodeFirst这种设计模式数据库如何来呢?表实体又如何得到呢?好,带着这两个问题,我们开始今天设计模式的学习。
为了便于学习和更好的理解、掌握,我们通过一个具体的项目来展开学习。
先来说一下大致流程,我们新建一个测试项目,了解过原理之后进行代码实例测试,模拟一下用户添加、订单添加。
1.新建WinForm测试项目
这里只是为了说明CodeFirst设计模式,所以采用了比较简单的Winform项目形式。
新建项目CodeOnlyDemo

创建好项目之后,我们还需要引入一些dll文件。如EntityFramwork.dll 、System.Data.Entity.dll、System.ComponentModel.DataAnnotations.dll。具体引入方法就不用在此累述了吧。
好吧,再累述一下上面几个dll文件的作用。
EntityFramwork.dll :EF框架的dll文件
System.Data.Entity.dll:实体文件
System.ComponentModel.DataAnnotations.dll:就本项目而言,是为了在下面的类属性上添加主键定义
2.添加实体类
(1)Customer类
using System;
using System.Collections.Generic;
using System.Linq;
using System.Text;
using System.ComponentModel.DataAnnotations;
namespace CodeOnlyDemo
{
public class Customer
{
[Key]
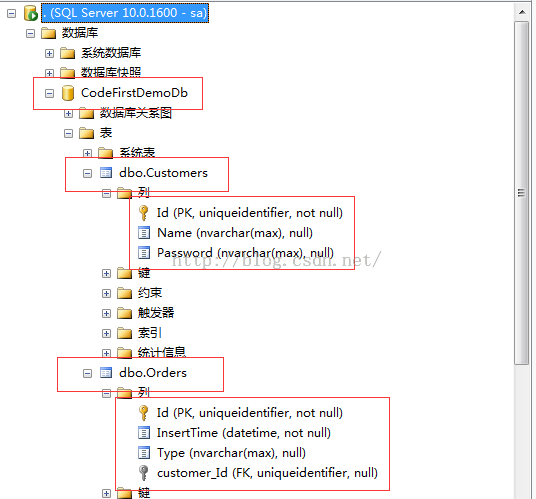
public Guid Id { get; set; }
public string Name { get; set; }
public string Password { get;set;}
public ICollection<Order> Order { get; set; }
}
}这里只定义了该类的几个简要属性:Id、Name、Password、Order
(2)Order类
using System;
using System.Collections.Generic;
using System.Linq;
using System.Text;
using System.ComponentModel.DataAnnotations;
namespace CodeOnlyDemo
{
    public class Order
    {
        [Key]
        public Guid Id { get; set; }

        public DateTime InsertTime { get; set; }

        public string Type { get; set; }

        public Customer customer { get; set; }
    }
}
注意:这里还需要在Order的属性中添加一个Customer类的属性。
(3)DemoContext类
using System;
using System.Collections.Generic;
using System.Linq;
using System.Text;
using System.Data.Objects;
using System.Data.Entity;
using System.Configuration;
namespace CodeOnlyDemo
{
    public class DemoContext :DbContext
    {
        public DemoContext()
            : base("name=ConnCodeFirst")
        {

        }
        public DbSet<Order> order { get; set; }
        public DbSet<Customer> cunstomer { get; set; }
    }
}
关于该类的定义就没什么可说的了吧。算了,还是再说一下吧。
        //
        // 摘要:
        //     Constructs a new context instance using the given string as the name or connection
        //     string for the database to which a connection will be made.  See the class
        //     remarks for how this is used to create a connection.
        //
        // 参数:
        //   nameOrConnectionString:
        //     Either the database name or a connection string.
        public DbContext(string nameOrConnectionString);
主要意思就是读取配置文件中链接字符串,创建链接对象。
3.添加配置文件App.Config
<?xml version="1.0" encoding="utf-8" ?>
<configuration>
  <connectionStrings>
    <add name="ConnCodeFirst" connectionString="server=.;uid=sa;pwd=123456;database=CodeFirstDemoDb" providerName="System.Data.SqlClient" />
  </connectionStrings>
</configuration>
上面的内容如何得到就真的不用我再介绍了吧?
4.测试
4.1修改启动项
using System;
using System.Collections.Generic;
using System.Linq;
using System.Windows.Forms;

namespace CodeOnlyDemo
{
    static class Program
    {
        /// <summary>
        /// 应用程序的主入口点。
        /// </summary>
        [STAThread]
        static void Main()
        {
            DemoContext dbContext = new DemoContext();
            dbContext.Database.CreateIfNotExists();//不存在的情况下会创建对应的数据库
            Application.EnableVisualStyles();
            Application.SetCompatibleTextRenderingDefault(false);
            Application.Run(new CustomerDemo());
        }
    }
}
4.2添加CustomerDemo窗体
4.2.1 窗体

4.2.2 .cs代码
using System;
using System.Collections.Generic;
using System.ComponentModel;
using System.Data;
using System.Drawing;
using System.Linq;
using System.Text;
using System.Windows.Forms;

namespace CodeOnlyDemo
{
    public partial class CustomerDemo : Form
    {
        public CustomerDemo()
        {
            InitializeComponent();
        }

        private void btn_add_Click(object sender, EventArgs e)
        {
            string username = this.txt_username.Text.Trim();
            string password = this.txt_password.Text;
            using (DemoContext context = new DemoContext())
            {
                context.cunstomer.Add(new Customer { Id = Guid.NewGuid(), Name = username, Password = password });
                if (context.SaveChanges() > 0)
                {
                    new OrderDemo(username).Show();
                }
            }
        }
    }
}
4.3添加OrderDemo窗体
4.3.1 窗体
4.3.2 .cs代码
using System;
using System.Collections.Generic;
using System.ComponentModel;
using System.Data;
using System.Drawing;
using System.Linq;
using System.Text;
using System.Windows.Forms;
namespace CodeOnlyDemo
{
public partial class OrderDemo : Form
{
public string username;
public OrderDemo()
{
InitializeComponent();
}
public OrderDemo(string username)
: this()
{
this.label2.Text = username;
this.username = username;
}
private void btn_submit_Click(object sender, EventArgs e)
{
string name = this.txt_name.Text.Trim();
using (DemoContext context = new DemoContext())
{
Customer customer1 = context.cunstomer.Where(c => c.Name == username).FirstOrDefault();
context.order.Add(new Order { Id = Guid.NewGuid(), Type = name, InsertTime=DateTime.Now, customer = customer1 });
if (context.SaveChanges() > 0)
{
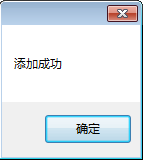
MessageBox.Show("添加成功");
}
}
}
}
}
4.4测试
4.4.1数据库建立
4.4.2Customer添加