Android-手把手教你自定义view
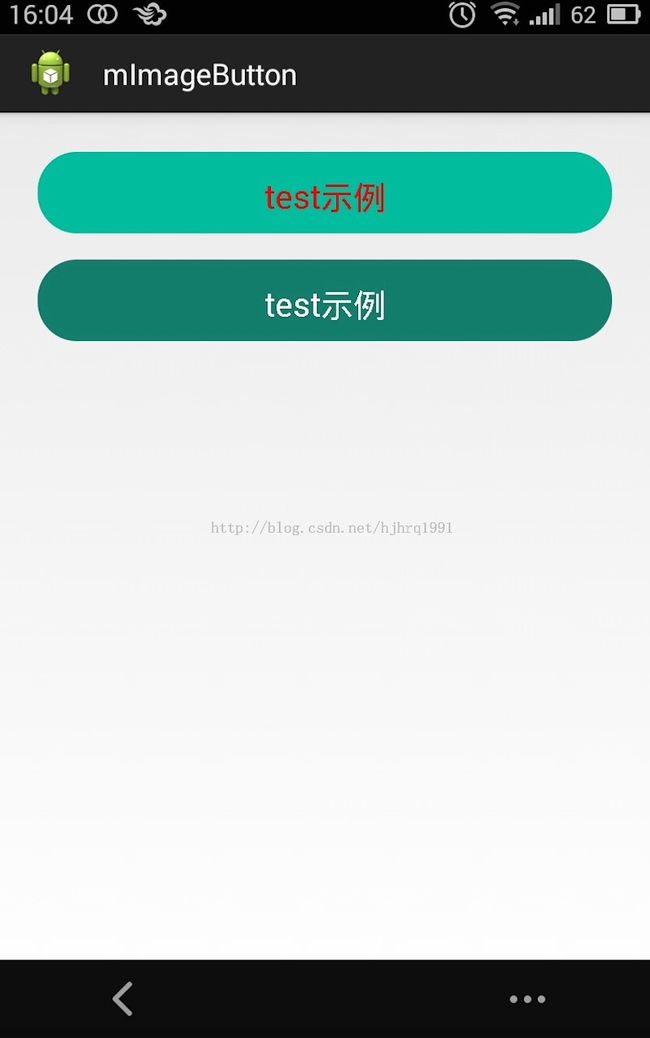
相信很多新手刚开始学android开发的时候都很惆怅,系统提供的控件不足以实现自己的效果,但是自定义又不会。本文以ImageButton为例子,通过重载ImageButton,对ImageButton进行扩展,实现ImageButton可以显示文字。
实现的效果图
现在来看看我的代码:
<span style="font-size:14px;">package com.hjhrq1991.mimagebutton;

import android.content.Context;
import android.content.res.TypedArray;
import android.graphics.Canvas;
import android.graphics.Paint;
import android.graphics.Paint.Align;
import android.util.AttributeSet;
import android.util.Log;
import android.widget.ImageButton;

/**
 *
 *
 * @Filename: mImageButton→com.hjhrq1991.mimagebutton→ImageButtonText.java
 * @Description: Copyright: Copyright (c)2014
 *
 * @author hjhrq1991
 * @version v1.0 Created at 2014-12-4 下午10:18:01
 */
public class ImageButtonText extends ImageButton {

	private static final String TAG = "ImageButton_withText";
	private String mText = "a";
	private int mColor = 0;
	private float mTextsize = 0f;
	private Paint mPatin;

	public ImageButtonText(Context context, AttributeSet attrs) {
		super(context, attrs);
		initAttrs(attrs);
	}

	/**
	 * 解析attrs参数,在xml里使用自定义属性
	 *
	 * @param attrs
	 */
	private void initAttrs(AttributeSet attrs) {
		TypedArray array = getContext().obtainStyledAttributes(attrs,
				R.styleable.ButtonAttrs);
		mText = array.getString(R.styleable.ButtonAttrs_textValue);
		mColor = array.getColor(R.styleable.ButtonAttrs_textColor, 230);
		mTextsize = array.getDimension(R.styleable.ButtonAttrs_textSize, 25.0f);
		array.recycle(); // 回收资源
		mPatin = new Paint();
		mPatin.setTextAlign(Align.CENTER);
		Log.d(TAG, "mtextsize = " + mTextsize);
	}

	public void setText(String text) {
		this.mText = text;
	}

	public void setColor(int color) {
		this.mColor = color;
	}

	public void setTextSize(float textsize) {
		this.mTextsize = textsize;
	}

	/**
	 * 复写onDraw方法,在Button中间绘制文字
	 */
	@Override
	protected void onDraw(Canvas canvas) {
		super.onDraw(canvas);
		mPatin.setColor(mColor);
		mPatin.setTextSize(mTextsize);
		canvas.drawText(mText, canvas.getWidth() / 2, canvas.getHeight() / 2,
				mPatin);
	}

}
</span>
查看上面的代码是否发现initAttrs()和onDraw()方法比较特别一点------都加了注释,是的,这两个方法是自定义时必须要注意的。
首先是initAttrs(),这个方法的作用是解析attrs参数实现在xml里添加自定义的属性
<span style="font-size:14px;"><!-- ?xml version="1.0" encoding="utf-8"? -->
<resources>

    <!-- 自定义按钮控件属性 -->
    <declare-styleable name="ButtonAttrs">
        <attr name="textColor" format="color" />
        <attr name="textSize" format="dimension" />
        <attr name="textValue" format="string" />
    </declare-styleable>

</resources></span>
我添加了这三个属性,字符串内容、字符串颜色、字符串字号。
写到这里自定义控件基本上写好了,但是自定义的控件要如何使用?
<span style="font-size:14px;"><RelativeLayout xmlns:android="http://schemas.android.com/apk/res/android"
    xmlns:custom="http://schemas.android.com/apk/res/com.hjhrq1991.mimagebutton"
    xmlns:tools="http://schemas.android.com/tools"
    android:layout_width="match_parent"
    android:layout_height="match_parent"
    android:paddingBottom="@dimen/activity_vertical_margin"
    android:paddingLeft="@dimen/activity_horizontal_margin"
    android:paddingRight="@dimen/activity_horizontal_margin"
    android:paddingTop="@dimen/activity_vertical_margin" >

    <com.hjhrq1991.mimagebutton.ImageButtonText
        android:id="@+id/button1"
        style="@style/BtnStyle1"
        android:layout_width="wrap_content"
        android:layout_height="wrap_content"
        android:layout_margin="8dip"
        custom:textValue="@string/test" />

    <com.hjhrq1991.mimagebutton.ImageButtonText
        android:id="@+id/button2"
        style="@style/BtnStyle2"
        android:layout_width="wrap_content"
        android:layout_height="wrap_content"
        android:layout_below="@id/button1"
        android:layout_margin="8dip"
        custom:textValue="@string/test" />

</RelativeLayout></span>
如果你细心看的话,会发现有三个命名空间。
多了一行:
xmlns:custom="http://schemas.android.com/apk/res/com.hjhrq1991.mimagebutton"
这行命名空间的作用是为了让你使用自定义的使用,其规则我就不说,自行百度把xml命名空间规则,说得比我详细多了:前缀:自定义后缀=“uri”,安卓里通常是
前缀:自定义后缀="http://schemas.android.com/apk/res/你的包名"
添加了命名空间后我们就可以在xml里使用之前定义的属性了:
<span style="font-size:14px;"><RelativeLayout xmlns:android="http://schemas.android.com/apk/res/android"
    xmlns:custom="http://schemas.android.com/apk/res/com.hjhrq1991.mimagebutton"
    xmlns:tools="http://schemas.android.com/tools"
    android:layout_width="match_parent"
    android:layout_height="match_parent"
    android:paddingBottom="@dimen/activity_vertical_margin"
    android:paddingLeft="@dimen/activity_horizontal_margin"
    android:paddingRight="@dimen/activity_horizontal_margin"
    android:paddingTop="@dimen/activity_vertical_margin" >

    <com.hjhrq1991.mimagebutton.ImageButtonText
        android:id="@+id/button1"
        style="@style/BtnStyle1"
        android:layout_width="wrap_content"
        android:layout_height="wrap_content"
        android:layout_margin="8dip"
        custom:textValue="@string/test" />

    <com.hjhrq1991.mimagebutton.ImageButtonText
        android:id="@+id/button2"
        style="@style/BtnStyle2"
        android:layout_width="wrap_content"
        android:layout_height="wrap_content"
        android:layout_below="@id/button1"
        android:layout_margin="8dip"
        custom:textValue="@string/test" />

</RelativeLayout></span>
我这里只展示使用了一个自定义属性,其他都是用style的形式。
其中我们的控件名需使用完整的,详细到如下图一样,而自定义属性的使用则如最下面的红色圈中:命名空间的后缀(自定义属性的前缀):属性名
我在这里小提一下,重写onDraw方法时要注意,不要在方法内使用new去创建对象,不然会有警告出来。因为在很多情况下都会执行onDraw方法,不断的重新new一下对象会造成资源的浪费,不利于系统的回收。
随文附上我的demo:demo下载地址
如有转载,请注明出处:http://blog.csdn.net/hjhrq1991
如有不懂,欢迎大家评论和关注,相互学习!
