Android布局概述
view子类是android用户界面表示的基本单元
view类的一些子类被称为widges工具;它提供了文本框和按钮类的UI对象的完整实现;
ViewGroup是view的一个扩展,可以容纳多个view;,他可以创建由互相联系的view组成的符合控件
布局:
FramelLayout-帧布局;
LinearLaout--线性布局;
TableLayout--表格布局;
RealativeLayout--相对布局;
Layout布局文件的命名---(禁止用大写字母来参与文件的命名)
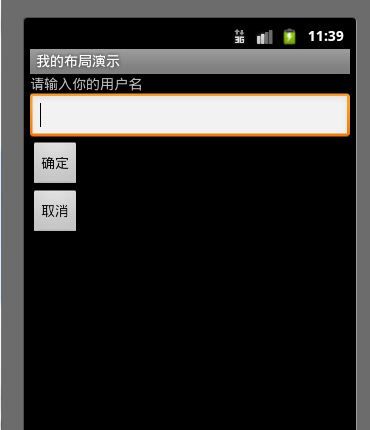
一、 LinearLayout(线性布局)
“LinearLayout”翻译成中文是“线性布局”,所谓线性布局就是在该标签下的所有子
元素会根据其orientation属性的值来决定是按行或者是按列逐个显示。
示例main.xml布局文件如下:
<?xml version="1.0" encoding="utf-8"?>
<LinearLayout xmlns:android="http://schemas.android.com/apk/res/android"
    android:layout_width="fill_parent"
    android:layout_height="fill_parent"
    android:orientation="vertical" >


    <TextView
        android:layout_width="fill_parent"
        android:layout_height="wrap_content"
        android:text="@string/name_text" />


    <EditText
         android:layout_width="fill_parent"
         android:layout_height="wrap_content"

        />

    <Button
         android:layout_width="wrap_content"
         android:layout_height="wrap_content"
         android:text="@string/ok_button"
        />

     <Button
         android:layout_width="wrap_content"
         android:layout_height="wrap_content"
         android:text="@string/no_button"
        />

</LinearLayout>
运行效果图:
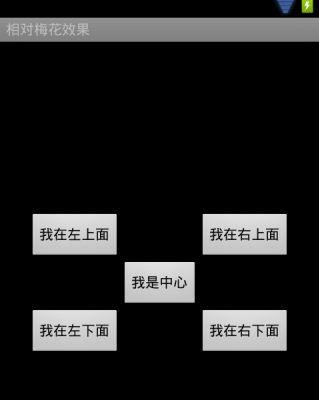
二、 RelativeLayout(相对布局)
相对布局中的视图组件是按相互之间的相对位置来确定的,并不是线性布局中的必须
按行或按列单个显示。示例布局文件如下:
<?xml version="1.0" encoding="utf-8"?>
<RelativeLayout xmlns:android="http://schemas.android.com/apk/res/android"
    android:layout_width="fill_parent"
    android:layout_height="fill_parent"
    android:orientation="vertical"

    >


    <Button
        android:layout_width="wrap_content"
        android:layout_height="wrap_content"
        android:layout_centerInParent="true"
        android:text="@string/button_zh"
        android:id="@+id/main"
        />


    <Button
        android:layout_width="wrap_content"
        android:layout_height="wrap_content"
        android:layout_centerInParent="true"
        android:text="@string/button_ys"
        android:layout_above="@+id/main"
        android:layout_toLeftOf="@+id/main"
        />

    <Button
        android:layout_width="wrap_content"
        android:layout_height="wrap_content"
        android:layout_centerInParent="true"
        android:text="@string/button_yx"
         android:layout_above="@+id/main"
        android:layout_toRightOf="@+id/main"

        />


    <Button
        android:layout_width="wrap_content"
        android:layout_height="wrap_content"
        android:layout_centerInParent="true"
        android:text="@string/button_zs"
         android:layout_below="@+id/main"
        android:layout_toRightOf="@+id/main"

        />


    <Button
        android:layout_width="wrap_content"
        android:layout_height="wrap_content"
        android:layout_centerInParent="true"
        android:text="@string/button_zx"
         android:layout_below="@+id/main"
        android:layout_toLeftOf="@+id/main"

        />
</RelativeLayout>
效果图如下:
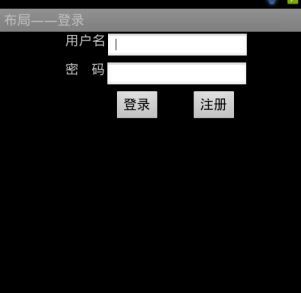
三、 线性布局与相对布局嵌套使用
布局之间可以相互嵌套使用,以完成更为复杂的布局效果。举例来说,下面是一个线性布局当中包含了相对布局的界面:
<?xml version="1.0" encoding="utf-8"?>
<LinearLayout xmlns:android="http://schemas.android.com/apk/res/android"
    android:layout_width="match_parent"
    android:layout_height="match_parent"
    android:orientation="vertical" >

    <RelativeLayout
        android:layout_width="fill_parent"
        android:layout_height="wrap_content"
        android:layout_marginLeft="70dp"
         >

        <TextView
            android:id="@+id/name_nest"
            android:layout_width="wrap_content"
            android:layout_height="30dp"
            android:text="@string/name_text" />

        <EditText
            android:layout_width="150dp"
            android:layout_height="30dp"
            android:layout_alignParentTop="true"
            android:layout_toRightOf="@+id/name_nest" >

            <requestFocus />
        </EditText>
    </RelativeLayout>

    <RelativeLayout
        android:layout_width="fill_parent"
        android:layout_height="wrap_content"
        android:layout_marginLeft="70dp"
         >

        <TextView
            android:id="@+id/password_nest"
            android:layout_width="wrap_content"
            android:layout_height="30dp"
            android:text="@string/password_text" />

        <EditText
            android:layout_width="150dp"
            android:layout_height="30dp"
            android:layout_toRightOf="@+id/password_nest" />
    </RelativeLayout>

    <RelativeLayout
        android:layout_width="fill_parent"
        android:layout_height="wrap_content"
        android:layout_marginLeft="120dp"
         >

        <Button
            android:id="@+id/button_re"
            android:layout_width="50dp"
            android:layout_height="35dp"
            android:text="@string/login" />

        <Button
            android:layout_width="50dp"
            android:layout_height="35dp"
            android:layout_marginLeft="30dp"
            android:layout_toRightOf="@+id/button_re"
            android:text="@string/register" />
    </RelativeLayout>

</LinearLayout>
运行效果图:
四、 表格布局:
表格布局的风格跟HTML中的表格比较接近,只是所采用的标签不同。
<TableLayout>是顶级元素,说明采用的是表格布局
<TableRow>定义一个行
<TextView>定义一个单元格的内容
示例布局文件内容如下:
<?xml version="1.0" encoding="utf-8"?>
<TableLayout xmlns:android="http://schemas.android.com/apk/res/android"
    android:layout_width="fill_parent"
    android:layout_height="fill_parent"
    android:stretchColumns="*"
    >

    <TableRow>

        <TextView
             android:layout_width="wrap_content"
             android:layout_height="wrap_content"
             android:text="@string/name"
            />

        <TextView
             android:layout_width="wrap_content"
             android:layout_height="wrap_content"
             android:text="@string/sex"

            />

        <TextView
             android:layout_width="wrap_content"
             android:layout_height="wrap_content"
             android:text="@string/age"

            />
        <TextView
             android:layout_width="wrap_content"
             android:layout_height="wrap_content"
             android:text="@string/weight"

            />

  </TableRow>
         <TableRow>

        <TextView
             android:layout_width="wrap_content"
             android:layout_height="wrap_content"
             android:text="@string/nameh"
            />

        <TextView
             android:layout_width="wrap_content"
             android:layout_height="wrap_content"
             android:text="@string/sexh"

            />

        <TextView
             android:layout_width="wrap_content"
             android:layout_height="wrap_content"
             android:text="@string/ageh"

            />
        <TextView
             android:layout_width="wrap_content"
             android:layout_height="wrap_content"
             android:text="@string/weighth"

            />

  </TableRow>
</TableLayout>
运行效果图:
五、 FrameLayout帧布局()
帧布局中的每一个组件都代表一个画面,默认以屏幕左上角作为(0,0)坐标,按组件 定义的先后顺序依次逐屏显示,后面出现的会覆盖前面的画面。用该布局可以实现动画效果。
接下来,我们用三幅图片实现一只小鸟飞翔的动画效果。首先准备好三张连续的小鸟飞行图片。
接着新建一个android project项目;
编写main.xml文件:
 <?xml version="1.0" encoding="utf-8"?>
<FrameLayout xmlns:android="http://schemas.android.com/apk/res/android"
    android:layout_width="match_parent"
    android:layout_height="match_parent"
    android:layout_gravity="center"
    android:id="@+id/frame"
    >
</FrameLayout>
然后编写Activity.java类:
public class FrameTestActivity extends Activity {

	private boolean flag = true;
	FrameLayout frame = null;

	protected void onCreate(Bundle savedInstanceState) {
		// TODO Auto-generated method stub
		super.onCreate(savedInstanceState);
		this.setContentView(R.layout.frame_layout);
		findViews();

		final MyHandler myHandler = new MyHandler();

		myHandler.sleep(10);

		frame.setOnClickListener(new OnClickListener() {

			@//判断是否点击
			public void onClick(View v) {
				flag = !flag;
				myHandler.sleep(10);

			}

		});

	}

	private void findViews() {
		frame = (FrameLayout) this.findViewById(R.id.frame);
	}
//由该类两个方法间的循环调用,实现界面不断更新。
	class MyHandler extends Handler {
		int i = 0;

		@Override
		public void handleMessage(Message msg) {
			i++;
//总共三幅图,依次显示
			show(i % 3);
//再次调用sleep方法
			sleep(10);
		}
//判断是否继续飞翔
		public void sleep(long delayMillis) {
			if (flag) {
				this.sendMessageDelayed(obtainMessage(10), delayMillis);
			}
		}

	}
//该方法是被调用以更新帧布局的前景图片
	private void show(int j) {
		Drawable pic[] = new Drawable[3];
		pic[0] = this.getResources().getDrawable(R.drawable.p1);
		pic[1] = this.getResources().getDrawable(R.drawable.p2);
		pic[2] = this.getResources().getDrawable(R.drawable.p3);
//不同的情况,设置不同的前景
		frame.setForeground(pic[j]);
	}

}
说明:
由于FrameLayout中后出现的UI控件会覆盖前面出现的UI控件,每次只能显示一个UI控
件,因此,我们可以通过在Activity中对每次显示的图片内容进行切换以实现动画效果。或
许你会想到开启一条线程来控制切换,但在非主线程中不能更新UI界面,所以,我们使用了
Android提供的消息通讯类Handler。该类可以实现非主线程和负责UI的主线程之间的通信,
进而间接实现非主线程更新UI界面。由于sleep方法中的
sendMessageDelayed(obtainMessage(0),delayMillis);本身会延迟发送一个消息,该消息
会被框架传递给handleMessage事件。我们在handleMessage()方法中再次调用sleep()方法,
形成一个循环调用。在我们对界面进行点击之前,两个方法会一直循环调用。前景图片也会
不断的切换,进而实现动画的效果。