iOS之动画总结
在iOS中,图形可分为以下几个层次:
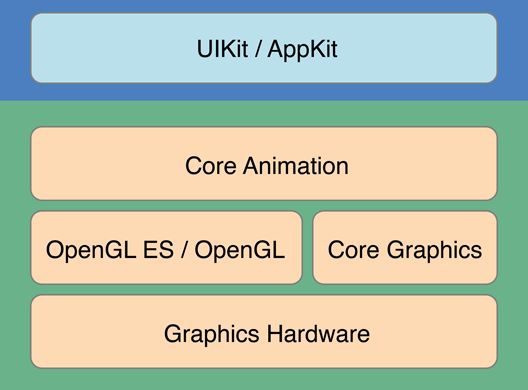
越上层,封装程度越高,动画实现越简洁越简单,但是自由度越低;反之亦然。
一, 基于Core Animation层的基本动画实现方案。
在iOS中,展示动画可以类比于显示生活中的“拍电影”。拍电影有三大要素:演员+剧本+开拍,概念类比如下:
演员--->CALayer,规定电影的主角是谁 剧本--->CAAnimation,规定电影该怎么演,怎么走,怎么变换 开拍--->AddAnimation,开始执行
1.1CALayer是什么呢?
CALayer是个与UIView很类似的概念,同样有layer,sublayer...,同样有backgroundColor、frame等相似的属性,我们可以将UIView看做一种特殊的CALayer,只不过UIView可以响应事件而已。一般来说,layer可以有两种用途,二者不互相冲突:一是对view相关属性的设置,包括圆角、阴影、边框等参数,更详细的参数请点击这里;二是实现对view的动画操控。因此对一个view进行core animation动画,本质上是对该view的.layer进行动画操纵。
1.2CAAnimation是什么呢?
CAAnimation可分为四种:
- 1.CABasicAnimation
- 通过设定起始点,终点,时间,动画会沿着你这设定点进行移动。可以看做特殊的CAKeyFrameAnimation
- 2.CAKeyframeAnimation
- Keyframe顾名思义就是关键点的frame,你可以通过设定CALayer的始点、中间关键点、终点的frame,时间,动画会沿你设定的轨迹进行移动
- 3.CAAnimationGroup
- Group也就是组合的意思,就是把对这个Layer的所有动画都组合起来。PS:一个layer设定了很多动画,他们都会同时执行,如何按顺序执行我到时候再讲。
- 4.CATransition
- 这个就是苹果帮开发者封装好的一些动画
1.3.实例
实践出真知,看个例子就知道:
比如我们想实现一个类似心跳的缩放动画可以这么做,分为演员初始化、设定剧本、电影开拍三个步骤:
|
|
- (
void
)initScaleLayer
{
//演员初始化
CALayer *scaleLayer = [[CALayer alloc] init];
scaleLayer.backgroundColor = [UIColor blueColor].CGColor;
scaleLayer.frame = CGRectMake(60, 20 + kYOffset, 50, 50);
scaleLayer.cornerRadius = 10;
[
self
.view.layer addSublayer:scaleLayer];
[scaleLayer release];
//设定剧本
CABasicAnimation *scaleAnimation = [CABasicAnimation animationWithKeyPath:@
"transform.scale"
];
scaleAnimation.fromValue = [
NSNumber
numberWithFloat:1.0];
scaleAnimation.toValue = [
NSNumber
numberWithFloat:1.5];
scaleAnimation.autoreverses =
YES
;
scaleAnimation.fillMode = kCAFillModeForwards;
scaleAnimation.repeatCount = MAXFLOAT;
scaleAnimation.duration = 0.8;
//开演
[scaleLayer addAnimation:scaleAnimation forKey:@
"scaleAnimation"
];
}
|
|
|
- (
void
)viewDidLoad {
[
super
viewDidLoad];
// Do any additional setup after loading the view from its nib.
[
self
initScaleLayer];
}
|
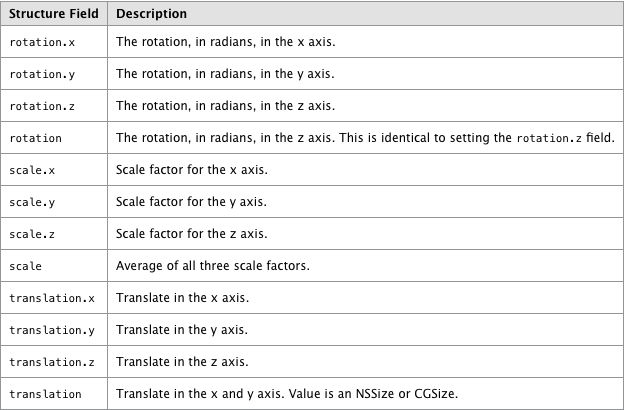
效果请参考附图中的蓝色方块。其他效果可以依葫芦画瓢轻松实现。想要实现不同的效果,最关键的地方在于CABasicAnimation对象的初始化方式中keyPath的设定。在iOS中有以下几种不同的keyPath,代表着不同的效果:
此外,我们还可以利用GroupAnimation实现多种动画的组合,在GroupAnimation中的各个动画类型是同时进行的。
- (
void
)initGroupLayer
{
//演员初始化
CALayer *groupLayer = [[CALayer alloc] init];
groupLayer.frame = CGRectMake(60, 340+100 + kYOffset, 50, 50);
groupLayer.cornerRadius = 10;
groupLayer.backgroundColor = [[UIColor purpleColor] CGColor];
[
self
.view.layer addSublayer:groupLayer];
[groupLayer release];
//设定剧本
CABasicAnimation *scaleAnimation = [CABasicAnimation animationWithKeyPath:@
"transform.scale"
];
scaleAnimation.fromValue = [
NSNumber
numberWithFloat:1.0];
scaleAnimation.toValue = [
NSNumber
numberWithFloat:1.5];
scaleAnimation.autoreverses =
YES
;
scaleAnimation.repeatCount = MAXFLOAT;
scaleAnimation.duration = 0.8;
CABasicAnimation *moveAnimation = [CABasicAnimation animationWithKeyPath:@
"position"
];
moveAnimation.fromValue = [
NSValue
valueWithCGPoint:groupLayer.position];
moveAnimation.toValue = [
NSValue
valueWithCGPoint:CGPointMake(320 - 80,
groupLayer.position.y)];
moveAnimation.autoreverses =
YES
;
moveAnimation.repeatCount = MAXFLOAT;
moveAnimation.duration = 2;
CABasicAnimation *rotateAnimation = [CABasicAnimation animationWithKeyPath:@
"transform.rotation.x"
];
rotateAnimation.fromValue = [
NSNumber
numberWithFloat:0.0];
rotateAnimation.toValue = [
NSNumber
numberWithFloat:6.0 * M_PI];
rotateAnimation.autoreverses =
YES
;
rotateAnimation.repeatCount = MAXFLOAT;
rotateAnimation.duration = 2;
CAAnimationGroup *groupAnnimation = [CAAnimationGroup animation];
groupAnnimation.duration = 2;
groupAnnimation.autoreverses =
YES
;
groupAnnimation.animations = @[moveAnimation, scaleAnimation, rotateAnimation];
groupAnnimation.repeatCount = MAXFLOAT;
//开演
[groupLayer addAnimation:groupAnnimation forKey:@
"groupAnnimation"
];
}
|
|
|
- (
void
)viewDidLoad {
[super viewDidLoad];
// Do any additional setup after loading the view from its nib.
[self initGroupLayer];
}
二、使用UIView类实现动画
基本写法,代码必须放在Begin和Commit之间: [UIView beginAnimations:nil context:nil]; // 开始动画 // Code... [UIView commitAnimations]; // 提交动画 简单例子: [UIView beginAnimations:nil context:nil]; // 开始动画 [UIView setAnimationDuration:10.0]; // 动画时长 /** * 图像向下移动 */ CGPoint point = _imageView.center; point.y += 150; [_imageView setCenter:point]; [UIView commitAnimations]; // 提交动画 同时运行多个动画效果: [UIView setAnimationDuration:3.0]; [_imageView setAlpha:0.0]; [UIView commitAnimations]; [UIView beginAnimations:nil context:nil]; [UIView setAnimationDuration:3.0]; CGPoint point = _imageView.center; point.y += 150; [_imageView setCenter:point]; [UIView commitAnimations]; 以上代码实现的动画效果为(同时执行): 1、图像向下平移150像像 2、设置图像透明度为0。 指定上下文: CGContextRef context = UIGraphicsGetCurrentContext(); [UIView beginAnimations:nil context:context]; [UIView setAnimationDuration:2.0]; [_imageView setAlpha:0]; [UIView commitAnimations]; UIGraphicsGetCurrentContext():获取当前视图的上下文
其它方法及属性: 以下方法及属性不为全部,只例举部分(其它没提及到的方法及属性请自行尝试,谢谢): // 开始动画 + (void)beginAnimations:(NSString *)animationID context:(void *)context; // 提交动画 + (void)commitAnimations; // 设置动画曲线,默认是匀速进行: + (void)setAnimationCurve:(UIViewAnimationCurve)curve; // 设置动画时长: + (void)setAnimationDuration:(NSTimeInterval)duration; // 默认为YES。为NO时跳过动画效果,直接跳到执行后的状态。 + (void)setAnimationsEnabled:(BOOL)enabled; // 设置动画延迟执行(delay:秒为单位): + (void)setAnimationDelay:(NSTimeInterval)delay; // 动画的重复播放次数 + (void)setAnimationRepeatCount:(float)repeatCount; // 如果为YES,逆向(相反)动画效果,结束后返回动画逆向前的状态; 默认为NO: + (void)setAnimationRepeatAutoreverses:(BOOL)repeatAutoreverses; // 设置动画代理: + (void)setAnimationDelegate:(id)delegate; // 动画将要开始时执行方法××(必须要先设置动画代理): + (void)setAnimationWillStartSelector:(SEL)selector; // 动画已结束时执行方法××(必须要先设置动画代理): + (void)setAnimationDidStopSelector:(SEL)selector; /** * 设置动画过渡效果 * * @param transition 动画的过渡效果 * @param view 过渡效果作用视图 * @param cache 如果为YES,开始和结束视图分别渲染一次并在动画中创建帧;否则,视图将会渲染每一帧。例如,你不需要在视图转变中不停的更新,你只需要等到转换完成再去更新视图。 */ + (void)setAnimationTransition:(UIViewAnimationTransition)transition forView:(UIView *)view cache:(BOOL)cache; // 删除所有动画层 // 注意:层指的是layout,例:[_imageView.layer removeAllAnimations]; - (void)removeAllAnimations;
三、使用UIView的动画块代码: 方法一: [UIView animateWithDuration:4.0 // 动画时长 animations:^{ // code }]; 方法二: [UIView animateWithDuration:4.0 // 动画时长 animations:^{ // code... } completion:^(BOOL finished) { // 动画完成后执行 // code... }]; 方法三: [UIView animateWithDuration:4.0 // 动画时长 delay:2.0 // 动画延迟 options:UIViewAnimationOptionCurveEaseIn // 动画过渡效果 animations:^{ // code... } completion:^(BOOL finished) { // 动画完成后执行 // code... }]; 方法四,Spring Animationring Animation): 在IOS7开始,系统动画效果广泛应用Spring Animation: [UIView animateWithDuration:4.0 // 动画时长 delay:0.0 // 动画延迟 usingSpringWithDamping:1.0 // 类似弹簧振动效果 0~1 initialSpringVelocity:5.0 // 初始速度 options:UIViewAnimationOptionCurveEaseInOut // 动画过渡效果 animations:^{ // code... CGPoint point = _imageView.center; point.y += 150; [_imageView setCenter:point]; } completion:^(BOOL finished) { // 动画完成后执行 // code... [_imageView setAlpha:1]; }]; usingSpringWithDamping:它的范围为 0.0f 到 1.0f ,数值越小「弹簧」的振动效果越明显。 initialSpringVelocity:初始的速度,数值越大一开始移动越快。值得注意的是,初始速度取值较高而时间较短时,也会出现反弹情况。 转:Spring Animation 是线性动画或 ease-out 动画的理想替代品。由于 iOS 本身大量使用的就是 Spring Animation,用户已经习惯了这种动画效果,因此使用它能使 App 让人感觉更加自然,用 Apple 的话说就是「instantly familiar」。此外,Spring Animation 不只能对位置使用,它适用于所有可被添加动画效果的属性。
方法五,关键帧动画: UIView动画已经具备高级的方法来创建动画,而且可以更好地理解和构建动画。IOS7以后苹果新加了一个animateKeyframesWithDuration的方法,我们可以使用它来创建更多更复杂更酷炫的动画效果,而不需要去使用到核心动画(CoreAnimatino)。 创建关键帧方法: /** * 添加关键帧方法 * * @param duration 动画时长 * @param delay 动画延迟 * @param options 动画效果选项 * @param animations 动画执行代码 * @param completion 动画结束执行代码 */ + (void)animateKeyframesWithDuration:(NSTimeInterval)duration delay:(NSTimeInterval)delay options:(UIViewKeyframeAnimationOptions)options animations:(void (^)(void))animations completion:(void (^)(BOOL finished))completion; 添加关键帧方法: /** * 添加关键帧 * * @param frameStartTime 动画相对开始时间 * @param frameDuration 动画相对持续时间 * @param animations 动画执行代码 */ + (void)addKeyframeWithRelativeStartTime:(double)frameStartTime relativeDuration:(double)frameDuration animations:(void (^)(void))animations; 以上说的相对时间,也就是说:“它们自身会根据动画总持续时长自动匹配其运行时长”。 下面用一个简单的示例作解答,彩虹变化视图: void (^keyFrameBlock)() = ^(){ // 创建颜色数组 NSArray *arrayColors = @[[UIColor orangeColor], [UIColor yellowColor], [UIColor greenColor], [UIColor blueColor], [UIColor purpleColor], [UIColor redColor]]; NSUInteger colorCount = [arrayColors count]; // 循环添加关键帧 for (NSUInteger i = 0; i < colorCount; i++) { [UIView addKeyframeWithRelativeStartTime:i / (CGFloat)colorCount relativeDuration:1 / (CGFloat)colorCount animations:^{ [_graduallyView setBackgroundColor:arrayColors[i]]; }]; } }; [UIView animateKeyframesWithDuration:4.0 delay:0.0 options:UIViewKeyframeAnimationOptionCalculationModeCubic | UIViewAnimationOptionCurveLinear animations:keyFrameBlock completion:^(BOOL finished) { // 动画完成后执行 // code... }]; 动画过渡效果(Options),新增了以下几个: UIViewKeyframeAnimationOptionCalculationModeLinear = 0 << 10, // default UIViewKeyframeAnimationOptionCalculationModeDiscrete = 1 << 10, UIViewKeyframeAnimationOptionCalculationModePaced = 2 << 10, UIViewKeyframeAnimationOptionCalculationModeCubic = 3 << 10, UIViewKeyframeAnimationOptionCalculationModeCubicPaced = 4 << 10 下面我们看一张图,让我们更容易理解
小结: UIView实现动画的方法有很多种。简单的动画效果你可以随意丢,比较复杂的动画效果你可以选用关键帧KeyFrame方法。 至于选用哪种,就需要根据产品需求去进行判断。
本文参考文章: http://www.tuicool.com/articles/FjiQJbF http://www.tuicool.com/articles/ZR7nYv http://www.cnblogs.com/wengzilin/p/4250957.html |