Android基础笔记(三)-数据存储和界面展现
- SQLite
- Android下数据库的创建
- SQLiteDatabase简介
- Android下数据库的第一种增删改查方式
- Android下数据库的第二种增删改查方式
- Android下数据库的事务
SQLite
SQLite,是一款轻量级的数据库,是遵循ACID(原子性、一致性、隔离性、持久性)的关联式数据库管理系统,多用于嵌入式开发中。
Android平台中嵌入了一个关系型数据库SQLite,和其他数据库不同的是SQLite存储数据时不区分类型。
例如一个字段声明为Integer类型,我们也可以将一个字符串存入,一个字段声明为布尔型,我们也可以存入浮点数。
除非是主键被定义为Integer,这时只能存储64位整数SQLite,无需安装,是Android平台自带的一个数据库。
Android下数据库的创建
- 什么时候才会使用到数据库技术?
- 有大量相似结构的数据需要增删改查的时候。
- 在Android中创建数据一般分为两个步骤
- ① 写一个类继承SQLiteOpenHelper,并实现指定的构造函数、onCreate方法、onUpgrade方法
-
很简略的写了一个类,其中在构造函数中详细解释了
context、name、factory、version等几个需要传入SQLiteOpenHelper中的参数。public class MySQLiteOpenHelper extends SQLiteOpenHelper { public MySQLiteOpenHelper(Context context) { // context : 使用上下文环境去打开或者创建一个数据库 // name : 数据库文件名,如果传入null,则会在内存中创建数据库 // factory : 游标结果集工厂,如果需要使用则需要自定义结果集工厂,null值代表使用默认结果集工厂 // version : 数据库版本,如果升级数据库时,version增加会调用onUpgrade()方法 super(context, "my.db", null, 1); } // 数据库第一次被创建时调用该方法,这里面主要进行对数据库的初始化操作 @Override public void onCreate(SQLiteDatabase db) {} // 数据库的版本更新的时候执行 @Override public void onUpgrade(SQLiteDatabase db, int oldVersion, int newVersion) { } } -
② 调用实现的数据库帮助类中的
getReadableDatabase()或getWritableDataBase()方法,从而创建数据库 -
在单元测试中,调用
getReadableDatabase()或getWritableDataBase()中的任意一个方法,都会创建数据库。public void testCreate() { // 使用Helper帮助类创建数据库 MySQLiteOpenHelper helper = new MySQLiteOpenHelper(getContext()); // 无论是Writable还是Readable都会创建或者打开数据库 SQLiteDatabase writableDatabase = helper.getWritableDatabase(); SQLiteDatabase readableDatabase = helper.getReadableDatabase(); } -
③ 结果图
我们发现使用getReadableDatabase()或getWritableDataBase()这两个都能够创建数据库,那么有什么不同之处呢? - ① 源码上的不同
-
看一下
getWritableDatabase的源码,很简单。可以发现,核心语句被加上了同步,通过望文生义也可以知道给getDatabaseLocked(true)传入true,代表了给数据库加上了锁。这相当于,在多个线程情况下可以同时操作数据库。public SQLiteDatabase getWritableDatabase() { synchronized (this) { return getDatabaseLocked(true); } } -
看一下
getReadableDatabase()的源码。可以发现与上面最大的不同在于,核心语句getDatabaseLocked(false)传入了false,并没有给数据库加锁。
public SQLiteDatabase getReadableDatabase() {
    synchronized (this) {
        return getDatabaseLocked(false);
    }
}-
: ② 使用场景上的不同
-
getReadableDatabase()没有加锁,不能在多线程条件下对数据库进行增删改。 -
getWritableDatabase()加锁,可以在多线程条件下对数据库进行增删改。 - 如何创建数据库表?
-
上面的代码只是创建了一个空的数据库,里面并没有数据库表,那么数据库表该如何创建呢?也是很简单,只需要在
onCreate()方法中,执行db.execSQL(sql)方法,就可以创建sql代表的表了。@Override public void onCreate(SQLiteDatabase db) { db.execSQL("create table info(_id integer primary key autoincrement,name varchar(20))"); } -
通过上面的代码,就可以在第一次使用
getReadableDatabase()或getWritableDatabase()时创建数据库表了。 - 查看Andriod数据库db文件的两种方式
- ① 使用 SQLite Expert Personal 3应用程序,就可以方便的查看导出的 db数据库文件。
-
② 在
adb shell下,使用Android提供的sqlite3命令,访问指定的数据库。d:\Android-Eclipse\sdk\platform-tools>adb shell root@android:/ # cd /data/data/com.bzh.dbcreate cd /data/data/com.bzh.dbcreate root@android:/data/data/com.bzh.dbcreate # cd databases cd databases root@android:/data/data/com.bzh.dbcreate/databases # sqlite3 my.db sqlite3 my.db SQLite version 3.7.11 2012-03-20 11:35:50 Enter ".help" for instructions Enter SQL statements terminated with a ";" sqlite> select * from info; select * from info; sqlite> - 可以看到,虽然数据库表中没有数据,但是已经可以查询了,说明数据库表创建成功。
SQLiteDatabase简介
Android提供了一个名为SQLiteDatabase的类,该类封装了一些操作数据库的API,使用该类可以完成对数据进行添加(Create)、查询(Retrieve)、更新(Update)和删除(Delete)操作(这些操作简称为CRUD)。
和JDBC访问数据库不同,操作SQLite数据库无需加载驱动,不用获取连接,直接可以使用。
-
执行SQL语句来操作数据库有两种方式,拼串和使用占位符
?。使用占位符”?”来执行SQL语句能够防止SQL注入攻击。 -
① 拼串方式使用的方法
//增、删、改。 execSQL(String sql) //查询(拼串方式,第二个参数传null即可)。 Cursor rawQuery(String sql, String[] selectionArgs) -
② 占位符”?”使用的方法
void execSQL(String sql, Object[] bindArgs)。
Cursor rawQuery(String sql, String[] selectionArgs)。
Android下数据库的第一种增删改查方式
创建一个简单的数据库表
比较简单就不详细介绍了,两个字段name和phone
@Override
public void onCreate(SQLiteDatabase db) {
    db.execSQL("create table info("
            + "_id integer primary key autoincrement,"
            + "name varchar(20)," +
            "phone varchar(20)"
            + ")");

}实现简单的Dao(增删改查)
代码比较简单,直接执行原生的SQL语句,并传入响应的参数,代码如下:
public class InfoDao {

    private static final String Tag = "InfoDao";
    private MyOpenHelper help;

    // 创建数据库帮助类
    public InfoDao(Context context) {
        help = new MyOpenHelper(context);
    }

    // 增加
    public void add(String name, String phone) {
        // 获取数据库操作对象
        SQLiteDatabase db = help.getWritableDatabase();
        // 执行SQL语句
        db.execSQL("insert into info(name,phone) values(?,?)", new String[] {
                name, phone });
        // 关闭数据库
        db.close();
    }

    // 删除
    public void delete(String name) {
        SQLiteDatabase db = help.getWritableDatabase();
        db.execSQL("delete from info where name=?", new String[] { name });
        db.close();
    }

    // 更新
    public void update(String phone, String name) {
        SQLiteDatabase db = help.getWritableDatabase();
        db.execSQL("update info set phone=? where name=?", new String[] {
                phone, name });
        db.close();

    }

    // 查询
    public void find() {
        SQLiteDatabase db = help.getWritableDatabase();
        // Cursor提供了随机读写数据库结果集的一些方法
        Cursor cursor = db.rawQuery("select name,phone from info", null);
        if (cursor != null) {
            while (cursor.moveToNext()) {
                int columnIndex = 0;
                // 根据列名获取该列对应的索引值
                columnIndex = cursor.getColumnIndex("name");
                // 根据索引获取数据
                String name = cursor.getString(columnIndex);

                columnIndex = cursor.getColumnIndex("phone");
                String phone = cursor.getString(columnIndex);

                Log.i(Tag, "姓名是:" + name + ", 电话是:" + phone);
            }
        }
        db.close();

    }
}
测试结果:
- 值得注意几点
-
①
Cursor提供了随机读写数据库结果集的一些方法 -
例如:将游标下移
moveToNext() -
根据列名获取该列对应的索引值
columnIndex = cursor.getColumnIndex("name"); -
根据索引获取数据
String name = cursor.getString(columnIndex); - ② 此种增删改查方式的弊端
- SQL语句非常容易拼写错误
- 没有返回值,没有办法判断成功与否
Android下数据库的第二种增删改查方式
Google工程师为我们提供了更为简洁的方法(insert()、delete()、updte()、query()),帮助我们完成增删改查操作。
与第一种增删改查不同的地方主要在于Dao文件,下面是代码,已经添加了很详细的注释:
public class InfoDao {

    private static final String Tag = "InfoDao";
    private MyOpenHelper help;
    private SQLiteDatabase db;

    // 创建数据库帮助类
    public InfoDao(Context context) {
        help = new MyOpenHelper(context);
        db = help.getWritableDatabase();
    }

    // 增加
    public boolean add(String name, String phone) {
        // Google工程师帮我们封装了更为简单的插入一行的方法

        // 表名
        String table = "info";
        // 如果写null,就无法插入一条空数据(2.3会出异常,4.0之后可以写null)
        String nullColumnHack = null;
        // 实际上是一个Map,K对应着列名,V对应着列值
        ContentValues values = new ContentValues();
        values.put("name", name);
        values.put("phone", phone);

        // 插入成功返回被插入行的ID;失败返回-1
        long result = db.insert(table, nullColumnHack, values);
        return result != -1;
    }

    // 删除
    public int delete(String name) {
        // Google工程师帮我们封装了更为简单的删除一行的方法

        String table = "info";
        // 过滤条件;输入null,则删除所有行;
        String whereClause = "name=?";
        // 过滤条件对应的参数值;也就是whereClause中?号对应的实际值。
        String[] whereArgs = { name };
        // delete语句会返回执行完删除操作后,所影响的行数
        int affected = db.delete(table, whereClause, whereArgs);
        return affected;
    }

    // 更新
    public int update(String phone, String name) {
        // Google工程师帮我们封装了更为简单的更新一行的方法

        String table = "info";

        // 注意:null在此处是一个合法的值,会被转化为NULL更新到数据库
        ContentValues values = new ContentValues();
        values.put("phone", phone);
        String whereClause = "name=?";
        String[] whereArgs = { name };

        int affected = db.update(table, values, whereClause, whereArgs);
        return affected;
    }

    // 查询
    public void find() {

        String table = "info";

        // 查询哪些指定的列;如果传入null,表示返回所有列;
        String[] columns = { "name", "phone" };

        // 过滤条件;如果传入null,表示不进行过滤,返回所有行;
        String selection = null;
        // 过滤条件中?号对应的值
        String[] selectionArgs = null;

        // 分组条件;如果传入null,表示不分组;
        String groupBy = null;
        // 分组后的过滤条件;传入null,表示不过滤;
        String having = null;

        // 排序条件;传入null,进行默认排序ASC
        String orderBy = null;

        // 分页条件;传入null,不进行分页;
        String limit = null;

        // 更为简易的查询方法
        Cursor cursor = db.query(table, columns, selection, selectionArgs,
                groupBy, having, orderBy, limit);
        if (cursor != null) {
            while (cursor.moveToNext()) {
                int columnIndex = 0;
                // 根据列名获取该列对应的索引值
                columnIndex = cursor.getColumnIndex("name");
                // 根据索引获取数据
                String name = cursor.getString(columnIndex);

                columnIndex = cursor.getColumnIndex("phone");
                String phone = cursor.getString(columnIndex);

                Log.i(Tag, "姓名是:" + name + ", 电话是:" + phone);
            }
        }
    }
}
测试结果:
Android下数据库的事务
1.Andriod下的事务也是很简单,只涉及到了beginTransaction()、setTransactionSuccessful()、endTransaction()三个方法,具体的使用如下:
// 事务操作
private void transaction() {
    MyOpenHelper helper = new MyOpenHelper(getApplicationContext());
    SQLiteDatabase db = helper.getWritableDatabase();

    // 使用独占模式开启一个数据库事务
    db.beginTransaction();
    try {
        db.execSQL("update info set money=money-100 where name='张三'");
        int i = 1 / 0;
        db.execSQL("update info set money=money+100 where name='李四'");

        // 给事务做一个成功的标记
        db.setTransactionSuccessful();
    } catch (Exception e) {
        Toast.makeText(getApplicationContext(), "系统忙..正在维护...请稍后再试...",
                Toast.LENGTH_SHORT).show();
    } finally {
        // 结束事务,包括提交和回滚,需要放在finally中执行,否则事务只有到超时的时候才自动结束,会降低数据库并发效率
        db.endTransaction();
    }
}
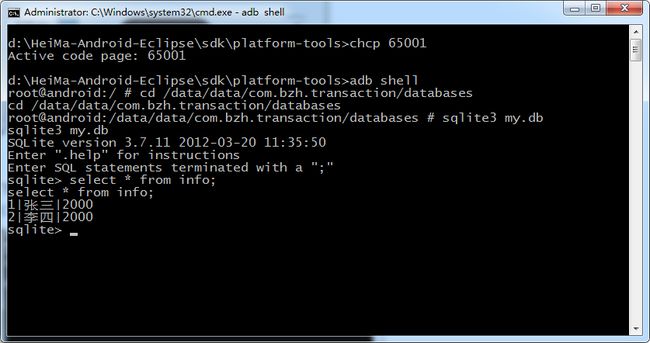
测试结果如下所示:
2.事务对效率的提高
在批量修改数据的时候,由于事务是在进行事务提交时将要执行的SQL操作一次性打开数据库连接执行,其执行速度比逐条执行SQL语句的速度快了很多倍。因此当我们开发中遇到对数据库的批量操作那么,使用事务是提高效率的重要原则。
案例:插入一万条数据到数据库,比较使用事务和不使用事务各自所需的时间。
public void testTransactionEfficient(){
        PersonOpenHelper helper = new PersonOpenHelper(getContext(), "person", null, 2);
        SQLiteDatabase database = helper.getWritableDatabase();
// ------测试不使用事务时插入1w条数据耗时--------------------
        long beginTime = System.currentTimeMillis();
        for(int i=0;i<10000;i++){
            database.execSQL("insert into person(name,age,phone) values('text'+"+i+","+i+",'"+(1320000+i)+""+"')");
        }
        long endTime = System.currentTimeMillis();
        System.out.println("不使用事务插入1w条数据耗时:"+(endTime-beginTime)+"毫秒");
// ---------测试使用事务时耗时-----------------------
        beginTime = System.currentTimeMillis();
        database.beginTransaction();
        for(int i=0;i<10000;i++){
            database.execSQL("insert into person(name,age,phone) values('text'+"+i+","+i+",'"+(1320000+i)+""+"')");
        }
        database.setTransactionSuccessful();
        database.endTransaction();
        endTime = System.currentTimeMillis();
        System.out.println("使用事务插入1w条数据耗时:"+(endTime-beginTime)+"毫秒");
    }
执行上面代码,查看控制台,发现不使用事务耗时19397毫秒,使用事务耗时3404毫秒,性能差别还是相当的明显。


