Android 学习 5 ->用代码布局和xml布局
浅谈一下以代码实现 线型布局 和 相对布局 引入LayoutInflater使用
LayoutInflater介绍:
<span style="font-size:18px;"><span style="font-size:18px;"> LayoutInflater mInflater = LayoutInflater.from(context);
     ViewGroup parent;
     View v = mInflater.inflate(R.layout.item_simpleadapter_view, parent,true);
     View v = mInflater.inflate(R.layout.item_simpleadapter_view, parent,false);
     View v = mInflater.inflate(R.layout.item_simpleadapter_view, null);</span></span>
public View inflate(int resourceId, ViewGroup root, boolean attachToRoot)
<1>如果设置了ViewGroup root参数,且attachToRoot设置为false的话,
则会从root中得到由layout_width和layout_height组成的LayoutParams,
就会对我们加载的视图View设置该LayoutParams。
<2>如果设置了ViewGroup root参数,且attachToRoot设置为true的话,
则将我们加载的视图做为子视图添加到root视图中。
<3>如果我们ViewGroup root设置为空的话,就直接返回我们创建的视图;
下面是以代码实现布局的方式:
<span style="font-size:18px;">import android.app.Activity;
import android.os.Bundle;
import android.view.Gravity;
import android.view.ViewGroup;
import android.view.ViewGroup.LayoutParams;
import android.widget.Button;
import android.widget.LinearLayout;
import android.widget.RelativeLayout;

public class CodeLayoutAcitivity extends Activity {
	@Override
	protected void onCreate(Bundle savedInstanceState) {
		super.onCreate(savedInstanceState);

		setRelationLayout();
	}

	public void setLinearLayout() {
		LinearLayout linearLayout = new LinearLayout(this);
		linearLayout.setLayoutParams(new LayoutParams(
				LayoutParams.MATCH_PARENT, LayoutParams.MATCH_PARENT));
		linearLayout.setOrientation(LinearLayout.HORIZONTAL);
		linearLayout.setBackgroundColor(getResources().getColor(
				android.R.color.darker_gray));
		linearLayout.setGravity(Gravity.CENTER);

		Button button = new Button(this);
		button.setLayoutParams(new LayoutParams(LayoutParams.WRAP_CONTENT,
				LayoutParams.WRAP_CONTENT));
		button.setText("按钮1");

		Button button2 = new Button(this);
		button2.setLayoutParams(new LayoutParams(LayoutParams.WRAP_CONTENT,
				LayoutParams.WRAP_CONTENT));
		button2.setText("按钮2");

		linearLayout.addView(button);
		linearLayout.addView(button2);

		setContentView(linearLayout);
	}

	public void setRelationLayout() {
		RelativeLayout rl = new RelativeLayout(this);
		Button btn1 = new Button(this);
		btn1.setText("----------1------------");
		btn1.setId(1);
		RelativeLayout.LayoutParams lp1 = new RelativeLayout.LayoutParams(
				ViewGroup.LayoutParams.WRAP_CONTENT,
				ViewGroup.LayoutParams.WRAP_CONTENT);

		lp1.addRule(RelativeLayout.ALIGN_PARENT_TOP);
		lp1.addRule(RelativeLayout.CENTER_HORIZONTAL, RelativeLayout.TRUE);
		// btn1 位于父 View 的顶部,在父 View 中水平居中
		rl.addView(btn1, lp1);

		Button btn2 = new Button(this);
		btn2.setText("|\n|\n2\n|\n|\n|");
		btn2.setId(2);
		RelativeLayout.LayoutParams lp2 = new RelativeLayout.LayoutParams(
				ViewGroup.LayoutParams.WRAP_CONTENT,
				ViewGroup.LayoutParams.WRAP_CONTENT);
		lp2.addRule(RelativeLayout.BELOW, 1);
		lp2.addRule(RelativeLayout.ALIGN_LEFT, 1);
		// btn2 位于 btn1 的下方、其左边和 btn1 的左边对齐
		rl.addView(btn2, lp2);

		Button btn3 = new Button(this);
		btn3.setText("|\n|\n3\n|\n|\n|");
		btn3.setId(3);
		RelativeLayout.LayoutParams lp3 = new RelativeLayout.LayoutParams(
				ViewGroup.LayoutParams.WRAP_CONTENT,
				ViewGroup.LayoutParams.WRAP_CONTENT);
		lp3.addRule(RelativeLayout.BELOW, 1);
		lp3.addRule(RelativeLayout.RIGHT_OF, 2);
		lp3.addRule(RelativeLayout.ALIGN_RIGHT, 1);
		// btn3 位于 btn1 的下方、btn2 的右方且其右边和 btn1 的右边对齐(要扩充)
		rl.addView(btn3, lp3);

		Button btn4 = new Button(this);
		btn4.setText("-----------------4--------------");
		btn4.setId(4);
		RelativeLayout.LayoutParams lp4 = new RelativeLayout.LayoutParams(
				ViewGroup.LayoutParams.WRAP_CONTENT,
				ViewGroup.LayoutParams.WRAP_CONTENT);
		lp4.addRule(RelativeLayout.BELOW, 2);
		lp4.addRule(RelativeLayout.CENTER_HORIZONTAL, RelativeLayout.TRUE);
		// btn4 位于 btn2 的下方,在父Veiw中水平居中
		rl.addView(btn4, lp4);

		setContentView(rl);
	}
}</span>
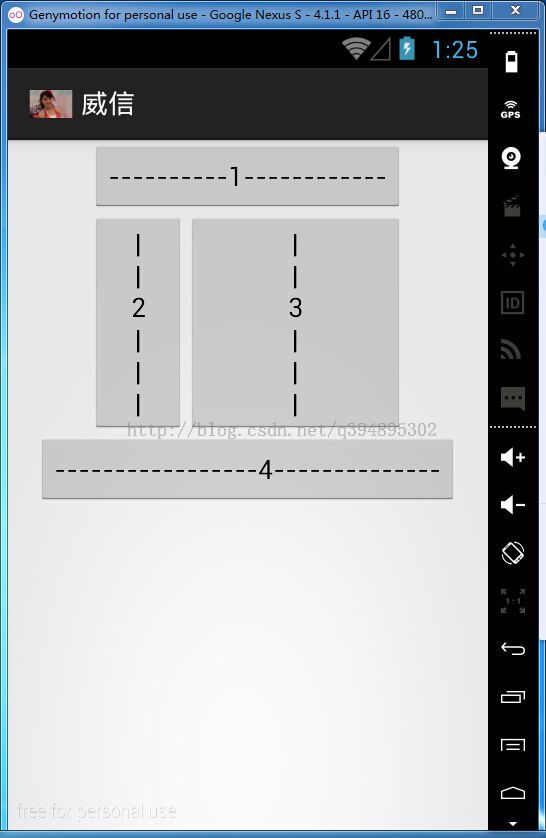
其效果如下图:
同样的效果同xml完成代码如下:
<span style="font-size:18px;"><?xml version="1.0" encoding="utf-8"?>
<RelativeLayout xmlns:android="http://schemas.android.com/apk/res/android"
    android:layout_width="match_parent"
    android:layout_height="match_parent" >

    <Button
        android:id="@+id/button1"
        android:layout_width="wrap_content"
        android:layout_height="wrap_content"
        android:layout_alignParentTop="true"
        android:layout_centerHorizontal="true"
        android:text="-------1-------" />

    <Button
        android:id="@+id/button2"
        android:layout_width="wrap_content"
        android:layout_height="wrap_content"
        android:layout_alignLeft="@+id/button1"
        android:layout_below="@+id/button1"
        android:text="|\n|\n2\n|\n|\n|" />

    <Button
        android:id="@+id/button3"
        android:layout_width="wrap_content"
        android:layout_height="wrap_content"
        android:layout_alignRight="@id/button1"
        android:layout_below="@id/button1"
        android:layout_toRightOf="@id/button2"
        android:text="|\n|\n3\n|\n|\n|" />

    <Button
        android:id="@+id/button4"
        android:layout_width="wrap_content"
        android:layout_height="wrap_content"
        android:layout_below="@+id/button2"
        android:layout_centerHorizontal="true"
        android:text="----------4--------" />

</RelativeLayout>
</span>
对比两种方法实现同样的效果,用xml方法写的代码层次分明,更容易看懂。
