Android Design Support Library
Android 5.0 Lollipop曾是在android版本发布中其中一个最重要的版本,在很大程度上是引进了material design。material design是一个新的设计语言,让android developers在ui编写上更加方便。下面将会介绍如何使用material design,但google的人明白这对那些只专注后台兼容性的人是一个挑战。借助android design support library,给程序员们带来了许多重要的materials design组件,兼容android 2.1或者更高。你会使用到如下的一些组件:navigation drawer view,floating action button,floating labels for editing text,snack bar,tabs,和一个结合motion、scroll的框架将他们连接在一起。
下面的例子的代码在
git clone https://github.com/LxxCaroline/SampleApplication.git
在该工程下supportSample的模块中。
1. Navigation View
导航抽屉(navigation drawer)是一个重要的组件,它可以让你更方便的撰写app的导航菜单,navigation view中的items可以从menu资源中获取。
可以在android.support.v4.widget.DrawerLayout中使用navigation view当菜单
<android.support.v4.widget.DrawerLayout xmlns:android="http://schemas.android.com/apk/res/android"
    xmlns:app="http://schemas.android.com/apk/res-auto"
    android:id="@+id/drawer_layout"
    android:layout_width="match_parent"
    android:layout_height="match_parent"
    android:fitsSystemWindows="true">

    <include layout="@layout/view_content" />


    <android.support.design.widget.NavigationView
        android:id="@+id/navigation"
        android:layout_width="250dp"
        android:layout_height="match_parent"
        android:layout_gravity="start"
        app:headerLayout="@layout/nav_header"
        app:itemTextColor="#000"
        app:menu="@menu/menu_main" />
</android.support.v4.widget.DrawerLayout>
需要注意几个属性:
1.app:headerLayout:该属性(可选)控制菜单的头部,也就是上图中紫色的部分
2.app:menu:该属性控制菜单栏下面的导航items,也就是上图中看到的home, message, friend, discussion。
3.app:itemTextColor:该属性控制导航items的文字颜色,还有类似的itemTextAppearance等。
最简单的菜单栏可以有以下的内容
<group android:checkableBehavior="single">
    <item
        android:id="@+id/navigation_item_1"
        android:checked="true"
        android:icon="@drawable/ic_android"
        android:title="@string/navigation_item_1"/>
    <item
        android:id="@+id/navigation_item_2"
        android:icon="@drawable/ic_android"
        android:title="@string/navigation_item_2"/>
</group>
被选中的item将会高亮显示在菜单栏中,当然你也可以有子菜单,分隔开不同组的items
<item
    android:id="@+id/navigation_subheader"
    android:title="@string/navigation_subheader">
    <menu>
        <item
            android:id="@+id/navigation_sub_item_1"
            android:icon="@drawable/ic_android"
            android:title="@string/navigation_sub_item_1"/>
        <item
            android:id="@+id/navigation_sub_item_2"
            android:icon="@drawable/ic_android"
            android:title="@string/navigation_sub_item_2"/>
    </menu>
</item>
接下来是监听菜单栏items的监听事件onNavigationItemSelectedListener,监听器中会告诉你哪一个item被点击了,在点击事件中可以执行一些操作,例如改变选中的状态,加载新的页面等。
2.Floating Labels for editing text
在material design中连最普通的EditText也有改善。当该输入框还没有焦点时会正常显示hint在输入框中,当获得焦点时,hint会以动画的形式显示在输入框的上方,一致保持可见的状态,让hint成为一个floating label。
<android.support.design.widget.TextInputLayout
        android:layout_width="match_parent"
        android:layout_height="wrap_content">

        <EditText
              android:layout_width="match_parent"
              android:layout_height="wrap_content"
              android:hint="Username" />
</android.support.design.widget.TextInputLayout>
这里需要介绍他的一些属性
android.support.design:counterEnabled="true"
android.support.design:counterTextAppearance="@style/counterText“
android.support.design:counterOverflowTextAppearance="@style/counterOverride"
android.support.design:counterMaxLength="10“
android.support.design:hintAnimationEnabled="true“
android.support.design:errorEnabled="true“ (setError(CharSequence))
android:hint=“MyCustomHint“
1.counterEnabled:textInputLayout支持对当前输入的字符进行计数,当将该开关打开,则会自动计数
2.counterTextAppearance:该属性是用于设置计数文案的appearance,可以再styles.xml中写出你想要的效果,这里我只是简单的设置了textColor
3.counterOverflowTextAppearance:这个属性需要搭配counterMaxLength混合使用,当我设置counterMaxLength为10的时候,如果当前字符超出了10,则设置当前count的文案appearance,此时hint的文案也会跟随着count变动。
4.counterMaxLength:该属性是用于设置counter的最大值
5.hintAnimationEnabled:随着焦点的移动,hint文案会动画显示,当焦点在edittext的时候,hint会自动缩小动画过渡至左上方,当焦点消失时,hint会自动变大动画过渡至Edittext内。如果将该属性设为false,则动画关闭,hint文案会较突兀的从左上方移至Edittext内。
6.errorEnabled:TextInputLayout支持错误信息,例如当获取Edittext内容为空时,可以让其显示错误信息。只用将开关打开,并在代码中调用setError("your custom error hint")即可。
7.android:hint:这个参数和Edittext类似。在TextInputLayout有个浮动的label,该label是设置提示语的,如果没有给TextInputLayout设置该属性的话,则会去Edittext中获取hint,如果Edittext中也没有的话,该label不显示。如果Edittext中有的话,则该label显示Edittext的hint。如果Edittext中有该属性,并且TextInputLayout也有该属性的话,则TextInputLayout的属性优先有效,显示在label的地方,而Edittext的hint显示在输入框内。
看下效果
另外需要注意的是,引用上述属性时(除hint外),前缀都是android.support.design,通过xmlns:android.support.design="http://schemas.android.com/apk/res-auto"
不要用xmlns:android.support.design="http://schemas.android.com/tools"
3. Floating Action Button
悬浮按钮是一个圆形的按钮,接受界面上的点击事件,这和普通的button没有什么区别,用法一致。
google提供了该button的两种大小,分别为normal和mini,,你可以通过app:fabSize=""来设置,当然你也可以通过layout_width和layout_height来设置。
该按钮继承自ImageView,所以你可以用属性src来设置显示图片。
4.SnackBar
在snack bar还没出现之前,我们都是用toast来与用户进行沟通,现在提供了一种新的交互方式---snack bar。这是一个轻量级的,并且可以用户可以通过点击的方式快速响应。snack bar显示在屏幕的底部,它包括一个显示text(主要内容)的和一个提供点击的text,在一定的时间过后,该snack bar就会消失,和toast一样。当然你也可以将它滑出界面。
Snackbar
  .make(parentLayout, R.string.snackbar_text, Snackbar.LENGTH_LONG)
  .setAction(R.string.snackbar_action, myOnClickListener)
  .show(); // Don’t forget to show!
<?xml version="1.0" encoding="utf-8"?>
<LinearLayout xmlns:android="http://schemas.android.com/apk/res/android"
    android:layout_width="match_parent"
    android:layout_height="match_parent"
    xmlns:app="http://schemas.android.com/apk/res-auto"
    android:orientation="vertical">

    <android.support.design.widget.TabLayout
        android:id="@+id/tab_layout"
        android:layout_width="match_parent"
        app:tabMode="scrollable"
        app:tabSelectedTextColor="#FF00FF00"
        android:layout_height="wrap_content" />

    <android.support.v4.view.ViewPager
        android:id="@+id/view_pager"
        android:layout_width="match_parent"
        android:layout_height="match_parent" />

</LinearLayout>
TabLayout tabLayout = ...;
tabLayout.addTab(tabLayout.newTab().setText("Tab 1"));
mTabLayout = (TabLayout) findViewById(R.id.tab_layout);
mViewPager = (ViewPager) findViewById(R.id.view_pager);
final PagerAdapter adapter = new PagerAdapter() {
    @Override
    public int getCount() {
        //设置总共有几个tab
        return 10;
    }

    @Override
    public boolean isViewFromObject(View view, Object object) {
        return view == object;
    }

    @Override
    public CharSequence getPageTitle(int position) {
        //指定对应position的tab的名字,显示在tab上的title文字
        return "tab" + position;
    }

    //初始化每个tab内容的页面,需要根据不同位置来加载不同的页面
    @Override
    public Object instantiateItem(ViewGroup container, int position) {
        TextView tv = new TextView(SecondActivity.this);
        tv.setText("tv" + position);
        tv.setTextSize(30.f);
        container.addView(tv);
        return tv;
    }

    //必须实现该函数,否则在左右滑动的时候会抛出异常说该函数未实现
    @Override
    public void destroyItem(ViewGroup container, int position, Object object) {
        ((ViewPager) container).removeView((View) object);
    }
};
mViewPager.setAdapter(adapter);
//将TabLayout和ViewPager连接起来
mTabLayout.setupWithViewPager(mViewPager);
- instantiateItem(ViewGroup, int)
- destroyItem(ViewGroup,int,Object)
- getCount()
- isViewFromObject(View, Object)
PagerAdapter与AdapterViews所使用的适配器相比,功能会更多。AdapterViews所使用的适配器直接提供一套View的回收机制,而PagerAdapter却提供了在View更新过程中每一个步骤所对应的回调函数。PagerAdapter可以按照需要自定义View的回收机制或者使用一套更加复杂的用来管理page view的方法,比如说可以将Fragment的管理机制用于page view的管理机制当中。
ViewPager不是直接与Views关联而是与一个key对象关联起来。这个key对象用来记录并且在这个适配器中唯一地标示某个页面。而这个唯一性与页面所处的位置无关。如果ViewPager的页面内容改变,那么系统就会调用这个ViewPager所对应的PagerAdapter的startUpdate(ViewGroup)方法。之后,系统会根据页面中的内容,调用若干次instantiateItem(ViewGroup, int) 或者destroyItem(ViewGroup, int, Object)方法,最后,在这次更新结束之前,系统会调用 finishUpdate(ViewGroup)方法。在finishUpdate结束之前 , instantiateItem和 destroyItem方法会分别完成将key objects所对应的view对象加载到其父ViewGroup中和删除之。而isViewFromObject(View, Object)方法可以用于判断某个view是否对应某个key对象。其中,我们可以简单地将Page Views本身作为key objects,我们可以在instantiateItem(ViewGroup, int)中创建view对象和将这个对象添加到父ViewGroup中,并且最后将这个view对象作为这个方法的返回值。同样地,destroyItem(ViewGroup, int, Object)也可以类似操作。相对于地,isViewFromObject(View, Object) 可以这样子实现:
return view == object;.
PagerAdapter支持数据集更新。其中,Data set改变必须要发生在主线程中,并且最后必须要调用notifyDataSetChanged()方法。这点与AdapterView adapters很相似。数据集的改变,可以实时地更新页面。假如,PagerAdapter实现了getItemPosition(Object)方法,那么ViewPager可以保持当前的页面处于状态。
CoordinatorLayout rootLayout = (CoordinatorLayout) findViewById(R.id.coordinator_layout);

FloatingActionButton fabBtn = (FloatingActionButton) findViewById(R.id.fabBtn);
fabBtn.setOnClickListener(new View.OnClickListener() {
    @Override
    public void onClick(View v) {
        Snackbar.make(rootLayout, "Hello. I am Snackbar!", Snackbar.LENGTH_SHORT)
                .setAction("Undo", new View.OnClickListener() {
                    @Override
                    public void onClick(View v) {
                    }
                })
                .show();
    }
});
<?xml version="1.0" encoding="utf-8"?>
<android.support.design.widget.CoordinatorLayout xmlns:android="http://schemas.android.com/apk/res/android"
    xmlns:app="http://schemas.android.com/apk/res-auto"
    android:id="@+id/coordinator_layout"
    android:layout_width="match_parent"
    android:layout_height="match_parent"
    android:orientation="vertical">

    <android.support.design.widget.FloatingActionButton
        android:id="@+id/fabBtn"
        android:layout_width="wrap_content"
        android:layout_height="wrap_content"
        android:layout_gravity="bottom|right"
        android:layout_marginBottom="7dp"
        android:layout_marginRight="7dp"
        android:src="@drawable/ic_plus"
        app:borderWidth="0dp"
        app:fabSize="normal" />

</android.support.design.widget.CoordinatorLayout>
我们只需要写这么点代码就可以实现视频中的效果了。那些动态的效果完全由coordinatorLayout来完成。
接下来讲下CoordinatorLayout其他方面的用处,首先来看下该效果,点击这里
只要你想实现该动态滑动的效果,tool Bar和app Bar动态收拢和展开的效果前提是该页面有滑动的操作,如果该页面只是单纯显示自然不会有该效果,这点是需要读者注意的,刚开始写了个demo,发现根本没效果,那是因为我的页面只有个按钮,怎么滑,当然不会出现该效果了,我也是真是傻到家了。。。。。
<?xml version="1.0" encoding="utf-8"?>
<android.support.design.widget.CoordinatorLayout xmlns:android="http://schemas.android.com/apk/res/android"
    xmlns:app="http://schemas.android.com/apk/res-auto"
    android:layout_width="match_parent"
    android:layout_height="match_parent"
    android:orientation="vertical">

    <!--  Your Scrollable View-->
    <android.support.v7.widget.RecyclerView
        android:id="@+id/lv"
        android:layout_width="match_parent"
        android:layout_height="match_parent"
        app:layout_behavior="@string/appbar_scrolling_view_behavior" />

    <android.support.design.widget.AppBarLayout
        android:id="@+id/appbar_layout"
        android:layout_width="match_parent"
        android:layout_height="256dp"
        android:theme="@style/ThemeOverlay.AppCompat.Dark.ActionBar">

        <android.support.v7.widget.Toolbar
            android:id="@+id/toolbar"
            android:layout_width="match_parent"
            android:layout_height="56dp"
            android:layout_gravity="top"
            app:layout_collapseMode="pin"
            app:layout_scrollFlags="scroll|enterAlways"
            app:popupTheme="@style/ThemeOverlay.AppCompat.Light"
            app:theme="@style/ThemeOverlay.AppCompat.Dark.ActionBar" />

        <ImageView
            android:layout_width="match_parent"
            android:layout_height="wrap_content"
            android:scaleType="centerCrop"
            android:src="@drawable/header"
            app:layout_collapseMode="parallax"
            app:layout_collapseParallaxMultiplier="0.7"
            app:layout_scrollFlags="scroll|enterAlways" />

    </android.support.design.widget.AppBarLayout>

</android.support.design.widget.CoordinatorLayout>
在MainActivity中只要填充RecyclerView的内容即可,这里不再介绍。请细看xml中的代码,最顶上的layout使用了CoordinatorLayout,AppBarLayout是用来显示滑动收缩展开的效果的工具。看里面的有些属性
- scroll:任何想要被滑动移除屏幕的话都要使用该属性,也就是说你想要达到视频中的效果都要添加改属性。那些没有使用该属性的view在滑动时将会被固定在屏幕的顶端。
- enterAlways:该标志位表示当该view被滑入页面时,会先展开全部。比如说一个页面上上面显示ImageView和ToolBar,下面显示了RecyclerView,刚开始先将ImageView和ToolBar滑出页面,此时再将ImageView和ToolBar滑入,你看到的效果是先将ImageView和ToolBar拉入,这时RecyclerView才会有相应的滑动,看到其他不可见的Item。
- enterAlwaysCollapsed:这个参数和上面那个参数的唯一区别是,当ImageView和ToolBar滑入时,不会全部显示,而是先显示预先定义的一个宽度,当你松手后,再次滑入,该ImageView和ToolBar才会完全展开。也就是说当你滑入ImageView和ToolBar,并想要完全显示的话,需要滑动两次。
- exitUntilCollapsed:当一个view被收起完毕时,会认为该view已退出。
app:layout_behavior="@string/appbar_scrolling_view_behavior"如果你将该句代码从RecyclerView中去掉,RecyclerView会放置在AppBarLayout视图层的下面,也就是说RecyclerView被AppBarLayout挡住了,如果只有加上该句话,RecyclerView就会显示在该AppBarLayout的下面,能够完全显示出来。
<?xml version="1.0" encoding="utf-8"?>
<android.support.design.widget.CoordinatorLayout xmlns:android="http://schemas.android.com/apk/res/android"
    xmlns:app="http://schemas.android.com/apk/res-auto"
    android:layout_width="match_parent"
    android:layout_height="match_parent"
    android:orientation="vertical">

    <!--  Your Scrollable View-->
    <android.support.v7.widget.RecyclerView
        android:id="@+id/lv"
        android:layout_width="match_parent"
        android:layout_height="match_parent"
        app:layout_behavior="@string/appbar_scrolling_view_behavior"
         />

    <android.support.design.widget.AppBarLayout
        android:id="@+id/appbar_layout"
        android:layout_width="match_parent"
        android:layout_height="256dp"
        android:theme="@style/ThemeOverlay.AppCompat.Dark.ActionBar">

        <android.support.design.widget.CollapsingToolbarLayout
            android:layout_width="match_parent"
            android:layout_height="match_parent"
            app:contentScrim="#71f"
            android:id="@+id/collapsingToolbarLayout"
            app:expandedTitleMarginStart="64dp"
            app:layout_scrollFlags="scroll|exitUntilCollapsed">

            <ImageView
                android:layout_width="match_parent"
                android:layout_height="wrap_content"
                android:scaleType="centerCrop"
                android:src="@drawable/header"
                app:layout_collapseMode="parallax"
                app:layout_collapseParallaxMultiplier="0.7"
                app:layout_scrollFlags="scroll|enterAlways" />

            <android.support.v7.widget.Toolbar
                android:id="@+id/toolbar"
                android:layout_width="match_parent"
                android:layout_height="56dp"
                android:layout_gravity="top"
                app:layout_collapseMode="pin"
                app:layout_scrollFlags="scroll|enterAlways"
                app:popupTheme="@style/ThemeOverlay.AppCompat.Light"
                app:theme="@style/ThemeOverlay.AppCompat.Dark.ActionBar" />

        </android.support.design.widget.CollapsingToolbarLayout>

    </android.support.design.widget.AppBarLayout>

</android.support.design.widget.CoordinatorLayout>
需要注意下,CollapsingToolBarLayout是一个FrameLayout,该例子中需要将ToolBar声明在ImageView的后面,否则ToolBar会被遮挡。
CollapsingToolbarLayout collapsingToolbarLayout = (CollapsingToolbarLayout) findViewById(R.id.collapsingToolbarLayout);
collapsingToolbarLayout.setTitle("Design Library");
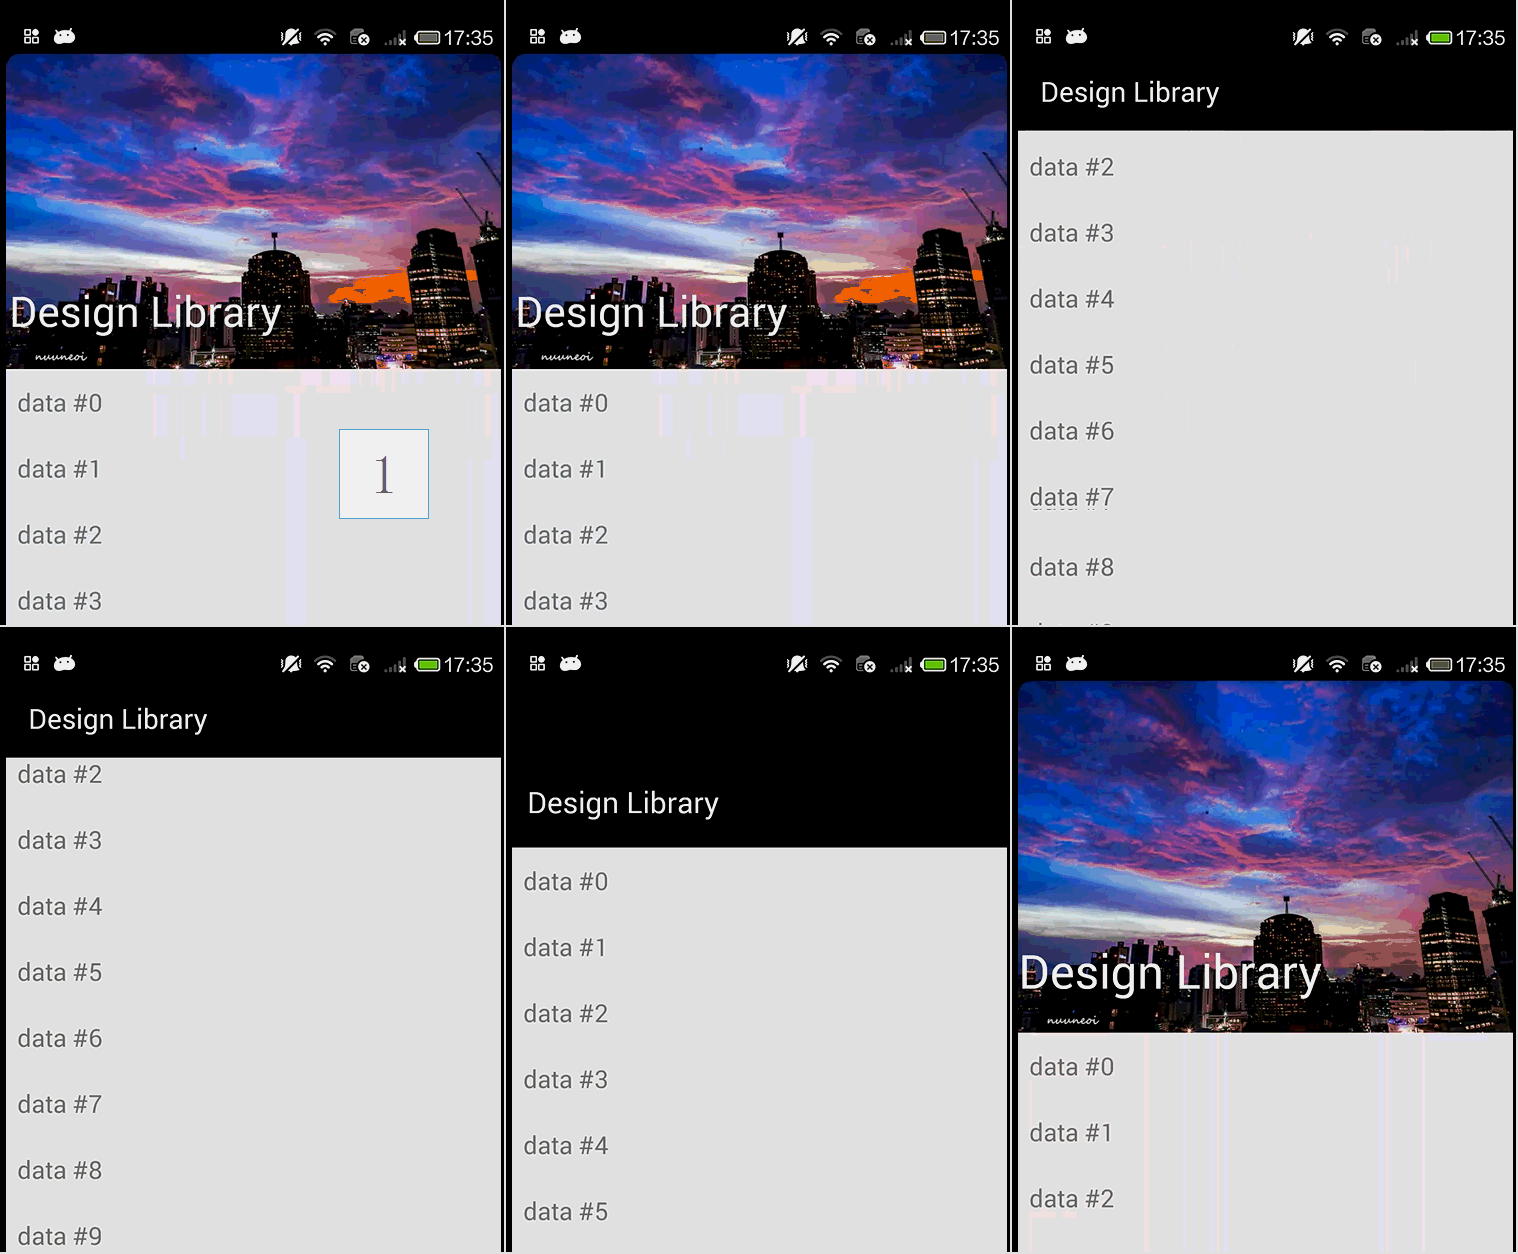
再讲两个参数
- app:expandedTitleMarginStart:该参数标明当CollapsingToolbarLayout展开后,title距离左边的距离
- app:contentScrim:该参数标明当CollapsingToolbarLayout完全收起后显示的颜色
再讲一个参数,在ImageView和ToolBar中
app:layout_collapseMode:该属性有两个值,分别是parallax和pin,先将ImageView中的该属性的值改为pin,看下效果
如果将该属性的值改为parallax的话,效果如下
看出区别了么,如果设为pin,那么图片只是单单的向上拉而已,如果改为parallax的话,图片就是向上卷起,而不是呆呆的向上拉。
而为toolBar设置为pin是为了防止toolBar被滑出页面,想将toolBar固定在顶端。
再讲下视觉系数
app:layout_collapseParallaxMultiplier:该参数与刚刚说到的app:layout_collapseMode参数成对使用,而且app:layout_collapseMode的值必须为parallax才有用。该值设置的是当ImageView收起时,图片的哪一部分做为显示的的部分
举个例子,现在将app:layout_collapseParallaxMultiplier设为1,看下效果
此时图片在收缩的时候,最顶端的图片并未移动,从最下方的图片开始收缩,但上方图片一直显示
再将该值设为0.1,看下效果
在图片收缩时,最下面0.1部分的图片一直显示,上方的图片不断被消失,该值可根据读者喜好设置。


