Corosync + Pacemaker 搭建高可用Httpd服务
实验描述
1.两个测试节点,分别为node5.redhat.com和node6.redhat.com地址分别为172.16.100.5和172.16.100.6
2.集群服务为httpd,利用nfs做共享存储,NFS地址为172.16.0.254,NFS已经共享出了一个/www/htdocs目录并且里面有index.html文件。
3.VIP地址为172.16.100.100
4.两个节点系统全部为CentOS7.2
5.由于本人还需要上班,所以时间紧张,描述的有点马虎,请多见谅。如有错误的地方,还请提出改正。
配置步骤
1.在所有节点安装pcs,并启动相应的pcsd进程
[root@node5 ~]# yum install pcs -y
[root@node5 ~]# systemctl start pcsd.service[root@node6 ~]# yum install pcs -y
[root@node6 ~]# systemctl start pcsd.service
2.给所有节点上的hacluster用户设置一个密码。
[root@node5 ~]# echo “redhat” | passwd �stdin hacluster
[root@node6 ~]# echo “redhat” | passwd �stdin hacluster
3.在一个节点上验证两个节点
[root@node5 ~]# pcs cluster auth node5.redhat.com node6.redhat.com
Username: hacluster
Password:这里输入的密码默认不会显示
node5.redhat.com: Authorized
node6.redhat.com: Authorized
4.将两个节点加入集群
[root@node5 ~]# pcs cluster setup �name mycluster node5.redhat.com node6.redhat.com
添加节点的输出信息
Shutting down pacemaker/corosync services…
Redirecting to /bin/systemctl stop pacemaker.service
Redirecting to /bin/systemctl stop corosync.service
Killing any remaining services…
Removing all cluster configuration files…
node5.redhat.com: Succeeded
node6.redhat.com: Succeeded
Synchronizing pcsd certificates on nodes node5.redhat.com, node6.redhat.com…
node5.redhat.com: Success
node6.redhat.com: SuccessRestaring pcsd on the nodes in order to reload the certificates…
node5.redhat.com: Success*显示添加成功*
node6.redhat.com: Success*显示添加成功*
5.两个节点同时启动corosync和pacemaker进程
[root@node5 ~]# systemctl start corosync.service
[root@node5 ~]# systemctl start pacemaker.service[root@node6 ~]# systemctl start corosync.service
[root@node6 ~]# systemctl start pacemaker.service
6.在两个节点上安装httpd进程并设置为开机启动
root@node5 ~]# yum install httpd -y
systemctl enable httpd.serviceroot@node6 ~]# yum install httpd -y
systemctl enable httpd.service
7.在两个节点上安装nft-utils以实现支持挂载nfs共享
[root@node5 ~]# yum install nfs-utils
[root@node6 ~]# yum install nfs-utils
8.安装crmsh,CentOS7默认不带crmsh,需要去网上下载rpm包,我用的是crmsh-2.2.0-7.1.noarch.rpm和crmsh-scripts-2.2.0-7.1.noarch.rpm、python-parallax-1.0.1-10.1.noarch.rpm
[root@node5 ~]# yum install crmsh-2.2.0-7.1.noarch.rpm crmsh-scripts-2.2.0-7.1.noarch.rpm python-parallax-1.0.1-10.1.noarch.rpm -y
[root@node6 ~]# yum install crmsh-2.2.0-7.1.noarch.rpm crmsh-scripts-2.2.0-7.1.noarch.rpm python-parallax-1.0.1-10.1.noarch.rpm -y
9.利用crmsh配置资源
[root@node5 ~]# crm configure
配置VIP资源
crm(live)configure# primitive webip ocf:heartbeat:IPaddr ip=’172.16.100.100’ op monitor interval=20s timeout=40s配置NFS资源
crm(live)configure# primitive webstore ocf:heartbeat:Filesystem params device=’172.16.0.254:/www/htdocs’ directory=’/var/www/html’ fstype=’nfs’ op start timeout=60s op stop timeout=60s op monitor interval=20s timeout=40s配置WEB资源
crm(live)configure# primitive webserver systemd:httpd op start timeout=60s op stop timeout=60s op monitor interval=20s timeout=60s
因为是两节点集群,需要关闭stonith
crm(live)configure# property stonith-enabled=falsecrm(live)configure# commit
10.设置这三个服务要同时在一个节点上运行,并且启动顺序一定为VIP -> NFS -> httpd
设置三个服务在同一节点上运行有两种方法实现,一种是将所有资源设置到同一个组里面,或者设置排列约束。当然,即设置了组,又定义为了排列约束也是可以的。设置启动顺序那么必须使用顺序约束。
设置组
crm(live)configure# group webservice webip webstore webserver
或排列约束
crm(live)configure# colocation webip_with_webstore inf: webip webstore
crm(live)configure# colocation webstore_with_webserver inf: webstore webserver顺序约束
crm(live)configure# order webip_before_webstore Mandatory: webip webstore
crm(live)configure# order webstore_before_webserver Mandatory: webstore webserver
crm(live)configure# commit
验证配置
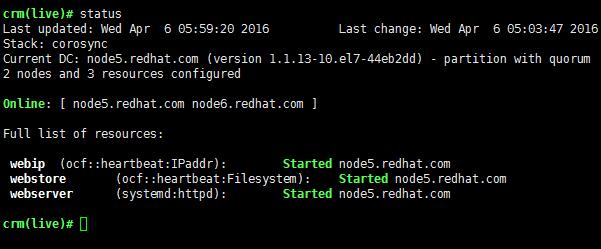
1.首先查看集群状态
crm(live)configure# cd 退出到crmsh的主配置界面
crm(live)#status 输出status查看集群状态一切正常
2.打开浏览器,输入VIP地址进行查看。
测试也是正常的
3.将node5节点设置为standby状态,查看服务是否转移成功。
crm(live)# node standby node5.redhat.com
crm(live)# status
可以看到node服务转移到了node6节点上
4.再次打开浏览器进行测试。
服务依旧正常,这样就实现了我们高可用的目的。


