GCC & ELF文件格式 &linux内核如何加载和启动一个可执行程序
慕课18原创作品转载请注明出处 + 《Linux内核分析》MOOC课程http://mooc.study.163.com/course/USTC-1000029000
背景知识:
一、gcc 编译器常用的命令行参数一览
1. gcc -E source_file.c
-E,只执行到预编译。直接输出预编译结果。
2. gcc -S source_file.c
-S,只执行到源代码到汇编代码的转换,输出汇编代码。
3. gcc -c source_file.c
-c,只执行到编译,输出目标文件。
4. gcc (-E/S/c/) source_file.c -o output_filename
-o, 指定输出文件名,可以配合以上三种标签使用。
-o 参数可以被省略。这种情况下编译器将使用以下默认名称输出:
-E:预编译结果将被输出到标准输出端口(通常是显示器)
-S:生成名为source_file.s的汇编代码
-c:生成名为source_file.o的目标文件。
无标签情况:生成名为a.out的可执行文件。
5. gcc -g source_file.c
-g,生成供调试用的可执行文件,可以在gdb中运行。由于文件中包含了调试信息因此运行效率很低,且文件也大不少。
这里可以用strip命令重新将文件中debug信息删除。这是会发现生成的文件甚至比正常编译的输出更小了,这是因为strip把原先正常编译中的一些额 外信息(如函数名之类)也删除了。用法为 strip a.out
6. gcc -s source_file.c
-s, 直接生成与运用strip同样效果的可执行文件(删除了所有符号信息)。
7. gcc -O source_file.c
-O(大写的字母O),编译器对代码进行自动优化编译,输出效率更高的可执行文件。
-O 后面还可以跟上数字指定优化级别,如:
gcc -O2 source_file.c
数字越大,越加优化。但是通常情况下,自动的东西都不是太聪明,太大的优化级别可能会使生成的文件产生一系列的bug。一般可选择2;3会有一定风险。
8. gcc -Wall source_file.c
-W,在编译中开启一些额外的警告(warning)信息。-Wall,将所有的警告信息全开。
9. gcc source_file.c -L/path/to/lib -lxxx -I/path/to/include
-l, 指定所使用到的函数库,本例中链接器会尝试链接名为libxxx.a的函数库。
-L,指定函数库所在的文件夹,本例中链接器会尝试搜索/path/to/lib文件夹。
-I, 指定头文件所在的文件夹,本例中预编译器会尝试搜索/path/to/include文件夹。
在终端中输入:gcc --help可得到更多信息(也可以通过man gcc 或 info gcc )
Usage: gcc [options] file...
Options:
-pass-exit-codes Exit with highest error code from a phase
--help Display this information
--target-help Display target specific command line options
--help={target|optimizers|warnings|params|[^]{joined|separate|undocumented}}[,...]
Display specific types of command line options
(Use '-v --help' to display command line options of sub-processes)
--version Display compiler version information
-dumpspecs Display all of the built in spec strings
-dumpversion Display the version of the compiler
-dumpmachine Display the compiler's target processor
-print-search-dirs Display the directories in the compiler's search path
-print-libgcc-file-name Display the name of the compiler's companion library
-print-file-name=<lib> Display the full path to library <lib>
-print-prog-name=<prog> Display the full path to compiler component <prog>
-print-multi-directory Display the root directory for versions of libgcc
-print-multi-lib Display the mapping between command line options and
multiple library search directories
-print-multi-os-directory Display the relative path to OS libraries
-print-sysroot Display the target libraries directory
-print-sysroot-headers-suffix Display the sysroot suffix used to find headers
-Wa,<options> Pass comma-separated <options> on to the assembler
-Wp,<options> Pass comma-separated <options> on to the preprocessor
-Wl,<options> Pass comma-separated <options> on to the linker
-Xassembler <arg> Pass <arg> on to the assembler
-Xpreprocessor <arg> Pass <arg> on to the preprocessor
-Xlinker <arg> Pass <arg> on to the linker
-combine Pass multiple source files to compiler at once
-save-temps Do not delete intermediate files
-pipe Use pipes rather than intermediate files
-time Time the execution of each subprocess
-specs=<file> Override built-in specs with the contents of <file>
-std=<standard> Assume that the input sources are for <standard>
--sysroot=<directory> Use <directory> as the root directory for headers
and libraries
-B <directory> Add <directory> to the compiler's search paths
-b <machine> Run gcc for target <machine>, if installed
-V <version> Run gcc version number <version>, if installed
-v Display the programs invoked by the compiler
-### Like -v but options quoted and commands not executed
-E Preprocess only; do not compile, assemble or link
-S Compile only; do not assemble or link
-c Compile and assemble, but do not link
-o <file> Place the output into <file>
-x <language> Specify the language of the following input files
Permissible languages include: c c++ assembler none
'none' means revert to the default behavior of
guessing the language based on the file's extension
Options starting with -g, -f, -m, -O, -W, or --param are automatically
passed on to the various sub-processes invoked by gcc. In order to pass
other options on to these processes the -W<letter> options must be used.
二、ELF文件的格式
ELF( executable and linking format)是一种对象文件的格式,用于定义不同类型的对象文件(Object Files)中都放了什么东西,以及都已什么样的格式去放这些东西。
可以通过readelf 命令来获取一个ELF的格式 (更多内容可参考一篇博文http://www.360doc.com/content/11/0826/13/7588214_143424472.shtml)
Usage: readelf <option(s)> elf-file(s)
Display information about the contents of ELF format files
Options are:
-a --all Equivalent to: -h -l -S -s -r -d -V -A -I
-h --file-header Display the ELF file header
-l --program-headers Display the program headers
--segments An alias for --program-headers
-S --section-headers Display the sections' header
--sections An alias for --section-headers
-g --section-groups Display the section groups
-t --section-details Display the section details
-e --headers Equivalent to: -h -l -S
-s --syms Display the symbol table
--symbols An alias for --syms
-n --notes Display the core notes (if present)
-r --relocs Display the relocations (if present)
-u --unwind Display the unwind info (if present)
-d --dynamic Display the dynamic section (if present)
-V --version-info Display the version sections (if present)
-A --arch-specific Display architecture specific information (if any).
-c --archive-index Display the symbol/file index in an archive
-D --use-dynamic Use the dynamic section info when displaying symbols
-x --hex-dump=<number|name>
Dump the contents of section <number|name> as bytes
-p --string-dump=<number|name>
Dump the contents of section <number|name> as strings
-R --relocated-dump=<number|name>
Dump the contents of section <number|name> as relocated bytes
-w[lLiaprmfFsoR] or
--debug-dump[=rawline,=decodedline,=info,=abbrev,=pubnames,=aranges,=macro,=frames,=str,=loc,=Ranges]
Display the contents of DWARF2 debug sections
-I --histogram Display histogram of bucket list lengths
-W --wide Allow output width to exceed 80 characters
@<file> Read options from <file>
-H --help Display this information
-v --version Display the version number of readelf
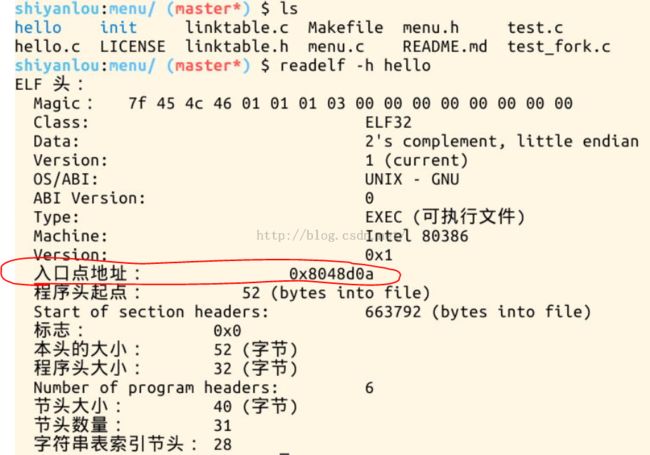
下面举个例子:readelf -h a.out (-h 表示得到可执行文件的文件头)
entry point address表示执行文件时第一条指令的入口地址
三、exec函数族
在Linux中,并不存在exec()函数,exec指的是一组函数,一共有6个,分别是:
#include <unistd.h>
extern char **environ;
int execl(const char *path, const char *arg, ...);
int execlp(const char *file, const char *arg, ...);
int execle(const char *path, const char *arg, ..., char * const envp[]);
int execv(const char *path, char *const argv[]);
int execvp(const char *file, char *const argv[]);
int execve(const char *path, char *const argv[], char *const envp[]);
其中只有execve是真正意义上的系统调用,其它都是在此基础上经过包装的库函数。
exec函数族的作用是根据指定的文件名找到可执行文件,并用它来取代调用进程的内容,换句话说,就是在调用进程内部执行一个可执行文件。这里的可执行文件既可以是二进制文件,也可以是任何Linux下可执行的脚本文件。
函数名与参数的关系:
细看一下,这6个函数都是以exec开头(表示属于exec函数族),前3个函数接着字母l的,后3个接着字母v的,我的理解是l表示list(列举参数),v表示vector(参数向量表)
。它们的区别在于,
execv开头的函数是以"char *argv[]"(vector)形式传递命令行参数,而execl开头的函数采用了罗列(list)的方式,把参数一个一个列出来,然后以一个NULL表示结束
。这里的NULL的作用和argv数组里的NULL作用是一样的。
字母p是指在环境变量PATH的目录里去查找要执行的可执行文件。2个以p结尾的函数execlp和execvp,看起来,和execl与execv的差别很小,事实也如此,它们的区别从第一个参数名可以看出:除 execlp和execvp之外的4个函数都要求,它们的第1个参数path必须是一个完整的路径,如"/bin/ls";而execlp和execvp 的第1个参数file可以仅仅只是一个文件名,如"ls",这两个函数可以自动到环境变量PATH指定的目录里去查找(这样的话我们编译的可执行文件就必须放到系统环境变量所对应的目录中才能运行)。
字母e是指给可执行文件指定环境变量。在全部6个函数中,只有execle和execve使用了char *envp[]传递环境变量,其它的4个函数都没有这个参数,这并不意味着它们不传递环境变量,这4个函数将把默认的环境变量不做任何修改地传给被执行的应用程序。而execle和execve用指定的环境变量去替代默认的那些。
返回值:
与一般情况不同,exec函数族的函数执行成功后不会返回,因为调用进程的实体,包括代码段,数据段和堆栈等都已经被新的内容取代,只有进程ID等一些表面上的信息仍保持原样。调用失败时,会设置errno并返回-1,然后从原程序的调用点接着往下执行。
与其他系统调用比起来,exec很容易失败,被执行文件的位置,权限等很多因素都能导致调用失败。因此,使用exec函数族时,一定要加错误判断语句。最常见的错误:
找不到文件或路径,此时errno被设置为ENOENT;
数组argv和envp忘记用NULL结束,此时errno被设置为EFAULT;
没有对要执行文件的运行权限,此时errno被设置为EACCES。
2、应用
如果一个进程想执行另一个程序,它就可以fork或vfork出一个新进程,然后调用任何一个exec函数。
为此,Linux还专门对fork作了优化:通常fork会将调用进程的所有内容原封不动的拷贝到新产生的子进程中去,这些拷贝的动作很消耗时 间,而如果fork完之后我们马上就调用exec,那这些辛辛苦苦拷贝来的东西就会被立刻抹掉,这看起来非常不划算,于是人们设计了一种"写时复制(copy-on-write)" 技术,使得fork结束后并不立刻复制父进程的内容到子进程,而是到了真正使用时才复制,这样如果下一条语句是exec,它就不会作无用功了。其实"写时 复制"还是有复制,进程的mm结构、页表都还是被复制了("写时复制"也必须由这些信息来支撑。否则内核捕捉到CPU访存异常,怎么区分 这是“写时复制”引起的,还是真正的越权访问呢?)。
而vfork就把事情做绝了,所有有关于内存的东西都不复制了,父子进程的内存是完全共享的。 但是这样一来又有问题了,虽然用户程序可以设计很多方法来避免父子进程间的访存冲突。但是关键的一点,父子进程共用着栈,这可不由用户程序控制的。一个进 程进行了关于函数调用或返回的操作,则另一个进程的调用栈 (实际上就是同一个栈)也被影响了。这样的程序没法运行下去。所以,vfork有个限制,子进程生成后,父进程在vfork中被内核挂起,直到子进程有了 自己的内存空间(exec**)或退出(_exit)。并且, 在此之前,子进程不能从调用vfork的函数中返回(同时,不能修改栈上变量、不能继续调用除_exit或exec系列之外的函数,否则父进程的数据可能被改写)。
四、库文件的制作与使用
1、静态库文件的制作:
gcc -c files.c 得到files.o 将源文件编译成可连接的目标文件。
ar -rc libtarget
.a files
.o //将目标文件打包成静态库文件。 target 为库文件名,前面打包时前面必须加上lib
2、静态库文件的使用:
gcc -o main main.o -ltarget
注意点:(1) -l 后面跟的是库名 没有lib也没有.a 的后缀
(2) -ltarget 必须放在 main.o 的后面,main.o 为我们要编译的文件也就是调用库文件的文件。
3、动态库文件(共享库)的制作:
gcc -fpic -shared-olibtarget.so myalib.c
4、动态库文件的使用:
gcc -o main main.c -L./ mylib.so //
注意要加上动态链接库的搜索路径,否则编译器只会到系统路径中去寻找。
关于linux中库文件的更多详细内容请查看:http://blog.csdn.net/clp_csdnid/article/details/51106934
五、execve系统调用内核处理函数sys_execve的运行分析:(内核源码为3.18版源码)
1、execve的定义:
SYSCALL_DEFINE3(execve,
		const char __user *, filename,
		const char __user *const __user *, argv,
		const char __user *const __user *, envp)
{
	return do_execve(getname(filename), argv, envp);
}
可以看到在系统调用execve的定义中,设置了三个参数:将要执行的可执行文件的文件名;指向参数表的指针;环境变量。在函数体中直接转去执行内核函数 do_execve(),
2、内核函数do_execve()的定义:
int do_execve(struct filename *filename,
	const char __user *const __user *__argv,
	const char __user *const __user *__envp)
{
	struct user_arg_ptr argv = { .ptr.native = __argv };
	struct user_arg_ptr envp = { .ptr.native = __envp };
	return do_execve_common(filename, argv, envp);
}
从代码可以看出,在do_execve()中将execve传递过来的向量表中的变量接收到了user_arg_ptr结构体变量argv和envp中然后又去调用了内核函数do_execve_common()
3、内核函数do_execve_common()的定义:
static int do_execve_common(struct filename *filename,
				struct user_arg_ptr argv,
				struct user_arg_ptr envp)
{
	struct linux_binprm *bprm; //这个结构体用于保存加载二进制文件时的一些参数
	struct file *file;	    //文件指针
	struct files_struct *displaced; //open file table structure
	int retval;//返回值
参数检查:
	if (IS_ERR(filename))
		return PTR_ERR(filename);/*We move the actual failure in case of RLIMIT_NPROC excess from set*uid() to execve()
because too many poorly written programs don't check setuid() return code.
Here we additionally recheck whether NPROC limit is still exceeded.*/
if ((current->flags & PF_NPROC_EXCEEDED) && atomic_read(¤t_user()->processes) > rlimit(RLIMIT_NPROC)) {
retval = -EAGAIN;
goto out_ret;
}
/* We're below the limit (still or again), so we don't want to make further execve() calls fail. */
 current->flags &= ~PF_NPROC_EXCEEDED; //#define PF_NPROC_EXCEEDED 0x00001000 /* set_user noticed that RLIMIT_NPROC was exceeded */
	retval = unshare_files(&displaced);// 不共享文件,将文件重新复制一份 if (retval)
		goto out_ret;
	retval = -ENOMEM;
	bprm = kzalloc(sizeof(*bprm), GFP_KERNEL); 分配内存,GFP_KERNEL表示分配的内存类型为:普通的内核ram
	if (!bprm)
		goto out_files;
	retval = prepare_bprm_creds(bprm);  准备凭证
	if (retval)
		goto out_free;
	check_unsafe_exec(bprm);  //determine how safe it is to execute the proposed program
	current->in_execve = 1;
 file = do_open_exec(filename);  打开将要运行的文件:1、判断文件是否可执行 2、标记文件已经被打开 3、禁止对文件写入
	retval = PTR_ERR(file);
	if (IS_ERR(file))
		goto out_unmark;
	sched_exec();    //分配cpu
	bprm->file = file;
	bprm->filename = bprm->interp = filename->name;
 retval = bprm_mm_init(bprm);   //初始化内存单元 if (retval) goto out_unmark; bprm->argc = count(argv, MAX_ARG_STRINGS);// 统计参数个数 并做简单的检查  if ((retval = bprm->argc) < 0) goto out; bprm->envc = count(envp, MAX_ARG_STRINGS);  //统计环境变量的个数,并做简单检查
 if ((retval = bprm->envc) < 0) goto out; retval = prepare_binprm(bprm);// -> int cap_bprm_set_creds(struct linux_binprm *bprm)(链接)准备被二进制文件运行的凭证
	if (retval < 0)
		goto out;
复制参数:
	retval = copy_strings_kernel(1, &bprm->filename, bprm);
	if (retval < 0)
		goto out;
	bprm->exec = bprm->p;
	retval = copy_strings(bprm->envc, envp, bprm);
	if (retval < 0)
		goto out;
	retval = copy_strings(bprm->argc, argv, bprm);
	if (retval < 0)
		goto out;
  retval = exec_binprm(bprm); //==>search_binary_handler() 遍历二进制文件处理工具链表,找到解析该二进制文件的handler,并初始化 if (retval < 0) goto out;
/* execve succeeded */
	current->fs->in_exec = 0;
	current->in_execve = 0; // Tell the LSMs that the process is doing an execve */
	acct_update_integrals(current); // 更task_struct中完整的内存管理单元区域,根据可执行文件的文件的inode. //释放资源
task_numa_free(current);
free_bprm(bprm);
putname(filename);if (displaced)put_files_struct(displaced);return retval;出错处理: out: if (bprm->mm) { acct_arg_size(bprm, 0); mmput(bprm->mm); } out_unmark: current->fs->in_exec = 0; current->in_execve = 0; out_free: free_bprm(bprm); out_files: if (displaced) reset_files_struct(displaced); out_ret: putname(filename); return retval; }
3、search_binary_handler()函数的定义:
exec_binprm()函数中有调用了search_binary_handler()函数:
int search_binary_handler(struct linux_binprm *bprm)
1353{
1354	bool need_retry = IS_ENABLED(CONFIG_MODULES);
1355	struct linux_binfmt *fmt;
1356	int retval;
1357
1358	/* This allows 4 levels of binfmt rewrites before failing hard. */
1359	if (bprm->recursion_depth > 5)
1360		return -ELOOP;
1361
1362	retval = security_bprm_check(bprm);
1363	if (retval)
1364		return retval;
1365
1366	retval = -ENOENT;
1367 retry:
1368	read_lock(&binfmt_lock);
1369	list_for_each_entry(fmt, &formats, lh) {
//在这里遍历handler链表, fmt 变量是一个linux_binfmt结构体,
在这个结构体中有一个load_binary成员,再找到能够处理对应格式二进制文件的handler后,将load_binary成员指向对应handler,
1370		if (!try_module_get(fmt->module))
1371			continue;
1372		read_unlock(&binfmt_lock);
1373		bprm->recursion_depth++;
1374		retval = fmt->load_binary(bprm);  //然后用这个handler来处理该二进制文件 在load_binary() 的最后,
会调用 start_thread() 函数重新设置EIP和ESP 将程序强行转到要调用的可执行程序的入口区执行
1375		read_lock(&binfmt_lock);
1376		put_binfmt(fmt);
1377		bprm->recursion_depth--;
1378		if (retval < 0 && !bprm->mm) {
1379			/* we got to flush_old_exec() and failed after it */
1380			read_unlock(&binfmt_lock);
1381			force_sigsegv(SIGSEGV, current);
1382			return retval;
1383		}
1384		if (retval != -ENOEXEC || !bprm->file) {
1385			read_unlock(&binfmt_lock);
1386			return retval;
1387		}
1388	}
1389	read_unlock(&binfmt_lock);
1390
1391	if (need_retry) {
1392		if (printable(bprm->buf[0]) && printable(bprm->buf[1]) &&
1393		    printable(bprm->buf[2]) && printable(bprm->buf[3]))
1394			return retval;
1395		if (request_module("binfmt-%04x", *(ushort *)(bprm->buf + 2)) < 0)
1396			return retval;
1397		need_retry = false;
1398		goto retry;
1399	}
1400
1401	return retval;
1402}
六、使用GDB追踪实验:
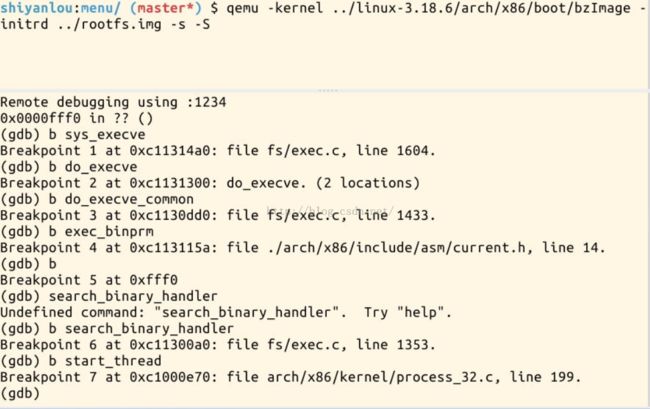
如下图所示:我们在测试程序中调用了一个系统调用execlp()去执行一个helloworld程序,然后跟踪内核的运行
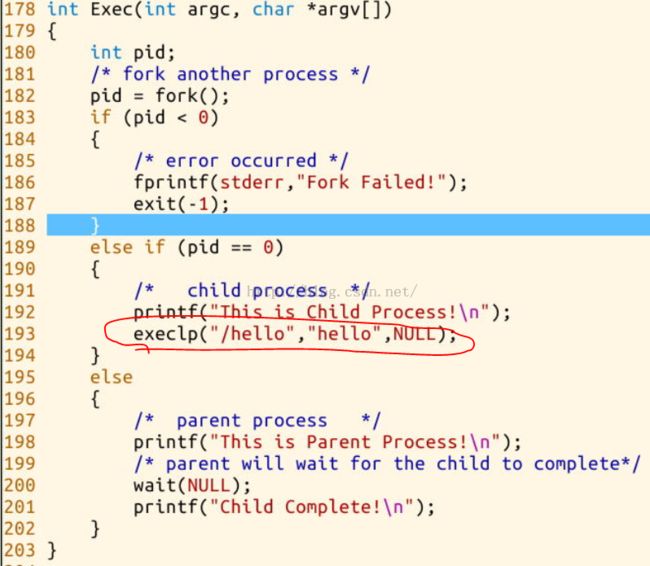
启动GDB跟踪测试程序的运行,并设置相关的断点,验证内核的执行过程。
程序中断在sys_execve处:

输入C继续运行,程序依次中断在do_execve, do_execve_common 处:
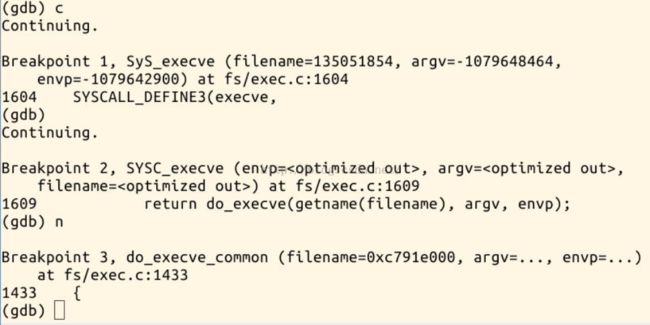
在do_execve_common 开始先是做参数检查
接下来是内存分配、初始化内存、传递参数等操作:

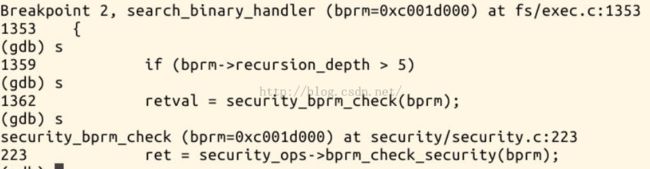
在do_execve_common de 最后调用了:exec_binprm()
查看函数exec_binprm代码,这段代码将父进程的pid保存,获取新的pid,后执行search_binary_hander(bprm),用来遍历format链表,找到合适的处理hello的handler。
最后执行start_thread() 函数跳转到hello去执行:
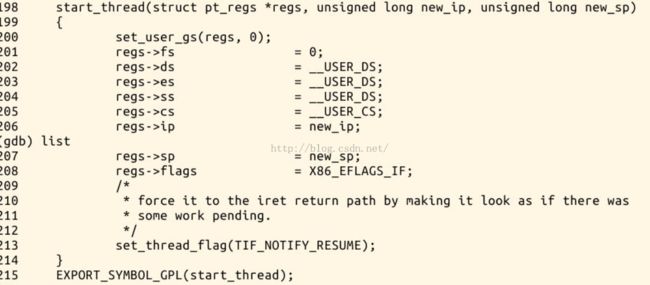

可以看到,gdb跟踪到最后,无法跟踪,那是因为如图中所示,程序直接跳转到了0x08048d0a 去执行了,我们通过readelf -h hello 可以看到,0x08048d0a 刚好就是hello的入口地址:
总结:
execl(const char *path, const char *arg, ...);
execlp(const char *file, const char *arg, ...);
execle(const char *path, const char *arg, ..., char * const envp[]);
execv(const char *path, char *const argv[]);
execvp(const char *file, char *const argv[]);
execve(const char *path, char *const argv[], char *const envp[]);
其中只有execve是真正意义上的系统调用,其它都是在此基础上经过包装的库函数。而execve系统调用有先后调用了内核函数do_execve和do_execve_common,所以do_execve_common才是最终的功能提供者!do_execve_common首先是检查参数,然后根据参数对结构体linux_bunprm结构体变量bprm进行初始化,再然后就是以bprm为参数调用exec_binprm()函数去执行二进制文件,在真正执行二进制文件之前,又调用了search_binary_handler()函数来找到加载该二进制文件的加载器,将二进制文件的信息和数据都加载进来后,调用start_thread()函数强行改变当前任务在内保存在内核堆栈中的eip和esp 然后转去执行对应的二进制文件。
GDB调试中文手册
load_elf_binary
http://www.360doc.com/content/11/0826/13/7588214_143424472.shtml