LNMP环境搭建与实例运行
一:CentOS7.2安装
1、在VMware 新建一个虚拟机CentOS 64位,配置好磁盘大小为30G,启动虚拟机进入CentOS安装界面
选择Install CentOS 7
2、设置系统语言为English,时区选择Asia/ShangHai
3、SECURITY POLICY选择默认的Default
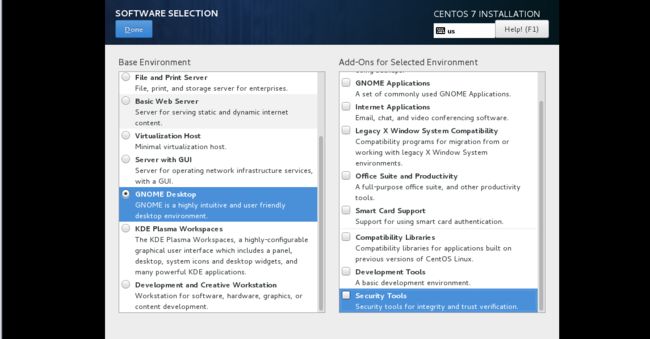
4、SOFTWARE SELECTION选择GNOME Desktop,安装图形用户界面

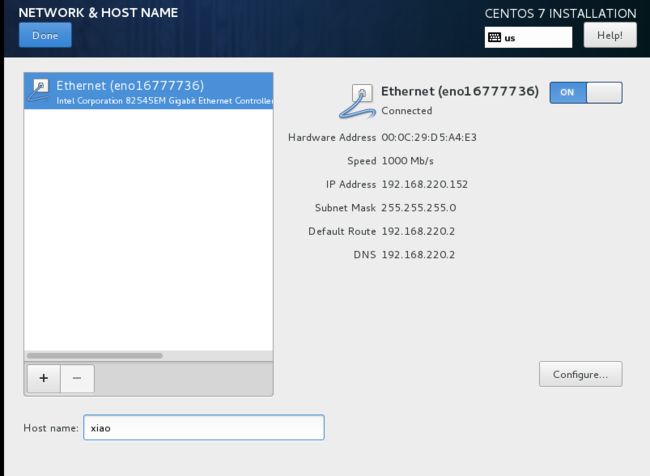
5、设置network和hostname,并开启网络连接(如果不开启网络,则会出现Xshell一直连接不上CentOS的问题)

6、设置ROOT PASSWORD
7、创建一个新用户:xiao,并设置密码
8、等待安装完毕,重启CentOS,会出现: centos7 license not accepted的问题
先输入1, read the license information
然后输入2, accept the agreements
再输入q,quit the conversition。最后输入yes,重启即可
9、创建系统快照
二:安装nginx环境
nginx不是一个CentOS基础库的一部分。因此安装EPEL库来获得nginx:
1、yum install epel-release
2、yum install nginx

3、创建的系统启动nginx的链接和启动它:
systemctl enable nginx.service
systemctl start nginx.service
4、查看是否可用 netstat –tap | grep nginx

安装成功
三:安装mariadb环境
CentOS7以上的版本采用mariadb替代了mysql,因此安装mariadb。
1、安装mariadb服务 yum install mariadb mariadb-server mariadb-devel
2、创建的系统启动mariadb的链接和启动它:
systemctl enable mariadb.service
systemctl start mariadb.service
3、现在检查网络启用。运行netstat -tap | grep mysql
4、设置mariadb的访问权限,防止任何人都能访问。
mysql_secure_installation
设置新的密码
四:安装PHP
1、安装 PHP5相关模块
yum install php-fpm php-cli php-mysql php-gd php-ldap php-odbc php-pdo php-pecl-memcache php-pear php-mbstring php-xml php-xmlrpc php-mbstring php-snmp php-soap

2、安装APC
APC是一个自由和开放的PHP操作码来缓存和优化PHP的中间代码。
从PHP PECL库中安装的APC。 PECL要求CentOS开发工具beinstalled编译APC包。
yum install php-devel
yum groupinstall ‘Development Tools’//安装开发工具包
安装 APC: pecl install apc

3配置php.ini
开启apc扩展extension=apc.so
设置 时区date.timezone =”Asia/ShangHai”
4、创建系统启动链接的PHP-FPM并启动它:
systemctl enable php-fpm.service
systemctl start php-fpm.service
遇到的问题:unable to bind listening socket for address ‘127.0.0.1:9000‘: Address already in use (98)
解决方法:先杀死该进程,然后重启
netstat -lntup | grep 9000
killall php-fpm
systemctl start php-fpm.service
五:环境测试
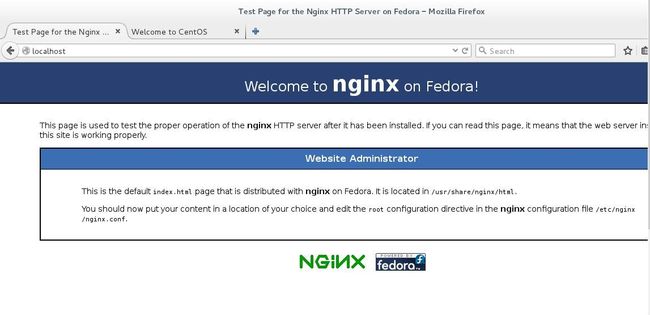
1、在浏览器窗口输入localhost,出现以下页面,则nginx安装成功

2、配置nginx.conf,解析php文件
然后 在/usr/share/nginx/html下新建index.php 文件
六:TP网站部署
1、配置nginx.conf
将root目录改为网站的目录
并添加以下配置,使nginx转发php请求给php-fpm解析。
location ~ .+\.php($|/){
                root /usr/share/nginx/html/website;
                fastcgi_pass 127.0.0.1:9000;
                fastcgi_index index.php;
                include        fastcgi.conf;
                fastcgi_param  SCRIPT_FILENAME  /usr/share/nginx/html/website$fastcgi_script_name;

            include        fastcgi_params;
}
设置图片,css,js等资源的缓存配置。
location ~ .*\.(gif|jpg|jpeg|png|bmp|flv|ico|swf)$         {
                access_log off;
                expires      24h;
        }

        location ~ .*\.(htm|html)$         {
         access_log off;
         expires      24h;
        }

    location ~ .*\.(js|css)?$     {

        access_log  off;
            expires      24h;
}
2、关闭selinux,以免在配置ThinkPHP项目时总是遇到权限的问题
临时关闭selinux:setenforce 0
3、部署ThinkPHP项目。
将项目的’URL_MODEL’配置为3,兼容模式,避免需要nginx才能使用pathinfo模式。
4、在浏览器中输入:localhost//index.php
