Liunx 下redis的安装单机版和集群版
1 Redis简介
Nosql数据库。Not only sql。非关系型数据库。
Redis是一个key-value型的数据库。
1.1 Redis安装
安装到linux环境,centos6.4
Redis:redis-3.0.0.tar.gz
安装redis需要先将官网下载的源码进行编译,编译依赖gcc环境,如果没有gcc环境,需要安装gcc:yum install gcc-c++
安装步骤:
第一步:把redis的源码包上传到linux系统。
第二步:解压缩tar -zxf redis-3.0.0.tar.gz
第三步:make
第四步:make install PREFIX=/usr/local/redis
1.2 Redis的启动
后端启动:
修改 redis.conf

启动时指定配置文件:
[root@bogon bin]# ./redis-server redis.conf
2 Redis集群搭建
2.1 Redis集群结构
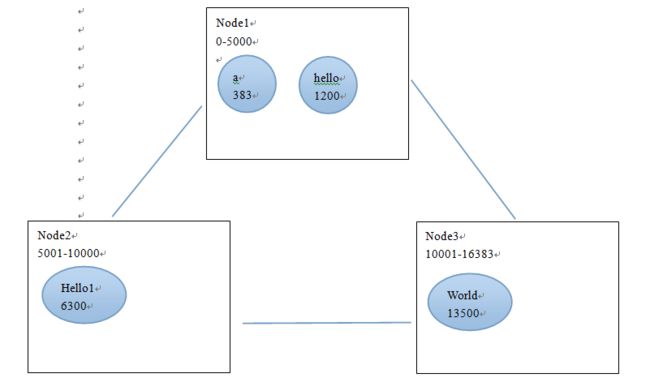
redis-cluster把所有的物理节点映射到[0-16383]slot

Redis 集群中内置了 16384 个哈希槽,当需要在 Redis 集群中放置一个 key-value 时,redis 先对 key 使用 crc16 算法算出一个结果,然后把结果对 16384 求余数,这样每个 key 都会对应一个编号在 0-16383 之间的哈希槽,redis 会根据节点数量大致均等的将哈希槽映射到不同的节点
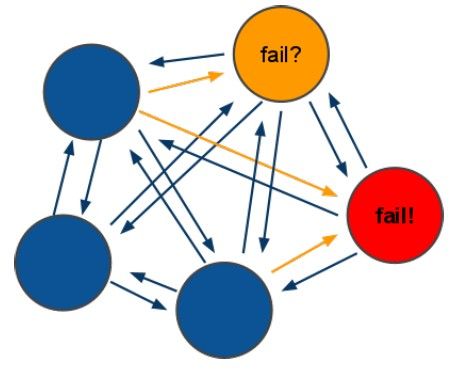
2.2 投票:容错

领着投票过程是集群中所有master参与,如果半数以上master节点与master节点通信超过(cluster-node-timeout),认为当前master节点挂掉.
(2):什么时候整个集群不可用(cluster_state:fail)?
a:如果集群任意master挂掉,且当前master没有slave.集群进入fail状态,也可以理解成集群的slot映射[0-16383]不完成时进入fail状态. ps : redis-3.0.0.rc1加入cluster-require-full-coverage参数,默认关闭,打开集群兼容部分失败.
b:如果集群超过半数以上master挂掉,无论是否有slave集群进入fail状态.
ps:当集群不可用时,所有对集群的操作做都不可用,收到((error) CLUSTERDOWN The cluster is down)错误
2.3 搭建集群
集群中至少有三个节点,每个节点应该有一个从节点。至少需要6台服务器。
可以使用6个redis实例来模拟。需要修改端口号:
7001~7006
2.3.1 需要的条件:
1、需要使用redis源码包中提供的工具:
-rwxrwxr-x. 1 root root 48141 Apr 1 2015 redis-trib.rb
[root@bogon src]# pwd
/root/redis-3.0.0/src
[root@bogon src]#
是一个ruby脚本。如果要运行脚本需要ruby的运行环境。
2、安装ruby环境(ruby的虚拟机):
yum install ruby
3、Ruby的包管理器:
yum install rubygems
4、redis-trib.rb运行需要依赖redis-3.0.0.gem

安装此包需要安装rubygems
把包上传到linux,然后安装:
gem install redis-3.0.0.gem
5、把redis-trib.rb复制到/usr/local/redis下
2.3.2 集群的搭建步骤
第一步:创建6个redis实例,修改端口号7001~7006。修改redis.conf文件

第二步:启动每个实例
第三步:使用脚本创建集群
./redis-trib.rb create --replicas 1 192.168.25.153:7001 192.168.25.153:7002 192.168.25.153:7003 192.168.25.153:7004 192.168.25.153:7005 192.168.25.153:7006[root@bogon redis]# ./redis-trib.rb create --replicas 1 192.168.131.153:7001 192.168.131.153:7002 192.168.131.153:7003 192.168.131.153:7004 192.168.131.153:7005 192.168.131.153:7006
>>> Creating cluster
Connecting to node 192.168.131.153:7001: [ERR] Sorry, can't connect to node 192.168.131.153:7001
[root@bogon redis]# ./redis-trib.rb create --replicas 1 192.168.25.153:7001 192.168.25.153:7002 192.168.25.153:7003 192.168.25.153:7004 192.168.25.153:7005 192.168.25.153:7006
>>> Creating cluster
Connecting to node 192.168.25.153:7001: OK
Connecting to node 192.168.25.153:7002: OK
Connecting to node 192.168.25.153:7003: OK
Connecting to node 192.168.25.153:7004: OK
Connecting to node 192.168.25.153:7005: OK
Connecting to node 192.168.25.153:7006: OK
>>> Performing hash slots allocation on 6 nodes...
Using 3 masters:
192.168.25.153:7001
192.168.25.153:7002
192.168.25.153:7003
Adding replica 192.168.25.153:7004 to 192.168.25.153:7001
Adding replica 192.168.25.153:7005 to 192.168.25.153:7002
Adding replica 192.168.25.153:7006 to 192.168.25.153:7003
M: c38aa1307040e22b44a5a62153d327d64e6705ca 192.168.25.153:7001
slots:0-5460 (5461 slots) master
M: 9832ac7206285aca96fed974789c1e9bb4d550c0 192.168.25.153:7002
slots:5461-10922 (5462 slots) master
M: 80eb5181165c686b29b4182a7f8beef7fd238735 192.168.25.153:7003
slots:10923-16383 (5461 slots) master
S: acc5851045d4e2c3a3d9d41ce6b024b154204ef3 192.168.25.153:7004
replicates c38aa1307040e22b44a5a62153d327d64e6705ca
S: 774393eb217084824bf01ec3b24d23d393f0ffb6 192.168.25.153:7005
replicates 9832ac7206285aca96fed974789c1e9bb4d550c0
S: 70ba85d22b6397c697a9a36e1eb5bbdcf4682d7d 192.168.25.153:7006
replicates 80eb5181165c686b29b4182a7f8beef7fd238735
Can I set the above configuration? (type 'yes' to accept): yes
>>> Nodes configuration updated
>>> Assign a different config epoch to each node
>>> Sending CLUSTER MEET messages to join the cluster
Waiting for the cluster to join..
>>> Performing Cluster Check (using node 192.168.25.153:7001)
M: c38aa1307040e22b44a5a62153d327d64e6705ca 192.168.25.153:7001
slots:0-5460 (5461 slots) master
M: 9832ac7206285aca96fed974789c1e9bb4d550c0 192.168.25.153:7002
slots:5461-10922 (5462 slots) master
M: 80eb5181165c686b29b4182a7f8beef7fd238735 192.168.25.153:7003
slots:10923-16383 (5461 slots) master
M: acc5851045d4e2c3a3d9d41ce6b024b154204ef3 192.168.25.153:7004
slots: (0 slots) master
replicates c38aa1307040e22b44a5a62153d327d64e6705ca
M: 774393eb217084824bf01ec3b24d23d393f0ffb6 192.168.25.153:7005
slots: (0 slots) master
replicates 9832ac7206285aca96fed974789c1e9bb4d550c0
M: 70ba85d22b6397c697a9a36e1eb5bbdcf4682d7d 192.168.25.153:7006
slots: (0 slots) master
replicates 80eb5181165c686b29b4182a7f8beef7fd238735
[OK] All nodes agree about slots configuration.
>>> Check for open slots...
>>> Check slots coverage...
[OK] All 16384 slots covered.
[root@bogon redis]#
2.3.4 连接集群
Redis-cli连接集群。
[root@bogon redis]# redis01/redis-cli -h 192.168.25.153 -p 7001 -c
注意连接集群一定要有-c参数。
Java客户端:使用jedis连接集群。
需要依赖jedis的jar包。
3 单机版
//单机版测试
    @Test
    public void testJedis() throws Exception {
        Jedis jedis = new Jedis("192.168.25.153", 6379);
        jedis.set("jedis", "1000");
        String result = jedis.get("jedis");
        System.out.println(result);
        jedis.close();
    }
3.1 带连接池的单机版
//带连接池的单机版
    @Test
    public void testJedisPool() throws Exception {
        JedisPool jedisPool = new JedisPool("192.168.25.153", 6379);
        //获得连接
        Jedis jedis = jedisPool.getResource();
        String result = jedis.get("jedis");
        System.out.println(result);
        //使用完毕后关闭
        jedis.close();
        jedisPool.close();
    }
3.2 连接集群
//连接集群测试
    @Test
    public void testJedisCluster() throws Exception {
        //设置集群中节点
        Set<HostAndPort> nodes = new HashSet<>();
        nodes.add(new HostAndPort("192.168.25.153", 7001));
        nodes.add(new HostAndPort("192.168.25.153", 7002));
        nodes.add(new HostAndPort("192.168.25.153", 7003));
        nodes.add(new HostAndPort("192.168.25.153", 7004));
        nodes.add(new HostAndPort("192.168.25.153", 7005));
        nodes.add(new HostAndPort("192.168.25.153", 7006));
        JedisCluster jedisCluster = new JedisCluster(nodes);
        jedisCluster.set("jedis", "hello world");
        String result = jedisCluster.get("jedis");
        System.out.println(result);

        //关闭连接
        jedisCluster.close();

    }