Android最佳实践之性能 - 提升Layout性能
优化布局结构
参考地址:http://developer.android.com/training/improving-layouts/optimizing-layout.html
布局是Android应用程序的关键部分,直接影响到用户体验。如果实现的不好,布局会消耗大量内存,应用程序UI会变得缓慢。Android SDK包含工具来帮助你识别布局性能问题,结合最佳实践,你将能够实现流畅的滚动体验和一个最低内存的占用。
我们有一个误解,就是使用基本的布局结构,可以实现最有效率的布局。加到App中的布局都会经历初始化、布局和绘制的阶段。比如LinearLayout可能会导致一个过深的视图层级。另外,嵌套在LinearLayout中的每一个View使用layout_weight属性时,性能更低,因为它需要被计算(onMeasure)两次。这在ListView 或 GridView中尤甚,因为这两个widget中的布局重复的出现。
检查你的布局
Android SDK提供了一个叫View Hierarchy的工具。,可以帮助你在App运行时检测布局的结构和瓶颈。hierarchyviewer工具位于/tools/目录中。打开之后可以选择设备以及运行的程序,点击* Load View Hierarchy*,例如下图是LinearLayout嵌套的View Hierarchy:
这是一个三层的视图结构,我们看到在第二层的LinearLayout上有一些问题。点击它会出现下图:
渲染一个列表item所花时间如下:
-Measure: 0.977ms
-Layout: 0.167ms
-Draw: 2.717ms
我们看到在draw上花了较多的时间,这样可以针对绘制进行优化。
修复你的布局
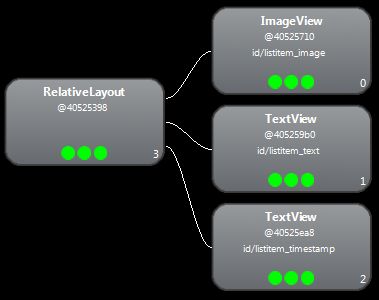
上述描述的布局性能问题是来自嵌套的LinearLayout,我们可以使用扁平的布局方式来提升,即减少它的视图层级。RelativeLayout是一个较好的选择,当使用RelativeLayout布局时,你会发现视图层级变成了2级。看上去如下:

选择渲染一个列表item所花时间如下:
Measure: 0.598ms
Layout: 0.110ms
Draw: 2.146ms
看到时间上有一些提升,但因为是列表项,当列表数据很多时,性能就提升了很多了。
大多数时候LinearLayout性能较低,是因为layout_weight属性的使用。
使用Lint
Lint已经取代Layoutopt工具,它具有更强大的功能。一些Lint的规则如下:
- 可优化的布局:如包含一个Imageview和一个TextView的LinearLayout,可被采用CompoundDrawable的TextView代替
- 如果FrameLayout作为根布局,而且没有设置backgroud以及padding属性,那么使用标签代替,会有稍稍的性能提升。
- 无效的泄露。一个布局如果没有子view没有backgroud,一般就该删掉它。减少视图层次。
- 过深的层级。视图层级过深,将影响性能。我们使用RelativeLayout 或 GridLayout来减少视图层级。默认视图的最大层级是10
Lint集成到Android Studio中,无论何时编译代码它都会自动执行。使用Lint可以对特定的构建变量或全部的构建变量进行监视。
在Android Studio中,File>Settings>Project Settings,可以设置监视配置。
Lint可以自动修复一些问题,或者提供修复建议,还可以直接跳转到对应的代码进行审查。
使用和重用布局
参考地址:http://developer.android.com/training/improving-layouts/reusing-layouts.html
在Android中可以使用 和 来嵌套一个布局到当前布局中。
重用布局特别强大,它允许你创建可重用的复杂的布局。比如,一个Toggle按钮,或自定义的带描述文本的进度条。这也意味着在多个应用程序中通用的布局元素可以提取,单独管理,然后被包含在其它布局中。因此,尽管你可以通过编写一个自定义View创建个人的UI组件,你也可以更轻易的重用一个布局文件。
创建一个重用布局
例如,下面是一个titlebar.xml:
<FrameLayout xmlns:android="http://schemas.android.com/apk/res/android" android:layout_width="match_parent" android:layout_height="wrap_content" android:background="@color/titlebar_bg">

    <ImageView android:layout_width="wrap_content" android:layout_height="wrap_content" android:src="@drawable/gafricalogo" />
</FrameLayout>
使用标签
将上面的titlebar加到自己的当前布局中:
<LinearLayout xmlns:android="http://schemas.android.com/apk/res/android"
    android:orientation="vertical"
    android:layout_width="match_parent"
    android:layout_height="match_parent"
    android:background="@color/app_bg"
    android:gravity="center_horizontal">

    <include layout="@layout/titlebar"/>

    <TextView android:layout_width="match_parent"
              android:layout_height="wrap_content"
              android:text="@string/hello"
              android:padding="10dp" />

    ...

</LinearLayout>
你也可以覆盖被include进来的布局的root View所有的布局参数(任意android:layout_*属性),例如:
<include android:id="@+id/news_title"
         android:layout_width="match_parent"
         android:layout_height="match_parent"
layout="@layout/title"/>然而,在include布局中药覆盖布局参数,务必要覆盖android:layout_height 和 android:layout_width参数,这样布局才能正确的生肖。
使用标签
标签有助于消除视图层次中不用的ViewGroup。例如,当你的主布局中有一个垂直的LinearLayout,其中有两个连续的View可以在多个布局中重用,然后将这个重用的布局组织起来需要一个根View,如果使用LinearLayout作为根View,那么会导致增加View的层次结构,这个LinearLayout没有任何实际意义,也会拖慢UI性能。
这时我们使用标签,可以避免这种现象发生:
<merge xmlns:android="http://schemas.android.com/apk/res/android">

    <Button  android:layout_width="fill_parent" android:layout_height="wrap_content" android:text="@string/add"/>

    <Button  android:layout_width="fill_parent" android:layout_height="wrap_content" android:text="@string/delete"/>

</merge>
现在,你将这个布局使用嵌套到另一个布局中,系统会直接忽略标签,直接将两个按钮加到布局中,取代include标签。
按需加载的ViewStub
http://developer.android.com/training/improving-layouts/loading-ondemand.html#ViewStub
有时需要加载一个暂时不需要的复杂视图,是比较消耗内存等资源且会影响界面的加载速度的。我们使用ViewStub来满足这个需求。
定义一个ViewStub
ViewStub是一个轻量的view,没有尺寸,不需要在布局中draw任何东西。每一个ViewStub都只需要指定android:layout属性即可,这个属性标识ViewStub要解析的布局。
<ViewStub android:id="@+id/stub_import" android:inflatedId="@+id/panel_import" android:layout="@layout/progress_overlay" android:layout_width="fill_parent" android:layout_height="wrap_content" android:layout_gravity="bottom" />加载ViewStub布局
需要加载ViewStub的布局,调用setVisibility(View.VISIBLE) 或 inflate()设置它可见即可:
((ViewStub) findViewById(R.id.stub_import)).setVisibility(View.VISIBLE);
// or
View importPanel = ((ViewStub) findViewById(R.id.stub_import)).inflate();
一旦ViewStub设置可见或inflate过之后,ViewStub 就不再是视图层级中的元素了,它会被inflate出来的布局替换,这个布局的rootView的id为ViewStub中的android:inflatedId属性指定的。
注意:ViewStub的一个缺点是现在不支持标签的解析。
让ListView平滑滚动
参考地址:http://developer.android.com/training/improving-layouts/smooth-scrolling.html
为了让ListView滚动平滑,需要让主线程摆脱繁重的任务处理,确保任何的网络操作、磁盘IO操作、SQL操作都在一个单独的线程中运行。
使用后台线程
使用后台线程(“worker thread”),给主线程(UI线程)减轻负担,让其专注于draw UI。AsyncTask 提供一个简单的方式实现在主线程异步加载数据:
// Using an AsyncTask to load the slow images in a background thread
new AsyncTask<ViewHolder, Void, Bitmap>() {
    private ViewHolder v;

    @Override
    protected Bitmap doInBackground(ViewHolder... params) {
        v = params[0];
        return mFakeImageLoader.getImage();
    }

    @Override
    protected void onPostExecute(Bitmap result) {
        super.onPostExecute(result);
        if (v.position == position) {
            // If this item hasn't been recycled already, hide the
            // progress and set and show the image
            v.progress.setVisibility(View.GONE);
            v.icon.setVisibility(View.VISIBLE);
            v.icon.setImageBitmap(result);
        }
    }
}.execute(holder);
从Android 3.0 (API level 11)开始,我们可以使用AsyncTask的新特性,使用多核心处理器。我们使用executeOnExecutor()而不是execute()来执行任务,它允许同时处理多个后台任务基于可用的处理器的数量。
使用View Holder对象
在滚动ListView时会频繁调用findViewById()方法,这样是非常消耗性能的,我们使用ViewHolder来解决这类问题:
static class ViewHolder {
  TextView text;
  TextView timestamp;
  ImageView icon;
  ProgressBar progress;
  int position;
}
然后填充和存储ViewHolder如下:
ViewHolder holder = new ViewHolder();
holder.icon = (ImageView) convertView.findViewById(R.id.listitem_image);
holder.text = (TextView) convertView.findViewById(R.id.listitem_text);
holder.timestamp = (TextView) convertView.findViewById(R.id.listitem_timestamp);
holder.progress = (ProgressBar) convertView.findViewById(R.id.progress_spinner);
convertView.setTag(holder);
现在你可以很容易地访问每个View,不需要findViewById(),节省宝贵的处理器时间片。