LEAPMOTION开发UI专题(1)
很
抱歉的是,之前说的LEAP/UI框架设计可能只有两篇 因为个人时间实在是不允许 这个问题如果展开去写的话 那么说写本书都是不为过的 且因为内容修改很是杂乱 所以我第一篇文章用来介绍LEAP预置UI的结构第二篇用来讲How to design&build~
鉴于直接涉及交互问题 因此这篇文章的受众显得很尴尬 但是相信 认真按照我之前博客学习的同学都能够理解其中的意思
关于leap这个东西 我在第一篇文章中就提到过 ——just a toy.
所以只是用来开发的练手,根本别指望交互效果能够很好
根据我的经验来讲 手势识别的交互UI根据交互方式大概分为三种
1,触发式操作
2,手势操作(下一期)
3,映射性操作(下一期)
所以 我从最基本的触发操作ui开始入手
预警:这篇文章very very long~~
入门:
从leap coreAsset当中找到
widght这个文件夹
那先找个demo运行一下吧
SENCES
下的运行一下咯~
好 我们就由这个开始 unity UI和leap交互的前导
首先 我们来熟悉 官方预设的四种UI样式 分别是:
dial\滚轮菜单
scrolltext\可滑动的字体
slider\滑动条
toggle button\按钮
当我们把这四种prefab拖入场景加以调整
再加上控制器 就算已经完整地展示了 所有的 官方预制形式
那么我们就来一个一个说吧
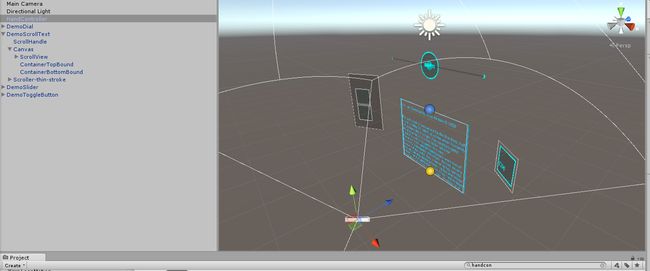
1.最简单的scrolltext\可滑动的字体
这个组件的主要控制过程在这里
scrollhandle
我们可以看到他的结构相当简单 boxcollider检测触发 文本上下边界 和显示框上下边界 当text的上边界高于显示框的时候会以一个速度贴合回来 并且因为使用localposition 这个组件的工作不会因为坐标的颠倒而出错
 protected virtual void ResetPivots()
    {
      m_pivot = transform.localPosition;
      if (m_target != null)
        m_targetPivot = transform.parent.InverseTransformPoint(m_target.transform.position);
    }
针对 TEXT组件的修改 我们可以直接在inspectors中修改文字等等操作 而直接生成一个类似阅读器之类的应用
在脚本中我们可以看到来龙去脉
首先是这个类LeapPhysicsBase:
相信有一定基础的小伙伴都知道 既然 设置了触发器 那么肯定会有 检测函数
 protected virtual void OnTriggerEnter(Collider collider)
    {
    //检测是否是手
      if (m_target == null && IsHand(collider) && State != LeapPhysicsState.Disabled)
      {

        State = LeapPhysicsState.Interacting;
        m_target = collider.gameObject;
        ResetPivots();
      }
    }


    protected virtual void OnTriggerExit(Collider collider)
    {

      if (collider.gameObject == m_target)
      {
        State = LeapPhysicsState.Reflecting;
        m_target = null;
      }
    }
以上两个函数清楚的写了触发执行的过程 那既然是检测不只是要判断是否出发 还要对造成出发的对象进行判断 是否为手于是调用了以下这个函数
    private bool IsHand(Collider collider)
    {
      return collider.transform.parent && collider.transform.parent.parent &&       collider.transform.parent.parent.GetComponent<HandModel>();
    }
以上三个部分共同工作,就生成了最基本的触发事件
而整个组建的状态更改 控制 识别都放在一个FixedUpdate();里面
 protected virtual void FixedUpdate()
    {
      if (m_target == null && State == LeapPhysicsState.Interacting)
      {
        State = LeapPhysicsState.Reflecting;
      }

      switch (State)
      {
        case LeapPhysicsState.Interacting://交互
          ApplyInteractions();
          break;
        case LeapPhysicsState.Reflecting://反映
          ApplyPhysics();
          break;
        case LeapPhysicsState.Disabled://无
          break;
        default:
          break;
      }
      ApplyConstraints();
    }
代码清晰易懂 对组件的3种状态做了规整的编写 代码结构十分清晰
public enum LeapPhysicsState
  {
    Interacting, // Responsible for moving the widgets with the fingers
    Reflecting, // Responsible for reflecting widget information and simulating the physics
    Disabled // State in  which the widget is disabled
  }
在不同的状态下 对应不同的执行过程 非常规整、 值得一提的是 leap官方的代码风格很适合我们去仔细钻研 其中不乏一些亮点 对于我们来说很值得借鉴 对于没有形成良好代码风格的新手来说十分值得学习
 protected virtual void Awake()
    {
      if (GetComponent<Collider>() == null)
      {
        Debug.LogWarning("This Widget lacks a collider. Will not function as expected.");
      }//碰撞其检测与error/warning输出
}在这个基类的脚本中 我们基本了解了这个组件的运行机理下面就来看第二个脚本ScrollBase
这个脚本中有几个重要的常数
1,弹簧力(SnapSpringForce);
2,阻力(drag);
3,交互比例(InteractionScale);
这几个参数决定着你出发这个组件并滑动之后 多久能停下来 惯性运行的时间 等等效果
其中甚至运用到了一些公式运算
m_dampingForce = Mathf.Sqrt(4.0f * SnapSpringForce);
(阻尼/力)
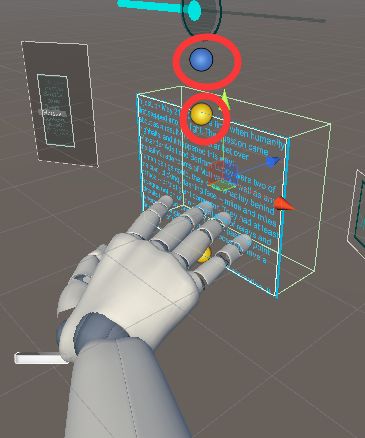
类似这种运算 但最重要的还是定义了文本组件的上下界和显示框的上下界
我们可以清晰地看到 在这个组件的下方 文明本下界要长的多
从文本的属性来看 我们也可以清楚地看到纵横比也可以修改文字
而从脚本层面我们可以看到更多的这种继承关系
这是基类中的
 protected virtual void ResetPivots()
    {
      m_pivot = transform.localPosition;
      if (m_target != null)
        m_targetPivot = transform.parent.InverseTransformPoint(m_target.transform.position);
    }
这是scrollbase中的
 protected override void ResetPivots() {
    base.ResetPivots();
    m_contentPivot = ContentTransform.localPosition;
  }
最后不得不佩服的是 为了实现 惯性这种细微的操作感代码的复杂程度高了不少 以至于催生了很多的计算方法
  //计算一维弹簧力
   protected float calculate1DSpringForce(float offsetVector) {
    float springForce = offsetVector * SnapSpringForce;
    float dampingForce = m_dampingForce * (m_velocity);
    return springForce - dampingForce;
  }
protected float calculateOverrunMagnitude() {
//计算超过量(文本边界超过显示边界的量)
float overrunDistance = 0.0f;
// Put all positions in object space.
Vector3 localContentTop = transform.InverseTransformPoint(ContentTopBound.position);
Vector3 localContentBottom = transform.InverseTransformPoint(ContentBottomBound.position);
Vector3 localContainerTop = transform.InverseTransformPoint(ContainerTopBound.position);
Vector3 localContainerBottom = transform.InverseTransformPoint(ContainerBottomBound.position);
if (localContentTop.y < localContainerTop.y) {
overrunDistance = localContainerTop.y - localContentTop.y;
}
else if (localContentBottom.y > localContainerBottom.y) {
overrunDistance = localContainerBottom.y - localContentBottom.y;
}
return overrunDistance;
}
至于一些 基类中的状态判断循环所采用的应用方法 我只贴一个例子
ApplyInteractions();
基类中定义了它的抽象方法在状态循环中 当状态为
case LeapPhysicsState.Interacting:
时调用了ApplyInteractions(); 而在scrollbase类中 整个重载了这个方法
  protected override void ApplyInteractions() {

    Vector3 targetInteractorPositionChange = transform.parent.InverseTransformPoint(m_target.transform.position) - m_targetPivot;
    targetInteractorPositionChange *= InteractionScale;
    targetInteractorPositionChange.x = 0.0f;
    targetInteractorPositionChange.z = 0.0f;
    Vector3 contentCurrentPosition = ContentTransform.localPosition;
    Vector3 newContentPosition = m_contentPivot + targetInteractorPositionChange;
    Vector3 velocity = (newContentPosition - contentCurrentPosition) / Time.deltaTime;
    m_velocity = velocity.y;

    ContentTransform.localPosition = newContentPosition;
  }
在这种结构下 我们其实如果只是想实现一个交互 那么还是很简单的 但是如果想加强操控感受 改善交互效果 可以说难度非常大 已经超出了新手的能力范围 因为其中涉及到了太多的 UI交互设计技巧 经验和逻辑。
OK~ NEXT
2.按钮
照旧 我们先看他的构成 非常清晰有没有
四种图像分别对应
打开状态
关闭状态
转移状态
通用元素
接下来我们抛开他的素材去看代码
这两个类的规模就要小很多了 因为没有很复杂的交互优化 整个组件非常清爽
在ButtonDemoGraphics脚本中
public void SetActive(bool status)
    {
        Renderer[] renderers = GetComponentsInChildren<Renderer>();
        Text[] texts = GetComponentsInChildren<Text>();
        Image[] GUIimages = GetComponentsInChildren<Image>();
        foreach (Renderer renderer in renderers)
        {
            renderer.enabled = status;
        }
        foreach(Text text in texts){
            text.enabled = status;
        }
        foreach(Image image in GUIimages){
            image.enabled = status;
        }

    }
设置激活的方法显得非常干练包括对材质,图片,文字的遍历
public void SetColor(Color color)
    {
        Renderer[] renderers = GetComponentsInChildren<Renderer>();
        Text[] texts = GetComponentsInChildren<Text>();
        Image[] GUIimages = GetComponentsInChildren<Image>();
        foreach (Renderer renderer in renderers)
        {
            renderer.material.color = color;
        }
        foreach (Text text in texts){
            text.color = color;
        }
        foreach(Image image in GUIimages){
            image.color = color;
        }
    }
包括对颜色更改也是
而在对此基类调用的时候ButtonDemoToggle类这种代码结构异常的清晰明了(真的好棒!!啊)
 private void TurnsOnGraphics()
  {
    onGraphics.SetActive(true);
    offGraphics.SetActive(false);
    midGraphics.SetColor(MidGraphicsOnColor);
    botGraphics.SetColor(BotGraphicsOnColor);
  }

  private void TurnsOffGraphics()
  {
    onGraphics.SetActive(false);
    offGraphics.SetActive(true);
    midGraphics.SetColor(MidGraphicsOffColor);
    botGraphics.SetColor(BotGraphicsOffColor);
  }
如果你想使用这个按钮 做一个状态判断的话
  public override void ButtonTurnsOn()
  {
    TurnsOnGraphics();
  }

  public override void ButtonTurnsOff()
  {
    TurnsOffGraphics();
  }
写在这两个方法下 的话 就能达成你的目的啦
比如 我想按钮显示关闭的时候的时候程序暂停运行 那就
public override void ButtonTurnsOff() { TurnsOffGraphics(); Debug.Break(); }至于替换原本的ON/OFF的UI纹理 那就不用我教了 相信 能看到这里的都会操作 我们去如何设计按键触发的过程
就有了一个清晰的方案
自定义按钮样式替换元素 ->继承以重用脚本设计->自定义触发操作->完成
总结:
按钮为什么这里就总结了?
答:按钮的类继承关系非常复杂 但是 组件本身有着很好的可修改性 重用性 因此 对于这种良心 组件 我们也不用想着从 脚本角度去修改 替换按钮的外观 和样式 保留官方这种成熟的继承风格 对于我们生成 的软件的稳定性至关重要;
public abstract class ButtonToggleBase : ButtonBase, BinaryInteractionHandler < bool > , IDataBoundWidget < ButtonToggleBase, bool>
随意感受一下这个继承
3.滑动条(slider)
先看图
我们可以看到 为了达成滑动条这个组件 所需要的 步骤 就多得多了
虽然在hierarchy里面全部展开以后很吓人的样子但是其实 只有三类
1.top
2.line
3.dot
我们先从top开始看
其实 他就是按键的马甲而已,SliderDemoGraphics负责控制这个按键的图像

top的结构从这个拆分能清楚的看清每个部分
toplayer:圆点按钮中心
midlayer:填充材质(slidersecondary)
botlayer:选定高亮边框
所以在这个类当中 我们会看到按钮中出现过的套路
 public void SetActive(bool status)
  {
    Renderer[] renderers = GetComponentsInChildren<Renderer>();
    foreach (Renderer renderer in renderers)
    {
      renderer.enabled = status;
    }
  }
public void SetColor(Color color)
{
Renderer[] renderers = GetComponentsInChildren<Renderer>();
foreach (Renderer renderer in renderers)
{
renderer.material.color = color;
}
}Top的构成很简单 但是整个滑动条还是比较复杂的 就是因为这个类SliderDemo的继承SliderBase又继承于 LeapPhysicsSpring 这种继承关系导致我们想从自上而下的修改功能变得不是那么容易
而我们只能从底层向上寻找
Sliderdemo:
  protected override void sliderPressed()
  {
  //按下
    base.sliderPressed();
    PressedGraphics();
  }

  protected override void sliderReleased()
  {
  //释放
    base.sliderReleased();
    ReleasedGraphics();
  }
这两个函数描述了按下后和释放后的指令 所以从这里来看 我们可以把一切我们想要的滑动条的按钮触发释放 来激活的事件 写在这两个方法里
最重要的检查触发被放在了高一级的类Sliderbase中的CheckTrigger()方法:
private void CheckTrigger()
    {
      if (State == LeapPhysicsState.Interacting) {
      //状态确定
        fireSliderChanged (GetSliderFraction ());
        if (m_dataBinder != null) {
          m_dataBinder.SetCurrentData (GetSliderFraction ());
        }
      }
    }
而最根本的监听来自于一个诡异的方法
private void onStateChanged(object sender, EventArg<LeapPhysicsState> arg) {
      if ( arg.CurrentValue == LeapPhysicsState.Interacting ) {
        sliderPressed();//按下
      }
      else if ( arg.CurrentValue == LeapPhysicsState.Reflecting ) {
        sliderReleased();//释放
      }
}EventArg是包含事件数据的类的基类,而onStateChanged()方法中前者是一个对象(其实这里传递的是对象的引用,如button的click事件则sender就是button,相信有过c#/xaml/winfrom/编程经验得同学都见到过这个用法),后面是包含事件数据的类的基类。
而在这个代码中sender就是leap中的一个对象 后面的基类将状态参数CurrentValue 表达出来
讲完了触发那么现在该进一步了
arg.CurrentValue同时将修改State的值 这个值相当于整个类中的状态参量 代表按钮是否被按下
而在这个脚本中 还要根据state的值来进行更多的操作
 public enum LeapPhysicsState
  {
    Interacting, //手指等 触发按钮
    Reflecting, //模拟物理特性 从触发被改变回到预置位置
    Disabled // 关闭(正常)状态
  }
.Enum 类型是所有枚举类型的抽象基类(它是一种与枚举类型的基础类型不同的独特类型)
这里用到enum来准确描述状态 使得代码清晰易懂 易于维护
所以 当我们找到FixedUpdate中的UpdateGraphics()方法后
private void UpdateGraphics()
  {
    float handleFraction = GetHandleFraction();
    Vector3 topPosition = transform.localPosition;
    topPosition.x = 0f;
    topPosition.y = 0f;
    topPosition.z -= (1.0f - handleFraction) * 0.25f;
    topPosition.z = Mathf.Min(topPosition.z, -0.003f); // -0.003 为保证dots和top永不相交的中间层
    topLayer.transform.localPosition = topPosition;

    Vector3 botPosition = transform.localPosition;
    botPosition.x = 0f;
    topPosition.y = 0f;
    botPosition.z = -0.001f;
    botLayer.transform.localPosition = botPosition;

    midLayer.transform.localPosition = (topPosition + botPosition) / 2.0f;
//___________________________________________________________________
    if (activeBar)
    {
      UpdateActiveBar();//激活
    }
    //______________________________________________________________________
    if (numberOfDots > 0)
    {
      UpdateDots();//根据bot的位置判断
    }
  }
在此我们只从Dot展开去讲 因为其他的过程基本上是 八九不离十
在
private void UpdateDots()
  {
    for (int i = 0; i < dots.Count; ++i)
    {//dot的数量  根据此位置dot的x坐标 和 top的x轴自身坐标对比判断 来逐个绘制 小于高亮  大于常亮
      if (dots[i].transform.localPosition.x < transform.localPosition.x)
      {
        Renderer[] renderers = dots[i].GetComponentsInChildren<Renderer>();
        foreach (Renderer renderer in renderers)
        {
          renderer.material.color = DotsOnColor;
          renderer.material.SetFloat("_Gain", 3.0f);//高亮
        }
      }
      else
      {
        Renderer[] renderers = dots[i].GetComponentsInChildren<Renderer>();
        foreach (Renderer renderer in renderers)
        {
          renderer.material.color = DotsOffColor;
          renderer.material.SetFloat("_Gain", 1.0f);//常亮
        }
      }
    }
  }
而我们在先前的inspector中也看到了DotsOnColor/DotsOffColor

在其他部分的调用中 和Dots的绘制如出一辙 基本都是结合状态参量来进行判断 例如
 public void SetWidgetValue(float value) {
      if ( State == LeapPhysicsState.Interacting || State == LeapPhysicsState.Disabled ) { return; } // 使得状态在交互过程中稳定
      SetPositionFromFraction (value);
}那么最后来看这个LeapPhysicsBase类中state的终极目的:
    protected virtual void FixedUpdate()
    {
      if (m_target == null && State == LeapPhysicsState.Interacting)
      {
        State = LeapPhysicsState.Reflecting;
      }

      switch (State)
      {
        case LeapPhysicsState.Interacting://交互状态
          ApplyInteractions();
          break;
        case LeapPhysicsState.Reflecting://从交互状态返回正常状态
          ApplyPhysics();
          break;
        case LeapPhysicsState.Disabled://关闭(正常)状态
          break;
        default:
          break;
      }
      ApplyConstraints();
    }
这是一个大写的清晰明了 之前对State枚举类型在这里一下就亮了
用Switch来确定状态执行相应状态的方法集
至此 总分总式的把Solider说完了 已经 洋洋洒洒的说了1w字了 那么 我就继续吧
滚轮/表盘(Dial)
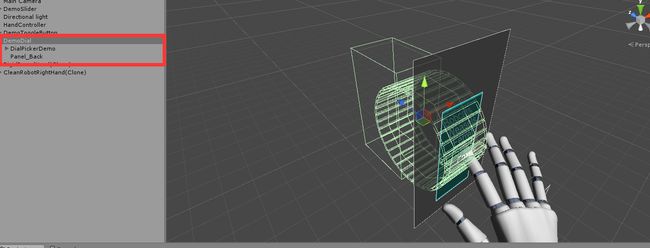
从trigger的网格来看就非常的复杂 所以要是自己想设计一个这种手势操作的UI组件 可以说难度非常大
并且 坦白说 这个组件如果不经过自定义或者修改非常的华而不实 因为 他的选项实在是太多了 多到你手退出操作区域的时候 都会产生误操作
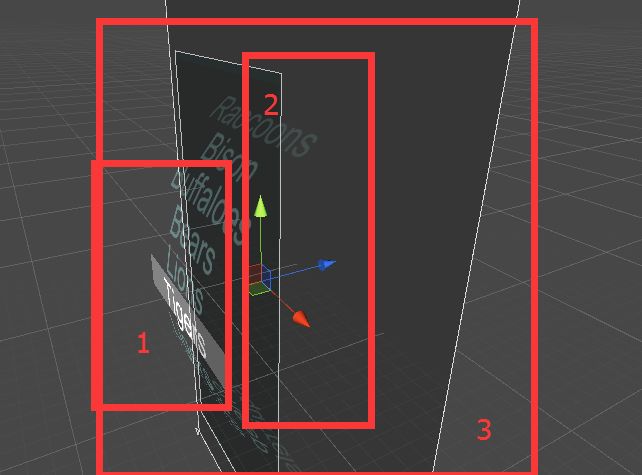
那么我们就先从可见外观结构说起
1.picker//选择器
2.maskpanel//荫罩面
3.backpanel //背景面
更进一步:
从这开始就开始有意思了起来
首先 这是两个collider 小的这个被设置为滚轮上的字在这个区域被显示为高亮(HighLight)
HilightTextVolume这个类中 清晰的表明了这一点 通过 触发器trigger的三个函数 巧妙的控制了字体的高亮显示
   //进入
   void OnTriggerEnter(Collider other) {
        Text text = other.GetComponentInChildren<Text>();
      if (text == null) { return; }
        text.color = Color.white;
    }
  //保持
    void OnTriggerStay(Collider other){
        Text text = other.GetComponentInChildren<Text>();
      if (text == null) { return; }
        text.color = Color.white;
        CurrentHilightValue = text.text;
    }
    //离开
    void OnTriggerExit(Collider other) {
      Text text = other.GetComponentInChildren<Text> ();
      if (text == null) { return; }
      text.color = textColor;
    }
这给我们提供了一个设计技巧 对于UI设计提升期的童鞋来说 是个相当有用的模式
进入->保持->离开
|________________|
而之后的用于隐藏的collider原理几乎一致在DatePickerHideVolume类中:
    void OnTriggerEnter(Collider other) {
    Text text = other.GetComponentInChildren<Text> ();
    if (text == null) { return; }
    text.enabled = false;//设置隐藏
    }

    void OnTriggerExit(Collider other) {
    Text text = other.GetComponentInChildren<Text> ();
    if (text == null) { return; }
    text.enabled = true;//设置显示
    }
那个大的collider 被放在转盘的圆心位置 所以转盘总有一半是被隐藏的 这样就保证了前视的时候后面的文字不会对前面的造成干扰
都是利用触发器来实现 但是还有个
比较有趣
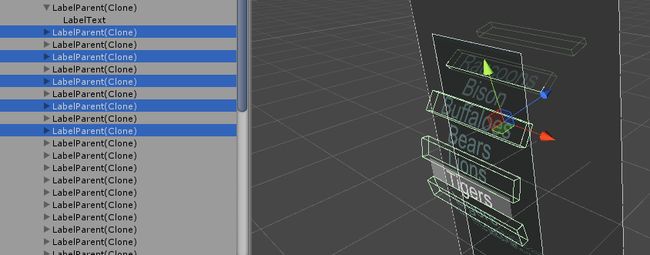
的问题 再来看图
我们发现 从下到上 文字的透明度越高这是怎么做到的呢?
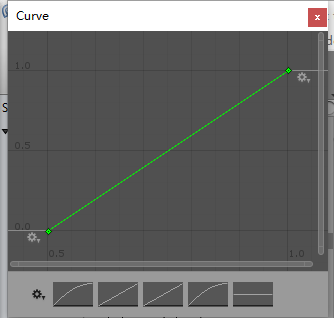
首先 定义了一条曲线
public AnimationCurve FadeCurve;
在曲线之后通过曲线来计算 透明值
    float opacityMod = FadeCurve.Evaluate(referenceDotDirection);//计算不透明度模
    float goalOpacity = m_originalLabelOpacity * opacityMod;//目标透明度
      foreach(Text textComponent in m_textLabels) {
      //遍历设定
      Color textColor = textComponent.color;
      textColor.a = goalOpacity;//对文字颜色的Alpha通道进行修改
      textComponent.color = textColor;
    }
讲完了这个外在 再来讲内在的控制部分
准备好受虐吧 这部分我也不太懂了 所以我尽量说我的理解 有错误请指出
先是生成label
public List< string > DialLabels;
根据字符串List的数量来生成label 这个数量我们当然可以确定 所以 我们想使用这个控件 的话
当然 应该使得这个list.count的数量趋近合理 这样不仅使得控件简洁明了 还是得交互变得更容易 准确性更高
 private void generateAndLayoutLabels() {
      float currentLayoutXAngle = LabelAngleRangeStart;

      for( int i=1; i<=DialLabels.Count; i++ ) {
        Transform labelPrefab = Instantiate(LabelPrefab, DialCenter.transform.position, transform.rotation) as Transform;

        //生成

        labelPrefab.Rotate(currentLayoutXAngle, 0f, 0f);
        LabelAngles.Add (-currentLayoutXAngle);
        labelPrefab.parent = DialCenter;
        labelPrefab.localScale = new Vector3(1f, 1f, 1f);
        Text labelText = labelPrefab.GetComponentInChildren<Text>();
        labelText.text = DialLabels[i - 1];
        DialLabelAngles.Add(DialLabels[i - 1], -currentLayoutXAngle);
        labelText.transform.localPosition = new Vector3(0f, 0f, -DialRadius);
        currentLayoutXAngle = ((Mathf.Abs(LabelAngleRangeStart) + Mathf.Abs(LabelAngleRangeEnd))/(DialLabels.Count)) * -i;

        //调整
      }

      LabelPrefab.gameObject.SetActive(false); // Turn off the original prefab that was copied.
    }
开始句柄
更改句柄
结束句柄
 //模拟交互的句柄
    public event EventHandler<EventArg<int>> ChangeHandler;
    public event EventHandler<EventArg<int>> StartHandler;
    public event EventHandler<EventArg<int>> EndHandler;
当然触发检测是必不可少的
        void OnTriggerEnter (Collider other)
        {
          if (target_ == null && IsHand (other)) {
          //像之前一样确定触发体是手
            target_ = other.gameObject;//旋转角
            pivot_ = transform.InverseTransformPoint (target_.transform.position) - transform.localPosition;//旋转轴心
            if (GetComponent<Rigidbody>().isKinematic == false)
              transform.GetComponent<Rigidbody>().angularVelocity = Vector3.zero;
            interacting_ = true;
            if (dialGraphics)
              dialGraphics.HilightDial ();
          }
        }

        void OnTriggerExit (Collider other)
        {
          if (other.gameObject == target_) {
            EndInteraction ();//结束交互
          }
        }
从触发检测部分计算出的目标角度和旋转轴心 然后我们找到应用的方法
    protected virtual void ApplyRotations ()
    {
    //旋转至目标角度
      Vector3 curr_direction = transform.InverseTransformPoint (target_.transform.position) - transform.localPosition;
      //轴心
      transform.localRotation = Quaternion.FromToRotation (pivot_, curr_direction) * transform.localRotation;
    }
而这一切都在基类的FixedUpdate()中运行
    void FixedUpdate ()
    {
      if (target_ == null && interacting_) {
        // 当交互时手已经被销毁

        EndInteraction ();//结束交互
      }
      if (target_ != null) {
        ApplyRotations ();//应用旋转
      }
      ApplyConstraints ();//应用约束以保证交互结束后 返回相应位置
    }
至此 一些零碎的约束我已经无力再写下去了 就来归纳一下组件共同拥有的一些特性:
1.触发检测用于检测手和组件的交互 同时一般返回 :
触发初始信息
触发过程信息
触发结束信息2.约束条件:
一般含有交互产生的改变量
交互后根据规则的对改变量的判断
对判断结果的执行3.静止状态:
一般含有系统用于初始化的初始量
对于不产生交互状态下的静态量
一般为产生触发后约束条件的结果
至此
我们讲完了所有四个预置控件的结构与应用方法
为我们在unity3D引擎中设计 VR/AR环境下的交互逻辑铺平了道路;
但是很明显的是 在VR环境中设计交互操作明显有一定的方法论 触发设计,特效设计,逻辑设计每个部分单独拿出来都可以写一本书 并且在讲求经验的情况下 这和以前的UI设计相去甚远 平面UI的难度因为操控体系的健全而变得较为容易 但在三维环境下 无论是对手的模拟 还是对现实环境的模拟 都使得UI设计变得没有统一规则
你可以虚拟出一个平面实现来类触屏操作而套用平面UI的设计方法
更可以通过虚拟物体来体现虚拟现实技术的优势 这就使得设计变得无限可能
这两种方式并没有优劣之分 各个应用环境之下 恰当的采用 效果才是最佳的。
最后 因为这系列文章过长 因此下次更新可能会在较长之后了(都是眼泪);
