Google Test源码解析
单元测试的重要性不言而喻,在软件工程的V模型研发流程中,它是软件研发完成后紧接着测试人员工作内容的一步,也是研发人员最后对代码进行把关的地方如果做的不好,在我们公司那是要扣你绩效的。
那有人就说了,现在都不流行瀑布模式了,现在流行的是极限编程XP,是敏捷开发。确实,我们公司就有小组在使用敏捷编程的方式进行开发,但是敏捷开发,其核心是极限编程,极限编程又是TDD,即测试驱动开发,其要求在编码之前就写好单元测试,每次迭代周期内,通过这些单元测试来判定是否达到本次迭代的目的。可见,极限编程对于单元测试的要求更高,所以我们学好单元测试是极有必要的。
但是我发现现在的PM(注意是Program Monkey)对于单元测试是越来越不重视了,就拿身边的例子来说,主要理由是“没时间”。也是,项目进度都赶不上,哪来的时间进行单元测试。网上有人总结了做单元测试的几点理由,找到一条比较合理的,粘了过来:
1. 不要让你的客户发现令人尴尬的bug。编写单元测试能让你覆盖大部分的应用案例,并且发现常见的问题。
2. 快速的测试复杂的场景而不用手工的在应用中重现这些问题。
3. 通过反复的测试,你在添加新功能的时候不会影响程序已有的功能。你永远无法知道你正在写的代码会对现有的代码产生什么影响。
4. 通过早期的测试,你可以避免写不必要的代码。这样可以让代码更简洁,更容易维护,同时也节省开发时间。
5. 你不用为相同的代码重复的进行测试。
6. 保证代码的可读性。单元测试能让你代码的目的性和逻辑性更容易被理解。
7. 保证代码的可维护性。单元测试能强制让你对功能进行封装。
8. 无忧的进行重构。在你重构以后,跑一遍测试,你就知道重构是否对程序的功能造成了破坏。
9. 节省测试的时间。测试是自动进行的,速度的快慢取决于你的CPU :)
10. 感觉更安全。有多少次你担心新功能会破坏程序,或者在修改核心代码的时候提心吊胆?
11. 额外附送一个:明确的知道什么东西是有问题的。详细的单元测试能让你知道程序的那些地方是有问题的而不用到处去寻找bug。
可见单元测试的重要性,基于主要在工作中使用C++进行代码编写,c++的测试工具中,开源的,使用广泛的,跨平台的就只有GTest了。Google还开源了其模拟测试框架
Google C++ Mocking Framework 相关信息可以浏览:
1、Google C++ Testing Framework:
http://code.google.com/p/googletest/wiki/Documentation
2、Google C++ Mocking Framework
http://code.google.com/p/googlemock/wiki/V1_7_ForDummies
这里由于有众神们对GTest应用方法的研究文章,此我推荐一个系列的文章,也是GTest官网上推荐的文章,可见其受欢迎程度,供大家参考:
3、玩转Google开源C++单元测试框架Google Test系列(gtest)(总)
http://www.cnblogs.com/coderzh/archive/2009/04/06/1426755.html
So,我就不画蛇添足了,我要做如虎添翼的事情(抄袭公司周末培训上,提问哥的名言):
直接进入主题,本节不会去讲解过多的代码细节,只是带着大家浏览一下整个test的流程。
首先,以项目中需要判断服务器回传结果是否正确的函数为例,给其添加一个TEST测试用例:
TEST( 测试,判断检查 )

{

std::auto_ptr<umxns::CUMX2> umxStuCodeNamesAck(new umxns::CUMX2());

umxns::CUMXApp* umxApp = umxStuCodeNamesAck->GetMsg();

umxApp->SetParam( "sCode","0");

EXPECT_TRUE(JudgeSuccess(umxStuCodeNamesAck.release(),"判断检查"));

}
将其宏定义展开,得到:
int RUN_ALL_TESTS() ;


inline int RUN_ALL_TESTS() {

return ::testing::UnitTest::GetInstance()->Run();

}


class 测试_判断检查_Test : public ::testing::Test

{

public:

测试_判断检查_Test() {}

private:

virtual void TestBody();

static ::testing::TestInfo* const test_info_ ;

测试_判断检查_Test(测试_判断检查_Test const &);

void operator=(测试_驱动测试_Test const &);

};

::testing::TestInfo* const 测试_判断检查_Test::test_info_

= ::testing::internal::MakeAndRegisterTestInfo(

"测试",

"判断检查",

0, 0,

(::testing::internal::GetTestTypeId()),

::testing::Test::SetUpTestCase,

::testing::Test::TearDownTestCase,

new ::testing::internal::TestFactoryImpl< 测试_判断检查_Test>);


void 测试_判断检查_Test::TestBody()

{

CString strTmp = GetExcelDriver();

switch (0)

 case 0:

 default:

 if (const ::testing::AssertionResult gtest_ar = (::testing::internal:: EqHelper<(sizeof(::testing::internal::IsNullLiteralHelper("Microsoft Excel Driver (*.xls)")) == 1)>::Compare("\"Microsoft Excel Driver (*.xls)\"", "strTmp", "Microsoft Excel Driver (*.xls)", strTmp)))

 ;

 else

 ::testing::internal::AssertHelper(::testing::TestPartResult::kNonFatalFailure, "d:\\工程\\工程\\实现\\*******\\cnyxclient\\cnyxclient\\datainfomanager.cpp", 13, gtest_ar.failure_message()) = ::testing::Message();

}
这里可以看到,由于C++没有反射机制,不能够去判断有哪些测试需要执行。这里GOOGLE用了一个宏定义来进行测试的注册,也是最方便的一种方法了。
再一个,咱也要看到,TEST宏定义中define TEST(test_case_name, test_name) GTEST_TEST(test_case_name, test_name),第一个参数是测试用例的名字,第二个参数是测试的名字,即一个测试用例中,可以包含多个测试,gtest是将他们的名字作为函数进行声明和调用的,所以,最好不要用中文,不然就成我上面的样子了:)
可以看到,注册的核心步骤就是利用::testing::internal::MakeAndRegisterTestInfo函数将测试进行了注册:
我们跟踪到注册函数:MakeAndRegisterTestInfo中:
TestInfo* MakeAndRegisterTestInfo(

    const char* test_case_name,

    const char* name,

    const char* type_param,

    const char* value_param,

    TypeId fixture_class_id,

    SetUpTestCaseFunc set_up_tc,

    TearDownTestCaseFunc tear_down_tc,

    TestFactoryBase* factory) {

  TestInfo* const test_info =

      new TestInfo(test_case_name, name, type_param, value_param,

                   fixture_class_id, factory);

  GetUnitTestImpl()->AddTestInfo(set_up_tc, tear_down_tc, test_info);

  return test_info;

}
函数中,看到其声明了一个TestInfo指针,这个类包含的内容有:
- 所在测试用例名称
- 测试名称
- 是否需要执行该测试
- 测试工厂,用来生成测试类
- 测试结果
通过通过GetUnitTestImpl()返回的单件UnitTestImpl:
该函数是一个Convenience Function连接函数,用来返回全局单件类UnitTest的实例。这个单件会在第一次调用
UnitTest::GetInstance()函数时创建一个UnitTest,而后,每次调用都会返回同一个结果。至于为什么要用连接函数来获取
调用其中的AddTestInfo()方法.将上一步得到的TestInfo加入到UnitTestImpl中对应的的TestCase中去:
// Adds a TestInfo to the unit test.

  void AddTestInfo(Test::SetUpTestCaseFunc set_up_tc,

                   Test::TearDownTestCaseFunc tear_down_tc,

                   TestInfo* test_info) {

    if (original_working_dir_.IsEmpty()) {

      original_working_dir_.Set(FilePath::GetCurrentDir());

      GTEST_CHECK_(!original_working_dir_.IsEmpty())

          << "Failed to get the current working directory.";

    }


    GetTestCase(test_info->test_case_name(),

                test_info->type_param(),

                set_up_tc,

                tear_down_tc)->AddTestInfo(test_info);

  }
其中GetTestCase()负责获取一个TestCase,有该TestCase就直接插入,没有就创建:
TestCase* UnitTestImpl::GetTestCase(const char* test_case_name,

                                    const char* type_param,

                                    Test::SetUpTestCaseFunc set_up_tc,

                                    Test::TearDownTestCaseFunc tear_down_tc) {

  // Can we find a TestCase with the given name?

  const std::vector<TestCase*>::const_iterator test_case =

      std::find_if(test_cases_.begin(), test_cases_.end(),

                   TestCaseNameIs(test_case_name));


  if (test_case != test_cases_.end())

    return *test_case;


  // No.  Let's create one.

  TestCase* const new_test_case =

      new TestCase(test_case_name, type_param, set_up_tc, tear_down_tc);


  // Is this a death test case?

  if (internal::UnitTestOptions::MatchesFilter(test_case_name,

                                               kDeathTestCaseFilter)) {

    ++last_death_test_case_;

    test_cases_.insert(test_cases_.begin() + last_death_test_case_,

                       new_test_case);

  } else {

    // No.  Appends to the end of the list.

    test_cases_.push_back(new_test_case);

  }


  test_case_indices_.push_back(static_cast<int>(test_case_indices_.size()));

  return new_test_case;

}
调用函数AddTestInfo,添加到测试列里面
// Adds a test to this test case.  Will delete the test upon

// destruction of the TestCase object.

void TestCase::AddTestInfo(TestInfo * test_info) {

  test_info_list_.push_back(test_info);

  test_indices_.push_back(static_cast<int>(test_indices_.size()));

}
测试部分Body:
测试代码中,首先利用EqHelper模板类的compare方法进行比较:
  // This templatized version is for the general case.

  template <typename T1, typename T2>

  static AssertionResult Compare(const char* expected_expression,

                                 const char* actual_expression,

                                 const T1& expected,

                                 const T2& actual) {

    return CmpHelperEQ(expected_expression, actual_expression, expected,

                       actual);

  }
判断结果进入结果类AssertionResult
最后输出到Message中::testing::Message(),即打印到界面上
而其中的int RUN_ALL_TESTS() inline函数实际为:
inline int RUN_ALL_TESTS() {

        return ::testing::UnitTest::GetInstance()->Run();

}
UnitTest的Run函数如下:
int UnitTest::Run() {

…...

  return internal::HandleExceptionsInMethodIfSupported(

      impl(),

      &internal::UnitTestImpl::RunAllTests,

      "auxiliary test code (environments or event listeners)") ? 0 : 1;

…...

}
实际上还是UnitTestImpl的RunAllTests处理的.
bool UnitTestImpl::RunAllTests() {

…...

  for (int i = 0; forever || i != repeat; i++) {

    // Runs each test case if there is at least one test to run.

    if (has_tests_to_run) {

      // Sets up all environments beforehand.

      repeater->OnEnvironmentsSetUpStart(*parent_);

      ForEach(environments_, SetUpEnvironment);

      repeater->OnEnvironmentsSetUpEnd(*parent_);


      // Runs the tests only if there was no fatal failure during global

      // set-up.

      if (!Test::HasFatalFailure()) {

        for (int test_index = 0; test_index < total_test_case_count();

             test_index++) {

          GetMutableTestCase(test_index)->Run();

        }

      }


      // Tears down all environments in reverse order afterwards.

      repeater->OnEnvironmentsTearDownStart(*parent_);

      std::for_each(environments_.rbegin(), environments_.rend(),

                    TearDownEnvironment);

      repeater->OnEnvironmentsTearDownEnd(*parent_);

    }


    // Gets the result and clears it.

    if (!Passed()) {

      failed = true;

    }


  }

  return !failed;

}
在for循环中,首先执行了Sets up事件,其次执行了测试函数体,最后,执行了 Tears down事件。
如果有用GTest做过测试,就会知道在测试前后,都会有一些2工作需要做,可以给每个test单独设置启动前和完成后事件,同时也可以给整个testcase设置事件,操作非常方便。
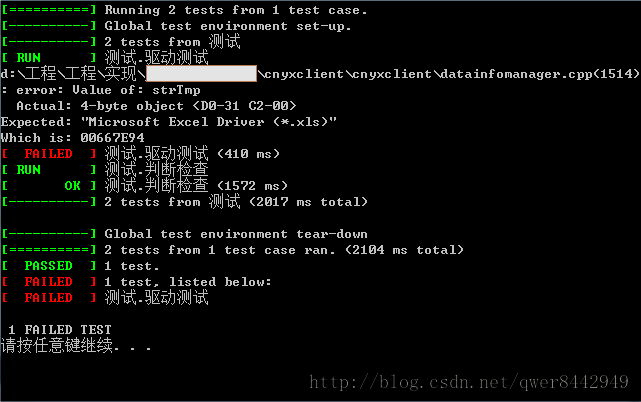
运行结果:

