Cocos2d-js官方完整项目教程翻译:七、加载TiledMap并且显示
一、简介
在本教程中,我将告诉你如何添加tiledmap的跑酷游戏作为新的背景。
我们还将学习如何使背景滚动无限和主角跑无限。
在这些神奇的是所有关于移动Cocos2D层。
二、做一些准备性的工作在我们开始动手之前,让我们添加资源文件和我们的游戏对应的名称。
三、资源管理课全局设置
因为我们将需要参考其他层的层内各。所以要检索的层的最佳方法是通过标签。
将下面的代码添加到globals.js:
if(typeof TagOfLayer == "undefined") {
    var TagOfLayer = {};
    TagOfLayer.background = 0;
    TagOfLayer.Animation = 1;
    TagOfLayer.Status = 2;
};
这里我们给背景层,层与层动画状态标签名称,因此我们可以通过标签获取其他层。
我们也需要在resource.js添加资源变量:
//Our two tiled map are named s_map00 and s_map01.
var res = {
    helloBG_png : "res/helloBG.png",
    start_n_png : "res/start_n.png",
    start_s_png : "res/start_s.png",
    PlayBG_png  : "res/PlayBG.png",
    runner_png  : "res/running.png",
    runner_plist : "res/running.plist",
    map_png: "map.png",
    map00_tmx: "map00.tmx",
    map01_tmx: "map01.tmx"
};

var g_resources = [
    //image
    res.helloBG_png,
    res.start_n_png,
    res.start_s_png,
    res.PlayBG_png,
    res.runner_png,
    res.runner_plist,
    res.map_png,
    res.map00_tmx,
    res.map01_tmx
];
上面的代码加有注释,所以让我们开始下一步。
四、开启ChipMunk的Debug Drawing
如果我们做的ChipMunk物理引擎,你最好使调试绘图。因此,调试过程会更得心应手。
将下面的代码添加到animationlayer.js的构造函数的函数:
this._debugNode = cc.PhysicsDebugNode.create(this.space);
// Parallax ratio and offset
this.addChild(this._debugNode, 10);
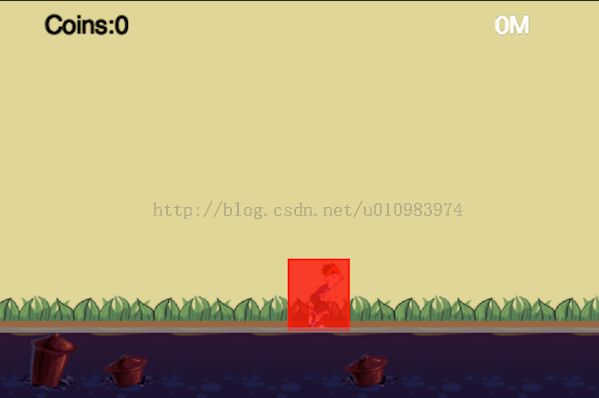
当你再次运行你的游戏时,你将看到你个红色的盒子在你的主角身上
五、TilesMap介绍
tiledmap是一个非常通用的概念在2D游戏。建设大型平面地图和一些视差滚动背景是很有用的。
tiledmap消耗更少的内存比正常的PNG文件。如果你想建立一些巨大的地图,它绝对是您正确的选择。
事不宜迟,让我们进入tiledmap。
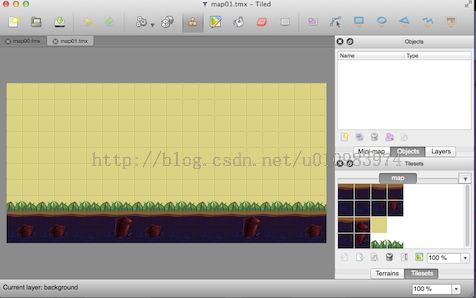
六、设计制作TiledMap背景地图
首先,你应该下载tiledmap。你可以从这里http://www.mapeditor.org/download.html下载它。tiledmap是一个跨平台的软件有许多不同的版本。你可以根据你的操作系统选择一个版本。下载后平铺的编辑器,你应该
熟悉它的使用。你可能想要在它的文档的外观。
当你感到舒服的瓷砖,你可以用我们提供的素材你平铺地图设计。
使两个细节处理平铺地图出了本教程的范围。
(*注:如果你不能使平铺地图的话,你可以跳过的过程和使用平铺地图由我们提供。*)

七、用tiledMap地图替换原来的地图
现在,它的时间与我们的新棒代替旧的静态背景图像平铺地图。
我们将在backgroundlayer.js做这个。首先,我们应该在四backgroundlayer类添加成员变量:
map00:null,
map01:null,
mapWidth:0,
mapIndex:0,
我们应该删除我们需要创建静态背景下的旧代码。
(*注:这里我取消注释的代码片段,您可以安全地删除它们。)
//        var winSize = cc.Director.getInstance().getWinSize();
//
//        var centerPos = cc.p(winSize.width / 2, winSize.height / 2);
//        var spriteBG = cc.Sprite.create(s_PlayBG);
//        spriteBG.setPosition(centerPos);
//        this.addChild(spriteBG);
最后 , 我们将添加 新的 代码片段 创建 平铺 地图 背景 。
this.map00 = cc.TMXTiledMap.create(res.map00_tmx);
this.addChild(this.map00);
this.mapWidth = this.map00.getContentSize().width;
this.map01 = cc.TMXTiledMap.create(res.map01_tmx);
this.map01.setPosition(cc.p(this.mapWidth, 0));
this.addChild(this.map01);
保存所有的更改然后运行项目:
在这里,我们添加两个地图。该map01旁边就是map00背景。在后面的章节中,我们将解释为什么我们要添加两个地图。
八、介绍场景显示
由于物理身体将对无限和精灵将同步它的位置与物理的身体。
几秒钟后,玩家将屏幕之外的,只是因为它是在上个教程。
所以我们需要移动游戏层的X位置每帧使它在可见光范围内。这里是animationlayer.js的代码片段:
getEyeX:function () {
    return this.sprite.getPositionX() - g_runnerStartX;
},
这里的geteyex函数计算动画层三角洲运动。
我们应该把相同的三角洲运动this.gamelayer包含背景层和动画在相反方向的层,这样我们就可以调用Update方法的每一帧在playscene.js更新方法末尾添加以下代码:
update:function (dt) {
        // chipmunk step
        this.space.step(dt);

        // Simulation cpSpaceAddPostStepCallback
        for(var i = 0; i < this.shapesToRemove.length; i++) {
            var shape = this.shapesToRemove[i];
            this.gameLayer.getChildByTag(TagOfLayer.background).removeObjectByShape(shape);
        }
        this.shapesToRemove = [];

        var animationLayer = this.gameLayer.getChildByTag(TagOfLayer.Animation);
        var eyeX = animationLayer.getEyeX();

        this.gameLayer.setPosition(cc.p(-eyeX,0));
    }
九、移动背景图层
建立背景层的运动过程几乎是我们在上一节相同。但我们需要做一些计算的两个瓦片地图。
让我们这样做。添加一个新的成员函数来backgroundlayer checkandreload:
checkAndReload:function (eyeX) {
        var newMapIndex = parseInt(eyeX / this.mapWidth);
        if (this.mapIndex == newMapIndex) {
            return false;
        }
        if (0 == newMapIndex % 2) {
            // change mapSecond
            this.map01.setPositionX(this.mapWidth * (newMapIndex + 1));
        } else {
            // change mapFirst
            this.map00.setPositionX(this.mapWidth * (newMapIndex + 1));
        }
        this.mapIndex = newMapIndex;
        return true;
    },
当eyex已超过屏幕的宽度,表达parseInt(eyex /本。mapwidth)将大于0的值。
我们将使用newmapindex决定地图需要多少像素需要移动。
然后我们应该在每帧中该功能。
update:function (dt) {
        var animationLayer = this.getParent().getChildByTag(TagOfLayer.Animation);
        var eyeX = animationLayer.getEyeX();
        this.checkAndReload(eyeX);
    }
最后 , 我们 应该在 背景 层 的init 方法 结束通话 scheduleupdate :
this.scheduleUpdate();十、把它包起来
最后。我们应该做一些最后的收尾工作。
修改playscene的onenter方法添加标签的层,并添加背景层,层层动画游戏
 onEnter:function () {
        this._super();
        this.initPhysics();
        this.gameLayer = cc.Layer.create();

        //add Background layer and Animation layer to gameLayer
        this.gameLayer.addChild(new BackgroundLayer(), 0, TagOfLayer.background);
        this.gameLayer.addChild(new AnimationLayer(this.space), 0, TagOfLayer.Animation);
        this.addChild(this.gameLayer);
        this.addChild(new StatusLayer(), 0, TagOfLayer.Status);

        this.scheduleUpdate();
    },
恭喜!您已成功完成本教程。跑去看它。
注意:如果你不想显示调试一个花栗鼠刚体图纸信息。你可以添加下面的代码创建后
的physicsdebugnode:
this._debugNode.setVisible(false);十一、总结
在本教程中,我们已经遇到了tiledmap和显示。这两个概念是非常重要的当你发展一物理无尽的游戏运行。
你可以从这里http://cocos2d-x.org/docs/tutorial/framework/html5/parkour-game-with-javascript-v3.0/chapter7/res/Parkour.zip下载整个项目。
十二、接下来我们写什么
在下一个教程中,我们将添加到我们的游戏币和障碍。在这个教程中,我们将学习如何重构我们的游戏代码,使其更可扩展。
我们也会做一些清理工作playscene和封装两类岩石的命名硬币。
保持调谐与下一个教程和编码快乐!
