Android自定义控件来袭(Scroller)
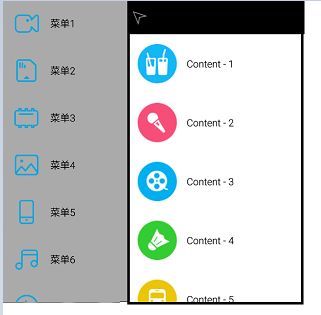
先看看效果图
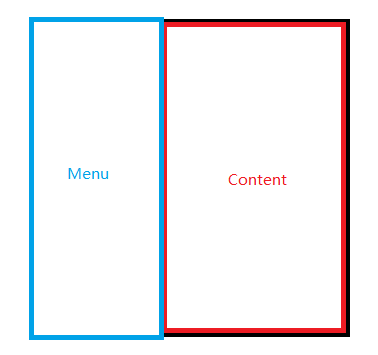
实现方法继承自ViewGroup需要我们自己来测量,布局,实现滑动的效果,处理滑动冲突,
自定义ViewGroup的一般思路是重写onMeasure方法,在onMeasure方法中调用measureChild来测量子View,然后调用setMeasuredDimension来测量自己的大小。然后重写onLayout方法,在onLayout中调用子View的layout方法来确定子View的位置,下面我们先来做好这两件工作
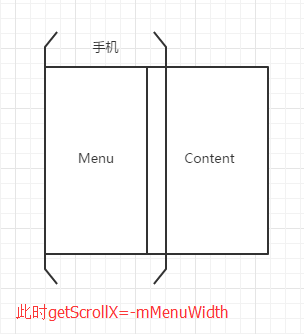
初始时候我们的Content应该是显示在屏幕中的,而Menu应该是显示在屏幕外的。当Menu打开时,应该是这种样子的
mMenuRightPadding是Menu距屏幕右侧的一个距离,因为我们Menu打开后,Content还是会留一部分,而不是完全隐藏的
public class MySlidingMenu extends ViewGroup {
public MySlidingMenu(Context context) {
        this(context, null, 0);
    }

    public MySlidingMenu(Context context, AttributeSet attrs) {
        this(context, attrs, 0);
    }

    public MySlidingMenu(Context context, AttributeSet attrs, int defStyleAttr) {
        super(context, attrs, defStyleAttr);
        DisplayMetrics metrics = new DisplayMetrics();
        WindowManager wm = (WindowManager) context.getSystemService(Context.WINDOW_SERVICE);
        wm.getDefaultDisplay().getMetrics(metrics);
         //获取屏幕的宽和高
        mScreenWidth = metrics.widthPixels;
        mScreenHeight = metrics.heightPixels;
         //设置Menu距离屏幕右侧的距离,convertToDp是将代码中的100转换成100dp
        mMenuRightPadding = convertToDp(context,100);
    }

 @Override
    protected void onMeasure(int widthMeasureSpec, int heightMeasureSpec) {
        //拿到Menu,Menu是第0个孩子
        mMenu = (ViewGroup) getChildAt(0);
        //拿到Content,Content是第1个孩子
        mContent = (ViewGroup) getChildAt(1);
        //设置Menu的宽为屏幕的宽度减去Menu距离屏幕右侧的距离
        mMenuWidth = mMenu.getLayoutParams().width = mScreenWidth - mMenuRightPadding;
        //设置Content的宽为屏幕的宽度
        mContentWidth = mContent.getLayoutParams().width = mScreenWidth;
        //测量Menu
        measureChild(mMenu,widthMeasureSpec,heightMeasureSpec);
        //测量Content
        measureChild(mContent, widthMeasureSpec, heightMeasureSpec);
        //测量自己,自己的宽度为Menu宽度加上Content宽度,高度为屏幕高度
        setMeasuredDimension(mMenuWidth + mContentWidth, mScreenHeight);
    }

@Override
    protected void onLayout(boolean changed, int l, int t, int r, int b) {
        //摆放Menu的位置,根据上面图可以确定上下左右的坐标
        mMenu.layout(-mMenuWidth, 0, 0, mScreenHeight);
        //摆放Content的位置
        mContent.layout(0, 0, mScreenWidth, mScreenHeight);
    }


/** * 将传进来的数转化为dp */
    private int convertToDp(Context context , int num){
        return (int) TypedValue.applyDimension(TypedValue.COMPLEX_UNIT_DIP,num,context.getResources().getDisplayMetrics());
    }
}
目前我们的侧滑菜单中的两个子View的位置应该是这个样子
接下来我们编写xml布局文件
left_menu.xml 左侧菜单的布局文件,是一个ListView
<?xml version="1.0" encoding="utf-8"?>
<RelativeLayout xmlns:android="http://schemas.android.com/apk/res/android" android:layout_width="match_parent" android:layout_height="match_parent">
   <ListView  android:id="@+id/menu_listview" android:layout_width="wrap_content" android:divider="@null" android:dividerHeight="0dp" android:scrollbars="none" android:layout_height="wrap_content">
   </ListView>
</RelativeLayout>
其中ListView的Item布局为left_menu_item.xml
<?xml version="1.0" encoding="utf-8"?>
<LinearLayout xmlns:android="http://schemas.android.com/apk/res/android" android:orientation="horizontal" android:layout_width="match_parent" android:gravity="center_vertical" android:layout_height="match_parent">
    <ImageView  android:id="@+id/menu_imageview" android:layout_width="wrap_content" android:layout_height="wrap_content" android:src="@drawable/menu_1" android:padding="20dp" />
    <TextView  android:id="@+id/menu_textview" android:layout_width="wrap_content" android:layout_height="wrap_content" android:text="菜单1" android:textColor="#000000" android:textSize="20sp" />
</LinearLayout>
我们再来编写内容区域的布局文件 content.xml 其中有一个header,header中有一个ImageView,这个ImageView是menu的开关,我们点击他的时候可以自动开关menu,然后header下面也是一个istview
<?xml version="1.0" encoding="utf-8"?>
<LinearLayout xmlns:android="http://schemas.android.com/apk/res/android" android:orientation="vertical" android:layout_width="match_parent" android:layout_height="match_parent">
    <LinearLayout  android:layout_width="match_parent" android:layout_height="65dp" android:background="#000000" android:gravity="center_vertical" android:orientation="horizontal" >
        <ImageView  android:id="@+id/menu_toggle" android:layout_width="40dp" android:layout_height="40dp" android:src="@drawable/toggle" android:paddingLeft="10dp" />
    </LinearLayout>
        <ListView  android:id="@+id/content_listview" android:layout_width="match_parent" android:layout_height="wrap_content" android:dividerHeight="0dp" android:divider="@null" android:scrollbars="none" />
</LinearLayout>
content的item的布局文件为 content_item.xml
<?xml version="1.0" encoding="utf-8"?>
<LinearLayout xmlns:android="http://schemas.android.com/apk/res/android" android:orientation="horizontal" android:layout_width="match_parent" android:gravity="center_vertical" android:background="#ffffff" android:layout_height="match_parent">
    <ImageView  android:id="@+id/content_imageview" android:layout_width="80dp" android:layout_height="80dp" android:src="@drawable/content_1" android:layout_margin="20dp" />
    <TextView  android:id="@+id/content_textview" android:layout_width="wrap_content" android:layout_height="wrap_content" android:text="Content - 1" android:textColor="#000000" android:textSize="20sp"/>


</LinearLayout>
在activity_main.xml中,我们将menu和content添加到我们的slidingMenu中
<RelativeLayout xmlns:android="http://schemas.android.com/apk/res/android"
    android:layout_width="match_parent"
    android:layout_height="match_parent"
    android:background="#aaaaaa"
   >
<com.example.user.slidingmenu.MySlidingMenu
    android:id="@+id/slidingmenu"
    android:layout_width="wrap_content"
    android:layout_height="match_parent"
    >
        <include
            android:id="@+id/menu"
            layout="@layout/left_menu"
            />
        <include
            android:id="@+id/content"
            layout="@layout/content"
            />
</com.example.user.slidingmenu.MySlidingMenu>

</RelativeLayout>
现在应该是这种效果
左侧菜单是隐藏在屏幕左侧外部的,但是现在还不能滑动,如果想要实现滑动功能,我们可以使用View的scrollTo和scrollBy方法,这两个方法的区别是scrollTo是直接将view移动到指定的位置,scrollBy是相对于当前的位置移动一个偏移量,所以我们应该重写onTouchEvent方法,用来计算出当前手指的一个偏移量,然后使用scrollBy方法一点一点的移动,就形成了一个可以跟随手指移动的view的动画效果了
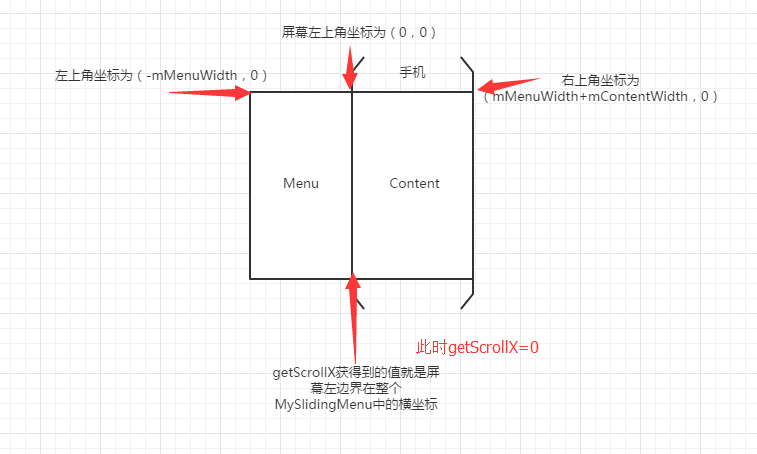
在写代码之前,我们先扫清一下障碍,我们先来弄清楚这些坐标是怎么回事
好了,把这些坐标弄清楚后,我们就简单多了,下面直接看onTouchEvent方法
@Override
    public boolean onTouchEvent(MotionEvent event) {
        int action = event.getAction();
        switch (action){
            case MotionEvent.ACTION_DOWN:
                mLastX = (int) event.getX();
                mLastY = (int) event.getY();
                break;
            case MotionEvent.ACTION_MOVE:
                int currentX = (int) event.getX();
                int currentY = (int) event.getY();
                //拿到x方向的偏移量
                int dx = currentX - mLastX;
                if (dx < 0){//向左滑动
                    //边界控制,如果Menu已经完全显示,再滑动的话
                    //Menu左侧就会出现白边了,进行边界控制
                    if (getScrollX() + Math.abs(dx) >= 0) {
                        //直接移动到(0,0)位置,不会出现白边
                        scrollTo(0, 0);

                    } else {//Menu没有完全显示呢
                        //其实这里dx还是-dx,大家不用刻意去记
                        //大家可以先使用dx,然后运行一下,发现
                        //移动的方向是相反的,那么果断这里加个负号就可以了
                        scrollBy(-dx, 0);

                    }

                }else{//向右滑动
                    //边界控制,如果Content已经完全显示,再滑动的话
                    //Content右侧就会出现白边了,进行边界控制
                    if (getScrollX() - dx <= -mMenuWidth) {
                        //直接移动到(-mMenuWidth,0)位置,不会出现白边
                        scrollTo(-mMenuWidth, 0);

                    } else {//Content没有完全显示呢
                        //根据手指移动
                        scrollBy(-dx, 0);

                    }

                }
                mLastX = currentX;
                mLastY = currentY;

                break;


        }
        return true;
    }
现在我们的SlidingMenu依然是不能够水平滑动的,但是listview可以竖直滑动,原因是我们的SlidingMenu默认是不拦截事件的,那么事件会传递给他的子View去执行,也就是说传递给了Content的ListView去执行了,所以listview是可以滑动的,为了简单,我们先重写onInterceptTouchEvent方法,我们返回true,让SlidingMenu拦截事件,我们的SlidingMenu就能够滑动了,但是ListView是不能滑动的,等下我们会进行滑动冲突的处理,现在先实现SlidingMenu的功能
@Override
    public boolean onInterceptTouchEvent(MotionEvent ev) {
        return true;
    }
我们在构造方法中初始化一个Scroller
public MySlidingMenu(Context context, AttributeSet attrs, int defStyleAttr) {
        super(context, attrs, defStyleAttr);
        ...
        mScroller = new Scroller(context);
        ...
    }
然后重写computeScroll方法,这个方法是保证Scroller自动滑动的必须方法,这是一个模板方法,到哪里都这么些就好了
@Override
    public void computeScroll() {
        if (mScroller.computeScrollOffset()){
            scrollTo(mScroller.getCurrX(), mScroller.getCurrY());
            invalidate();
        }
    }
接着我们在onTouchEvent的ACTION_UP中进行判断,判断当前menu打开了多少
case MotionEvent.ACTION_UP:
                if (getScrollX() < -mMenuWidth / 2){//打开Menu
                    //调用startScroll方法,第一个参数是起始X坐标,第二个参数
                    //是起始Y坐标,第三个参数是X方向偏移量,第四个参数是Y方向偏移量
                    mScroller.startScroll(getScrollX(), 0, -mMenuWidth - getScrollX(), 0, 300);
                    //设置一个已经打开的标识,当实现点击开关自动打开关闭功能时会用到
                    isOpen = true;
                    //一定不要忘了调用这个方法重绘,否则没有动画效果
                    invalidate();
                }else{//关闭Menu
                    //同上
                    mScroller.startScroll(getScrollX(), 0, -getScrollX(), 0, 300);
                    isOpen = false;
                    invalidate();
                }

                break;
关于startScroll中的startX和startY好判断,那么dx和dy怎么计算呢?其实也非常简单,比如我们startX坐标为30,我们想移动到-100,那么startX+dx = -100 –> dx = -100 - startX –> dx = -130
好了现在我们就可以实现松开手指后自动滑动的动画效果了
现在我们还需要点击content中左上角的一个三角,如果当前menu没有打开,则自动打开,如果已经打开,则自动关闭的功能,自动滑动的效果我们要借助Scroller.startScroll方法
/** * 点击开关,开闭Menu,如果当前menu已经打开,则关闭,如果当前menu已经关闭,则打开 */
    public void toggleMenu(){
        if (isOpen){
            closeMenu();
        }else{
            openMenu();
        }
    }

    /** * 关闭menu */
    private void closeMenu() {
        //也是使用startScroll方法,dx和dy的计算方法一样
        mScroller.startScroll(getScrollX(),0,-getScrollX(),0,500);
        invalidate();
        isOpen = false;
    }

    /** * 打开menu */
    private void openMenu() {
        mScroller.startScroll(getScrollX(),0,-mMenuWidth-getScrollX(),0,500);
        invalidate();
        isOpen = true;
    }
处理滑动冲突
由于我们的menu和content是listview,listview是支持竖直滑动的,而我们的slidingMenu是支持水平滑动的,因此会出现滑动的冲突。刚才我们直接在onInterceptTouchEvent中返回了true,因此SlidingMenu就会拦截所有的事件,而ListView接收不到任何的事件,因此ListView不能滑动了,我们要解决这个滑动冲突很简单,只需要判断当前是水平滑动还是竖直滑动,如果是水平滑动的话则让SlidingMenu拦截事件,如果是竖直滑动的话就不拦截事件,把事件交给子View的ListView去执行
@Override
    public boolean onInterceptTouchEvent(MotionEvent ev) {
        boolean intercept = false;
        int x = (int) ev.getX();
        int y = (int) ev.getY();
        switch (ev.getAction()){
            case MotionEvent.ACTION_DOWN:
                intercept = false;
                break;
            case MotionEvent.ACTION_MOVE:
                int deltaX = (int) ev.getX() - mLastXIntercept;
                int deltaY = (int) ev.getY() - mLastYIntercept;
                if (Math.abs(deltaX) > Math.abs(deltaY)){//横向滑动
                    intercept = true;
                }else{//纵向滑动
                    intercept = false;
                }
                break;
            case MotionEvent.ACTION_UP:
                intercept = false;
                break;
        }
        mLastX = x;
        mLastY = y;
        mLastXIntercept = x;
        mLastYIntercept = y;
        return intercept;
    }
現在就可以了,


