APICloud平台的融云2.0集成
融云2.0的官方文档地址:http://docs.apicloud.com/端API/开放SDK/rongCloud2
项目需要IM模块,最后还是选择了融云.在iOS原生开发中,融云sdk集成了聊天界面,给开发者提供了很大的便利,但是在apicloud平台上,由于开发者应用IM的场景各异,需求不统一,所以官方没有将聊天界面集成到模块中.
因此我选择了AUI这套专门为apicloud提供的前端开发框架进行IM界面的搭建.AUI官方地址:http://www.auicss.com.
这套框架集成了很多手机端的UI,效果不错,而且还在不断的更新中,大家不妨尝试一下.我用过其中的几个,总体感觉还是不错的!
接下来,就具体的说一说RongYun集成的步骤了(本文会不断的更新,若发现不妥之处和需要改进的地方,可以给我留言,谢谢!)
一.准备工作
在集成融云2.0之前,首先要到融云官网上进行注册,然后添加应用信息,并且生成两个测试用的targetId并记录下对应的token(这种方法仅为测试使用) 融云的官网:http://www.rongcloud.cn
之后在API调试里面 生成userID对应的token,这些信息在初始化融云时会用到,
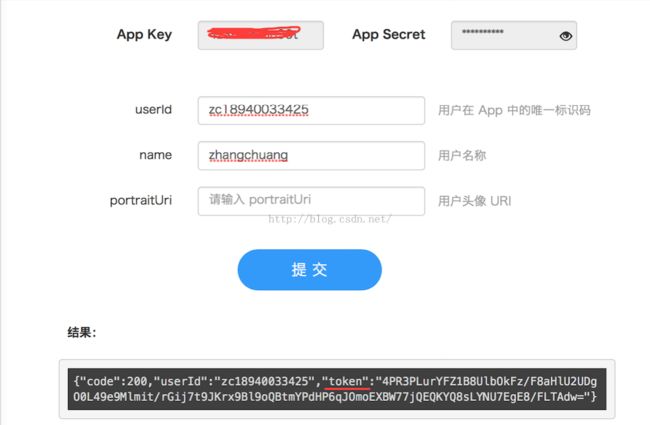
之后再次生成一个userID,并记录对应的token.这样,就相当于建立了两个用户,用户A和用户B,,之后便可实现用户A与用户B之间的通信了.
上述内容准备完之后,就要在自己的apicloud应用中添加融云2.0模块了. apicloud中的融云集成之前的准备在此略过,可以参照官方文档.
二.融云2.0的集成
在详细的介绍之前,先要说一说这个聊天界面使用的框架和模板.
1.doT.js (不熟悉的小伙伴可以参照这篇博客: http://www.cnblogs.com/kuikui/p/3505768.html)
2.AUI 前端UI框架(地址在上面给过了,很实用,小伙伴们可以看一看).
3.UIChatBox, 文档地址: http://docs.apicloud.com/端API/界面布局/UIChatBox#m11
好了,有了这几个,就可以轻松的完成一个简单的聊天界面的集成了!
1.融云2.0的初始化
首先要在config文件里填入一下代码
<feature name="rongCloud2">
    <param name="appKey" value="这里填写在融云官网自己app对应的key" />
  </feature>
<span style="font-size:14px;">apiready = function () {

        //RongY初始化
        var rong = api.require('rongCloud2');
        rong.init(function (ret, err) {
            if (ret.status == 'error') {
                api.toast({msg: err.code});
            } else {
                api.toast({msg: "success"});
                //链接到RongY
                rong.connect({
                            token: '自己的token'
                        },
                        function (ret, err) {
//                            alert(JSON.stringify(ret));
                            if (ret.status == 'success') {
//                        api.toast({msg: ret.result.userId});
                                isConnetced = true;
//                        alert(isConnetced);
                                //实时监听收到的消息

                            }
                        });
            }
        });
    }</span>
2.聊天界面UI
<span style="font-size:14px;"><body>

<!--//发送语音提示框-->
<div class="aui-toast" style="display:none" id="loading">
    <div class="aui-toast-loading"></div>
    <div class="aui-toast-content"></div>
</div>
<!--聊天页面-->
<div id="wrap" class="flex-wrap flex-vertical">
    <div id="message-content2" style="margin-top: 10px"></div>
    <div class="aui-content aui-content-padded" id="message-content">
        <script id="message-content-template" type="text/x-dot-template">

            {{for(var i=0;i<it.length ;i++){}}

            {{? it[i].tag=== 'TxtMsg'}}
            <div class="{{=it[i].firstSendType}}" style="margin-top: 20px">
                {{? it[i].messageDirection=== 'SEND'}}
                <div class="aui-text-center history-date">{{=it[i].sentTime}}</div>
                {{?? it[i].messageDirection=== 'RECEIVE'}}
                <div class="aui-text-center history-date">{{=it[i].receivedTime}}</div>
                {{?}}
                <div class="{{=it[i].secondSendType}}"><img src="../image/demo1.png"></div>
                <div class="{{=it[i].thirdSendType}}">
                    <div class="{{=it[i].fourthSendType}}"></div>
                    <span id="txt">{{=it[i].content.text}}</span>
                </div>
            </div>
            {{?}}
            {{? it[i].tag === 'ImgMsg'}}
            <div class="{{=it[i].firstSendType}}" style="margin-top: 20px">
                {{? it[i].messageDirection=== 'SEND'}}
                <div class="aui-text-center history-date">{{=it[i].sentTime}}</div>
                {{?? it[i].messageDirection=== 'RECEIVE'}}
                <div class="aui-text-center history-date">{{=it[i].receivedTime}}</div>
                {{?}}
                <div class="{{=it[i].secondSendType}}"><img src="../image/demo1.png"></div>
                <div class="{{=it[i].thirdSendType}}">
                    <div class="{{=it[i].fourthSendType}}"></div>
                    <img class="lazy" id="image" style="width: 100px; height: 100px" ;
                         data-original="{{=it[i].content.imageUrl}}"
                         onclick="clickShowBigPic('{{=it[i].content.imageUrl}}')">
                </div>
            </div>
            {{?}}
            {{? it[i].tag === 'VcMsg'}}
            <div class="{{=it[i].firstSendType}}" style="margin-top: 20px">
                {{? it[i].messageDirection=== 'SEND'}}
                <div class="aui-text-center history-date">{{=it[i].sentTime}}</div>
                {{?? it[i].messageDirection=== 'RECEIVE'}}
                <div class="aui-text-center history-date">{{=it[i].receivedTime}}</div>
                {{?}}
                <div class="{{=it[i].secondSendType}}"><img src="../image/demo1.png"></div>
                <div class="{{=it[i].thirdSendType}}">
                    <div class="{{=it[i].fourthSendType}}"></div>

                    <div class="aui-chat-status"><i id="voice-length{{=it[i].messageId}}" class="">{{=it[i].content.duration}}"</i>
                    </div>
                    {{? it[i].content.duration <= '15'}}
                    <span style="width: {{=it[i].content.duration * 15}}px;height: 30px; border-radius: 5px; background: green"
                          onclick="playVoice('{{=it[i].messageId}}', '{{=it[i].</span><span style="font-family: Arial, Helvetica, sans-serif; font-size: 14px;">content</span><span style="font-family: Arial, Helvetica, sans-serif;">}}')"></span></span><span style="font-size:14px;">
                    {{??}}
                     <span style="width: 170px;height: 30px; border-radius: 5px; background: green"
                           onclick="playVoice('{{=it[i].messageId}}', '{{=it[i].content}}')"></span>
                    {{?}}
                </div>
            </div>
            {{?}}
            {{}}}
        </script>
    </div>
</div>
</body></span>
整个聊天界面的UI就是这些代码了,还是很简单的吧~~当然了,这里只实现了基本的功能,代码后续会不断的更新.
3.JS部分
<span style="font-size: 18px;"> </span><span style="font-size:14px;">//发送消息
    function sengTxtMsg(p) {
        if (isConnetced) {

            var para;
            var rong = api.require('rongCloud2');
            rong.sendTextMessage({
                        conversationType: 'PRIVATE',
                        targetId: '13644978865',
                        text: p.msg,
                        extra: ''
                    }, function (ret, err) {

//                        alert(JSON.stringify((ret)));
                        //这里要判断消息类型,最后设定消息标签.
                        if (ret.status == 'prepare') {
                            var tag;
                            if (ret.result.message.objectName == "RC:TxtMsg") {
                                tag = "TxtMsg";
                            } else if (ret.result.message.objectName == "RC:ImgMsg") {
                                tag = "ImgMsg";
                            } else if (ret.result.message.objectName == "RC:VcMsg") {
                                tag = "VcMsg";
                            } else if (ret.result.message.objectName == "RC:LBSMsg") {
                                tag = "LBSMsg";
                            }


                            para = {
                                firstSendType: "aui-chat-sender",
                                secondSendType: "aui-chat-sender-avatar",
                                thirdSendType: "aui-chat-sender-cont",
                                fourthSendType: "aui-chat-right-triangle",
                                content: ret.result.message.content,
                                tag: tag,
                                //时间戳
                                sentTime: getTrueTime(ret.result.message.sentTime),
                                //发送类型
                                messageDirection: "SEND"
                            };
                            //这里我设置的每隔3分钟才会生成一个时间戳,如果没到三分钟时间为空,就显示不出来了
                            if (!timeTag) {
                                para.sentTime = "";
                            }
                        }

                        else if (ret.status == 'success') {
                           //doT.js的拼接
                            msgObj.push(para);
                            var interText = doT.template($("#message-content-template").text());
                            $("#message-content2").html(interText(msgObj));
                            $("img.lazy").lazyload();
                            document.getElementsByTagName('BODY')[0].scrollTop = document.getElementsByTagName('BODY')[0].scrollHeight;

                            //时间戳判断为false 不再发送
                            timeTag = false;
                        }
                        else if (ret.status == 'error')
                            api.toast({msg: err.code});
                    }
            );
        } else {
            api.alert({
                msg: "未连接到服务器"
            });
        }
    }</span>
ok,再简单的说明一下:通过点击键盘发送按钮,获取到输入框的文本信息,将其作为参数传递到该方法中,通过该方法将消息发送到用户B.
//发送图片
    function sendPictures(index) {
        var type = "";
        if (index == "0") {
            type = 'album';
            getPicture(type);
        } else if (index == "1") {
            type = 'camera';
            getPicture(type);
        } else {
            getLocation();
        }
    }

    //获取图片
    function getPicture(type) {

        var para;
        api.getPicture({
            sourceType: type,
            encodingType: 'jpg',
            mediaValue: 'pic',
            destinationType: 'url',
            allowEdit: false,
            quality: 80,
//            targetWidth: 100,
//            targetHeight: 100,
            saveToPhotoAlbum: false
        }, function (ret, err) {
            if (ret) {

                var para;
                var rong = api.require('rongCloud2');
                rong.sendImageMessage({
                            conversationType: 'PRIVATE',
                            targetId: '13644978865',
                            imagePath: ret.data,
                            extra: ''
                        }, function (ret, err) {
//                            alert(JSON.stringify((ret)));
                            if (ret.status == 'prepare') {
                                var tag;
                                if (ret.result.message.objectName == "RC:TxtMsg") {
                                    tag = "TxtMsg";
                                } else if (ret.result.message.objectName == "RC:ImgMsg") {
                                    tag = "ImgMsg";
                                } else if (ret.result.message.objectName == "RC:VcMsg") {
                                    tag = "VcMsg";
                                } else if (ret.result.message.objectName == "RC:LBSMsg") {
                                    tag = "LBSMsg";
                                }

                                para = {
                                    firstSendType: "aui-chat-sender",
                                    secondSendType: "aui-chat-sender-avatar",
                                    thirdSendType: "aui-chat-sender-cont",
                                    fourthSendType: "aui-chat-right-triangle",
                                    content: ret.result.message.content,
                                    tag: tag,
                                    //时间戳
                                    sentTime: getTrueTime(ret.result.message.sentTime),
                                    //发送类型
                                    messageDirection: "SEND"
                                };
                                //判断时间
                                if (!timeTag) {
                                    para.sentTime = "";
                                }
                            }

                            else if (ret.status == 'progress') {

                            }
//                                api.toast({msg: ret.result.progress});
                            else if (ret.status == 'success') {

                                //时间戳判断为false 不再发送
                                timeTag = false;
                                msgObj.push(para);

                                var interText = doT.template($("#message-content-template").text());
                                $("#message-content2").html(interText(msgObj));
                                $("img.lazy").lazyload();
                                document.getElementsByTagName('BODY')[0].scrollTop = document.getElementsByTagName('BODY')[0].scrollHeight;
                            }

                            else if (ret.status == 'error') {
                                api.toast({msg: "请检查当前网络状态"});
                            }
                        }
                );
            } else {
                alert(JSON.stringify(err));
            }
        });
    }
//发送语音消息
    function sendVoiceMsg(para) {

        var param;
        var rong = api.require('rongCloud2');
        rong.sendVoiceMessage({
                    conversationType: 'PRIVATE',
                    targetId: '13644978865',
                    voicePath: para.path,
                    duration: para.duration,
                    extra: ''
                }, function (ret, err) {
//                    alert(JSON.stringify(ret));
                    if (ret.status == 'prepare') {
//                        api.toast({ msg: JSON.stringify(ret.result.message) });

                        var tag;
                        if (ret.result.message.objectName == "RC:TxtMsg") {
                            tag = "TxtMsg";
                        } else if (ret.result.message.objectName == "RC:ImgMsg") {
                            tag = "ImgMsg";
                        } else if (ret.result.message.objectName == "RC:VcMsg") {
                            tag = "VcMsg";
                        } else if (ret.result.message.objectName == "RC:LBSMsg") {
                            tag = "LBSMsg";
                        }

                        param = {
                            firstSendType: "aui-chat-sender",
                            secondSendType: "aui-chat-sender-avatar",
                            thirdSendType: "aui-chat-sender-cont",
                            fourthSendType: "aui-chat-right-triangle",
                            content: ret.result.message.content,
                            tag: tag,
                            //时间戳
                            sentTime: getTrueTime(ret.result.message.sentTime),
                            //发送类型
                            messageDirection: "SEND"
                        };
                        //判断时间
                        if (!timeTag) {
                            param.sentTime = "";
                        }

                    }

                    else if (ret.status == 'success') {
                        //改变时间戳状态
                        timeTag = false;

                        msgObj.push(param);
////                        alert(JSON.stringify(msgObj));
                        alert(JSON.stringify(msgObj[msgObj.length - 1]));
                        var interText = doT.template($("#message-content-template").text());
                        $("#message-content2").html(interText(msgObj));
                        $("img.lazy").lazyload();
                        document.getElementsByTagName('BODY')[0].scrollTop = document.getElementsByTagName('BODY')[0].scrollHeight;
                    }
                    else if (ret.status == 'error') {
//                        api.toast({ msg: err.code });
                    }
                }
        );
    }
</span>
上面就是我刚才发送的一连串语音消息了.
3.4 消息的接收
消息的接收,要用到 rong.setOnReceiveMessageListener这个方法.也就是这个方法会监听你收到的消息.具体代码如下
var rong = api.require('rongCloud2');
        rong.setOnReceiveMessageListener(function (ret, err) {
//            alert(JSON.stringify(ret));
            var tag;
            var para;
            if (ret.result.message.objectName == "RC:TxtMsg") {
                tag = "TxtMsg";
            } else if (ret.result.message.objectName == "RC:ImgMsg") {
                tag = "ImgMsg";
            } else if (ret.result.message.objectName == "RC:VcMsg") {
                tag = "VcMsg";
            } else if (ret.result.message.objectName == "RC:LBSMsg") {
                tag = "LBSMsg";
            }

            para = {
                firstSendType: "aui-chat-receiver",
                secondSendType: "aui-chat-receiver-avatar",
                thirdSendType: "aui-chat-receiver-cont",
                fourthSendType: "aui-chat-left-triangle",
                content: ret.result.message.content,
                tag: tag,
                receivedTime: getTrueTime(ret.result.message.receivedTime),
                messageDirection: "RECEIVE"
            };
            if (!timeTag) {
                para.receivedTime = "";
            }

            msgObj.push(para);
            var interText = doT.template($("#message-content-template").text());
            $("#message-content2").html(interText(msgObj));
            $("img.lazy").lazyload();
            document.getElementsByTagName('BODY')[0].scrollTop = document.getElementsByTagName('BODY')[0].scrollHeight;
            //时间戳状态
            timeTag = false;

        });
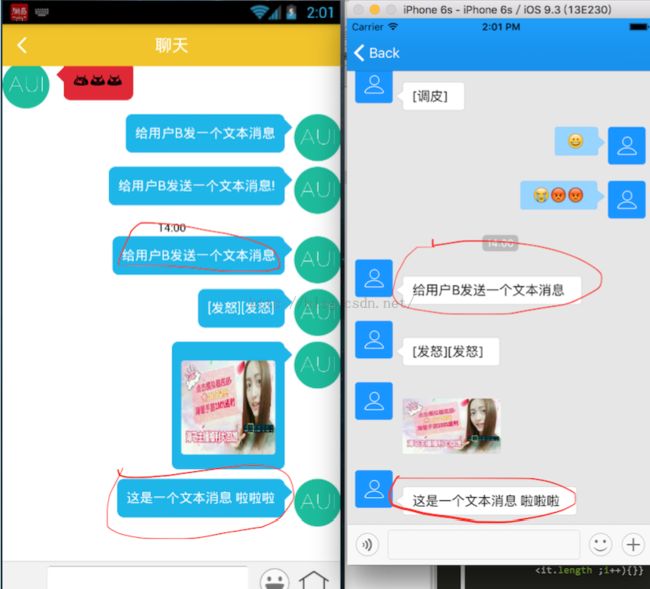
上面就是三条通过iPhone模拟器发送的消息,一条语音消息,一条图片消息,一天文字消息.
3.4 获取历史消息
获取历史消息也用对应的方法.而且这些消息是存在本地的,所以获取很方便
  //获取最近聊天信息
    function getRecentConverMsg() {

//        alert(num);
        var rong = api.require('rongCloud2');
        //先获取之前的聊天记录
        rong.getHistoryMessages({
            conversationType: 'PRIVATE',
            targetId: '13644978865',
            oldestMessageId: -1,
            count: 500
        }, function (ret, err) {


//            api.refreshHeaderLoadDone();
            var arr = [];
            arr = ret.result;
//            alert(JSON.stringify(arr));
            //记录最早的时间戳
            $api.setStorage('time', arr[arr.length - 1].receivedTime);
            for (var i = arr.length - 1; i >= 0; i--) {
                if (arr[i].messageDirection == "SEND") {
                    arr[i].firstSendType = "aui-chat-sender";
                    arr[i].secondSendType = "aui-chat-sender-avatar";
                    arr[i].thirdSendType = "aui-chat-sender-cont";
                    arr[i].fourthSendType = "aui-chat-right-triangle";
                } else {
                    arr[i].firstSendType = "aui-chat-receiver";
                    arr[i].secondSendType = "aui-chat-receiver-avatar";
                    arr[i].thirdSendType = "aui-chat-receiver-cont";
                    arr[i].fourthSendType = "aui-chat-left-triangle";
                }

                if (arr[i].objectName == "RC:TxtMsg") {
                    arr[i].tag = "TxtMsg";
                } else if (arr[i].objectName == "RC:ImgMsg") {
                    arr[i].tag = "ImgMsg";
                } else if (arr[i].objectName == "RC:VcMsg") {
                    arr[i].tag = "VcMsg";
                } else if (arr[i].objectName == "RC:LBSMsg") {

                }

                //如果时间间隔大于五分钟 加上时间戳
                if (arr[i].receivedTime - $api.getStorage("time") >= 180000) {
//                   alert("yes");
                    $api.setStorage('time', arr[i].receivedTime);
                    arr[i].receivedTime = getTrueTime(arr[i].receivedTime);
                    arr[i].sentTime = getTrueTime(arr[i].sentTime);
                } else {
                    arr[i].receivedTime = "";
                    arr[i].sentTime = "";
                }

                msgObj.push(arr[i]);
            }
            var interText = doT.template($("#message-content-template").text());
            $("#message-content2").prepend(interText(msgObj));
            $("img.lazy").lazyload();
            document.getElementsByTagName('BODY')[0].scrollTop = document.getElementsByTagName('BODY')[0].scrollHeight;

        });

    }
这样,我可以获取到之前3.31的聊天记录.
到这里,最基本的功能介绍完了,后续的功能还有很多,比如图片的查看,保存图片到本地,语音的播放等等,都是小问题了,这些代码就不放上来了.
本文会不断更新,欢希望大家提出更多的意见,一起进步!我的微信656593047,可以加我一起交流!!