iOS 9 学习系类: Gameplay Kit – Pathfinding
在之前的发布的 iOS 版本中,苹果就已经非常重视,让开发者编写游戏更简单。他们在 iOS 7 中介绍了 SpriteKit。 SpriteKit 是一个 2D 的图形和动画的库,你可以用来为 iOS 和 OS X 平台编写可交互的游戏。2012年的时候,他们又为 Mac 平台提供了 SceneKit 库,在 WWDC 2014 时,又将其拓展到了 iOS 平台,并增加了一些新的特性,例如粒子系统和物理模拟。
同时用过这两个库后,我个人可以作证,这两个库都是非常好用的。当你在游戏中用来展示可视化的元素时,他们非常有用。但是,毕竟我开发游戏的经验不多,我经常比较疑惑的是,如何去架构一个游戏项目,如果去构建模型,以及如何处理它们之间的关系。
随着 iOS 9 的发布,苹果试图通过一些方法来帮助开发者解决这些问题。他们介绍了一个新的库,GameplayKit,他是一组工具集,提供一系列的在 iOS 和 OS X 平台上开发的技术。
和高级别的游戏引擎,例如 SpriteKit 和 SceneKit 不同,GameplayKit 并不包括动画和渲染内容等,相应的,你可以使用 GameplayKit 来开发你的游戏玩法和机制,设置模型,使架构做到最小组件化和可伸缩。
-- 来自苹果文档中关于 GameplayKit 介绍部分。
这个库包涵了一下特性
- Randomisation
- Entities and Components
- State Machines
- Pathfinding
- Agents, Goals & Behaviours
- Rule Systems
这篇文章,着重介绍 pathfinding 在 GameplayKit 中的对应 API,当然也会涉及到一些其它部分。
创建一个 PathFinding 的例子
现在我们来创建一个简单的 SpriteKit 示例项目,来示范一下 GameplayKit 中 pathfinding 相关的API.
首先,在 Xcode 中创建一个 SpriteKit 类型游戏项目。
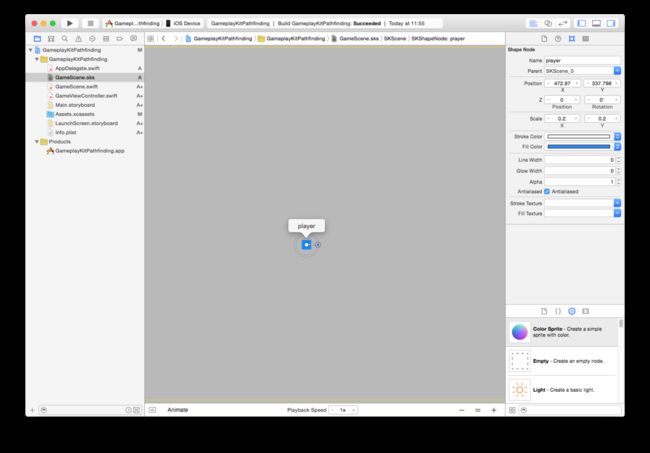
它会自动创建一个基于模版的基本游戏项目,下一步,我们打开 GameScene.sks文件,来添加几个节点。首先我们创建一个代表玩家的节点,我们希望它在迷宫中可以移动。
注意一下在右侧的 property inspector,我们把name 设置为“player”,后面我们会用它来和这个节点进行关联。
接下来,我们添加更多的节点。以让玩家去在迷宫中避让。否则的话,这个pathfinding 就太简单了。
使用 scene editor 拖拽一些 node 到场景中。你可以想上图一样去布置。简单也好、复杂也可以。只要能够保证,当玩家点击了某个特定点后,在通过时需要避让就行。你无须对这些节点进行修饰,让他们保持简单的矩形就好了。
接下来,打开 GameScene.swift 文件,重载 touchesBegan 方法。我们将使用用户点击的点,作为路径的终点。
override func touchesBegan(touches: Set<UITouch>, withEvent event: UIEvent?) {
for touch: AnyObject in touches {
    let location = (touch as! UITouch).locationInNode(self)
    self.movePlayerToLocation(location)
}}
一旦我们发现用户点击了,我们能要创建一个从玩家的当前点到点击的点之间的路径,同时这个路径要避让障碍物。为了做这些,我们需要创建一个 movePlayerToLocation 方法。
func movePlayerToLocation(location: CGPoint) {

// Ensure the player doesn't move when they are already moving.
guard (!moving) else {return}
moving = true
首先我们需要获得 player,我们可以通过 childNodeWithName 方法来获取。在前面我们已经通过 scene editor 给它命名好了。
 // Find the player in the scene.
let player = self.childNodeWithName("player")
当我们获取到障碍物的数组后,我们要计算从 player 的当前点到终点的路径。
// Create an array of obstacles, which is every child node, apart from the player node. let obstacles = SKNode.obstaclesFromNodeBounds(self.children.filter({ (element ) -> Bool in return element != player }))一旦我们获取到了 player 以后,我们要建立一个数组,把其它节点放进去。这是我们需要让 player 避让的障碍物数组。
// Assemble a graph based on the obstacles. Provide a buffer radius so there is a bit of space between the
// center of the player node and the edges of the obstacles.
let graph = GKObstacleGraph(obstacles: obstacles, bufferRadius: 10)

// Create a node for the user's current position, and the user's destination.
let startNode = GKGraphNode2D(point: float2(Float(player!.position.x), Float(player!.position.y)))
let endNode = GKGraphNode2D(point: float2(Float(location.x), Float(location.y)))

// Connect the two nodes just created to graph.
graph.connectNodeUsingObstacles(startNode)
graph.connectNodeUsingObstacles(endNode)

// Find a path from the start node to the end node using the graph.
let path:[GKGraphNode] = graph.findPathFromNode(startNode, toNode: endNode)

// If the path has 0 nodes, then a path could not be found, so return.
guard path.count > 0 else { moving = false; return }
现在我们获得了 player的路径,避让了障碍物。也可以通过 SKAction.followPath(path: CGPath, speed: CGFloat)方法来创建更好的路径。但这里我们选择从每个节点通过时是直线移动,可以让路径的算法,看起来非常明确。在实际的游戏项目中,或许会更多的使用 SKAction.followPath 方法。
下面的代码为 moveTO SKAction 创建路径上的和障碍物之间的间隙,然后把他们串起来。
// Create an array of actions that the player node can use to follow the path. var actions = [SKAction]() for node:GKGraphNode in path { if let point2d = node as? GKGraphNode2D { let point = CGPoint(x: CGFloat(point2d.position.x), y: CGFloat(point2d.position.y)) let action = SKAction.moveTo(point, duration: 1.0) actions.append(action) } } // Convert those actions into a sequence action, then run it on the player node. let sequence = SKAction.sequence(actions) player?.runAction(sequence, completion: { () -> Void in // When the action completes, allow the player to move again. self.moving = false })}
现在,当你在场景中点击一下, player 就会移动到你点击的地方,并且避开障碍物。如果你点到某个 Node的中心,或者无法到达的地方,那么 player 就不会移动。
结果
下面的视频展示了游戏的过程,你可以注意观察 player是如何避让障碍并移动到远点的。
视频链接
这里非常短暂的展示了一下pathfinding的特性。 接下来,我们会在下一篇中更加详细的展示 GameplayKit 在开发中的一些新特性是如何帮助开发者的。
github地址:https://github.com/fish-yan/GameplayKit-Pathfinding/tree/master

