Web开发模板
1、从Maven Template创建一个Web Project
1)输入如下命令:
mvn archetype:generate -DgroupId=com.dslztx -DartifactId=webexample -DarchetypeArtifactId=maven-archetype-webapp -DinteractiveMode=false
从maven-archetype-webapp这个Maven Template创建一个Web Project
2)得到的目录结构如下所示:
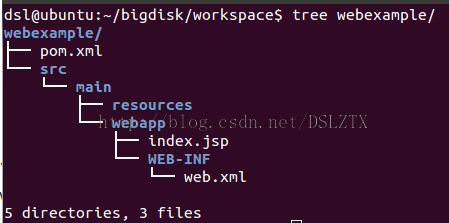
2、部署War包
1)输入如下命令:
mvn clean;
mvn package;
将Web Project打包成一个War包
2)将第1步骤中得到的War包移动到Tomcat目录中的webapps目录下面,正常情况下,该War包会被自动解包
解包后的目录结构如下所示:
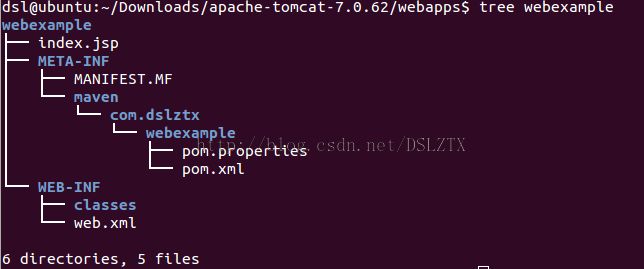
3)在浏览器中输入http://localhost:8080/webexample/index.jsp,就可以得到正常输出
3、增加动态调用接口
mvn clean;
mvn package;
将Web Project打包成一个War包
1)输入如下命令:
mvn archetype:generate -DgroupId=com.dslztx -DartifactId=webexample -DarchetypeArtifactId=maven-archetype-webapp -DinteractiveMode=false
从maven-archetype-webapp这个Maven Template创建一个Web Project
2)得到的目录结构如下所示:

2、部署War包
1)输入如下命令:
mvn clean;
mvn package;
将Web Project打包成一个War包
2)将第1步骤中得到的War包移动到Tomcat目录中的webapps目录下面,正常情况下,该War包会被自动解包
解包后的目录结构如下所示:

3)在浏览器中输入http://localhost:8080/webexample/index.jsp,就可以得到正常输出
3、增加动态调用接口
1)修改pom.xml
<project xmlns="http://maven.apache.org/POM/4.0.0" xmlns:xsi="http://www.w3.org/2001/XMLSchema-instance"
	xsi:schemaLocation="http://maven.apache.org/POM/4.0.0 http://maven.apache.org/maven-v4_0_0.xsd">

	<modelVersion>4.0.0</modelVersion>
	<groupId>com.dslztx</groupId>
	<artifactId>webexample</artifactId>
	<packaging>war</packaging>
	<version>1.0-SNAPSHOT</version>
	<name>webexample Maven Webapp</name>
	<url>http://maven.apache.org</url>

	<dependencies>
		<dependency>
			<groupId>junit</groupId>
			<artifactId>junit</artifactId>
			<version>3.8.1</version>
			<scope>test</scope>
		</dependency>

		<dependency>
			<groupId>org.springframework</groupId>
			<artifactId>spring-core</artifactId>
			<version>3.2.3.RELEASE</version>
		</dependency>

		<dependency>
			<groupId>org.springframework</groupId>
			<artifactId>spring-web</artifactId>
			<version>3.2.3.RELEASE</version>
		</dependency>

		<dependency>
			<groupId>org.springframework</groupId>
			<artifactId>spring-webmvc</artifactId>
			<version>3.2.3.RELEASE</version>
		</dependency>

		  <dependency>
            <groupId>javax.servlet</groupId>
            <artifactId>javax.servlet-api</artifactId>
            <version>3.0.1</version>
        </dependency>

	</dependencies>

	<build>
		<finalName>webexample</finalName>
	</build>

</project>
2)修改web.xml
<!DOCTYPE web-app PUBLIC
 "-//Sun Microsystems, Inc.//DTD Web Application 2.3//EN"
 "http://java.sun.com/dtd/web-app_2_3.dtd" >

<web-app>
	<display-name>Archetype Created Web Application</display-name>

	<servlet>
		<servlet-name>exampleWeb</servlet-name>
		<servlet-class>org.springframework.web.servlet.DispatcherServlet</servlet-class>

		<init-param>
			<param-name>contextConfigLocation</param-name>
			<param-value>
				classpath:applicationContext.xml
			</param-value>
		</init-param>

		<load-on-startup>1</load-on-startup>
	</servlet>

	<servlet-mapping>
		<servlet-name>exampleWeb</servlet-name>
		<url-pattern>/</url-pattern>
	</servlet-mapping>

</web-app>
3)增加一个applicationContext.xml
<?xml version="1.0" encoding="UTF-8"?>
<beans xmlns="http://www.springframework.org/schema/beans"
	xmlns:xsi="http://www.w3.org/2001/XMLSchema-instance" xmlns:aop="http://www.springframework.org/schema/aop"
	xmlns:mvc="http://www.springframework.org/schema/mvc" xmlns:context="http://www.springframework.org/schema/context"
	xmlns:tx="http://www.springframework.org/schema/tx"
	xsi:schemaLocation="http://www.springframework.org/schema/beans http://www.springframework.org/schema/beans/spring-beans.xsd
 http://www.springframework.org/schema/aop http://www.springframework.org/schema/aop/spring-aop.xsd
 http://www.springframework.org/schema/mvc http://www.springframework.org/schema/mvc/spring-mvc.xsd
 http://www.springframework.org/schema/context http://www.springframework.org/schema/context/spring-context.xsd http://www.springframework.org/schema/tx http://www.springframework.org/schema/tx/spring-tx.xsd">

	<context:component-scan base-package="com.dslztx" />

</beans>
4)增加一个ExampleController
package com.dslztx;

import java.io.IOException;
import java.io.PrintWriter;

import javax.servlet.http.HttpServletResponse;

import org.springframework.stereotype.Controller;
import org.springframework.web.bind.annotation.RequestMapping;

@Controller
@RequestMapping("/")
public class ExampleController {

    @RequestMapping("/example")
    public void exampleWeb(HttpServletResponse response) throws IOException {
        response.setContentType("application/json");
        PrintWriter out = response.getWriter();

        String json = "{\"Name\": \"Hello World!\"}";
        out.write(json);
    }
}
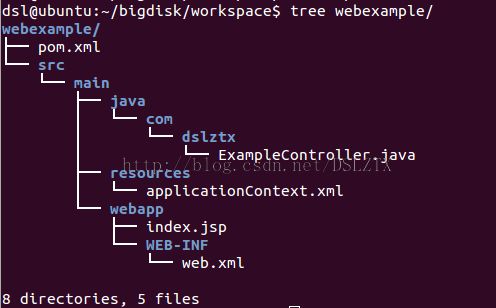
5)源代码目录结构
在进行以上4步操作后,源代码的目录结构如下:
6)打包
输入如下命令:mvn clean;
mvn package;
将Web Project打包成一个War包
7)部署
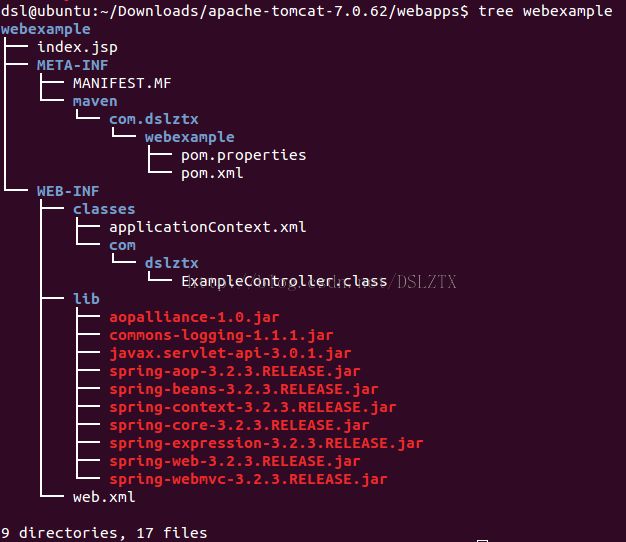
将第6步骤中得到的War包移动到Tomcat目录中的webapps目录下面,正常情况下,该War包会被自动解包
解包后的目录结构如下所示:
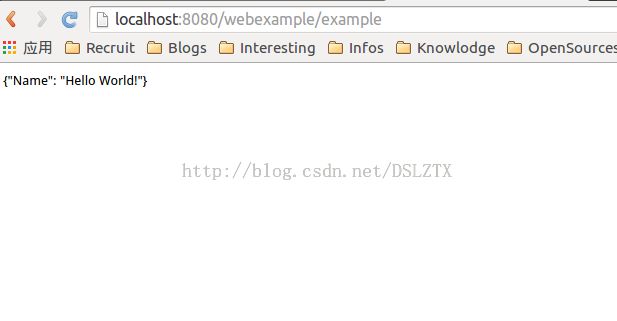
8)动态调用
在浏览器中输入http://localhost:8080/webexample/example,就可以得到正常输出,如下图所示
参考文献:
[1]http://www.mkyong.com/maven/how-to-create-a-web-application-project-with-maven/
[2]http://examples.javacodegeeks.com/enterprise-java/maven/how-to-deploy-maven-based-war-file-to-tomcat-example/
[3]http://stackoverflow.com/questions/5109112/how-to-deploy-a-war-file-in-tomcat-7
项目资源下载地址:http://download.csdn.net/detail/dslztx/8833367
