by Anshoo Arora on June 30, 2011
I have been using classes in my frameworks for a long time now, and my biggest gripe about QTP is its lack of Intellisense for custom classes. It also happens to be my biggest complaint. I understand this is not high priority for HP to include in its newer versions as there is a very small group of people who use OO techniques in test automation with QTP. There has been another workaround by Yaron, who used WSC to create intellisense.
I have been researching this topic and I finally have a workaround which I have tested for for the past few weeks with great success. The best part about this workaround is, I just need to create wrappers, without including any of the code I have in my QTP function libraries. If I add a new method to my class, all I do to update the Intellisense is add the method (without the QTP code) in my VB lib, create a DLL and Register the library for COM Interop.
Let’s get working then!
Step 1: Create your QTP Modular/Custom/Generic Class
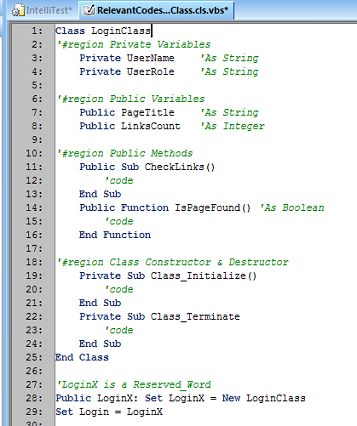
Class LoginClass

'#region Private Variables
    Private UserName    'As String
    Private UserRole    'As String

'#region Public Variables
    Public PageTitle    'As String
    Public LinksCount   'As Integer

'#region Public Methods
    Public Sub CheckLinks()
        Dim arrLinks

        arrLinks = Array("Home", "Register", "Language", "Sign-In")

        Call FunctionToCheckLinks(arrLinks)
    End Sub

    Public Function IsPageFound() 'As Boolean
        If Browser("title:=MyApp").Exist(15) Then IsPageFound = True
    End Function

'#region Class Constructor & Destructor
    Private Sub Class_Initialize()
        UserName = "test"
        UserRole = Global.UserRole
    End Sub

    Private Sub Class_Terminate
        'code
    End Sub

End Class

Public LoginX: Set LoginX = New LoginClass
Step 2: Converting QTP Class into VB.NET code
The next step is converting the method and property names to VB.NET. If you have never used VB.NET, don’t be scared! The syntax is quite straight-forward. The only thing to note here is, you must return values for Functions and Property Get. Also, the syntax of the Property construct differs slightly in VB.NET. Still, all you are including here are the names. You do NOT have to add the code from your QTP methods.
Always remember to include the Microsoft.VisualBasic.ComClass() flag before the class, and also, remember to make the class Public
All that goes in the VB.NET code are the names of the properties and methods. Do not include any QTP code here!
Below is a conversion of the QTP code above, to VB.NET. Notice that I have not included any of the code from my QTP class here:
SAVE THE CONVERTED CODE IN A .VB FORMAT FILE
Namespace RelevantCodes
    <Microsoft.VisualBasic.ComClass()> Public Class LoginClass

        Public Property PageTitle As String
            Get
                return "title"
            End Get
            Set(ByVal value As String)
                'code
            End Set
        End Property

        Public Property LinksCount As Integer
            Get
                return 10
            End Get
            Set(ByVal value As Integer)
            End Set
        End Property

        Public Sub CheckLinks()
        End Sub

        Public Function IsPageFound() As Boolean
        End Function

    End Class
End Namespace
Also remember that, your Public variables become Public Properties in VB.NET.
Step 3: Creating DLL from VB.NET Class using VBC.exe
Once our class is ready and we have saved it in .vb format, let’s create the DLL using VB’s command line compiler VBC/target:library creates a .NET code library (DLL), which is what we’re looking for.
C:\windows\Microsoft.NET\Framework\v2.0.50727\vbc.exe /target:library c:\RelevantCodes.vb
Executing the above syntax in cmd.exe will create a DLL file: RelevantCodes.DLL.
The path to your VBC.exe file may be different than the one I have used.
Step 4: Registering Class using RegAsm.exe
Next, we will use the .NET assembly registration tool RegAsm.exe that reads the metadata within an assembly (which we created using VBC.exe) and adds the necessary values to your registry. RegAsm.exe syntax: regasm assemblyFile [options].
C:\windows\Microsoft.NET\Framework\v2.0.50727\regasm.exe c:\Relevantcodes.dll /codebase
If QTP is already open, save all your tests and resources with libraries and re-open it. Launch it, and use CreateObject to create an instance of your class to see if its working. The syntax will be:
Set InstanceName = CreateObject("Namespace.Class")

'for our class:
Set LoginX = CreateObject("RelevantCodes.LoginClass")
You must see Intellisense for the instance to ensure everything has been a success until now. If this works, rest is just adding a few values to Registry and we’re done!
Step 5: Adding the Class Reference as a QTP Reserved Word
If the above works, we’re almost done! To get the intellisense for your class, we need to navigate to the registry key below and add a few values to the new key you create. Navigate to the following key in regedit.exe:
HKEY_CURRENT_USER\Software\Mercury Interactive\QuickTest Professional\MicTest\ReservedObjects\
If the above tree does not exist, try this:
HKEY_LOCAL_MACHINE\Software\Mercury Interactive\QuickTest Professional\MicTest\ReservedObjects\
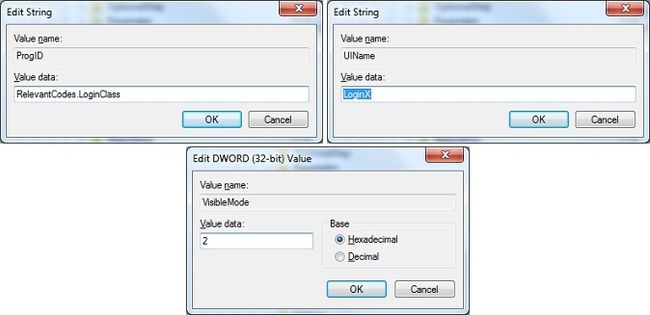
Once you’re there, add a new key under reserved objects. You can give this key any name. What I generally do is, I give the same name as my QTP class. My key, then, becomes LoginClass. Once the key is created, I create the following entries in the key: ProgID (string), UIName (string) and VisibleMode (DWord).
New Key in \ReservedObjects: Name of your QTP Class

String: ProgID,      Value: Namespace.ClassName
String: UIName,      Value: Name of your reference for your custom QTP class
DWord:  VisibleMode, Value: 2
Therefore, in our case, considering the above, we will have the following values:
New Key in \ReservedObjects: LoginClass

String: ProgID,      Value: RelevantCodes.LoginClass
String: UIName,      Value: LoginX
DWord:  VisibleMode, Value: 2

The final output of adding the key and all entries to it must look like below:
Step 6: Reference the Class Instance with another Keyword
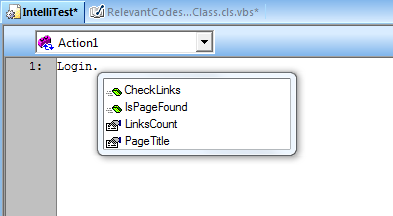
Lastly, all you need to do now is add a new variable and reference your Class Instance with it (as shown by Login below):
Public LoginX: Set LoginX = New LoginClass
Public Login : Set Login = LoginX

To create your tests and to get Intellisense, remember to associate your library with the test and use the Login keyword to see the intellisense.

I need to add a new method to my existing class. How do I do that!?!!
Well, once you converted the code for your original VB.NET library, DO NOT delete it. Once you add a new Public method to your QTP class, just add it to your VB.NET code, create (update) DLL using VBC.exe and re-register it using RegAsm. The new methods will now be available.
Summary
In summary, you have to follow the below 6 steps to create Intellisense for your custom QTP class:
- Create your QTP class
- Convert “Public” QTP methods to VB.NET (only the method names required!)
- Public Class
- Microsoft.VisualBasic.ComClass() attribute
- Use VBC.exe to create .NET library
- Creates a DLL in the same location as the .VB file
- Use RegAsm.exe Assembly Registration tool to add necessary values to Registry
- Add the Class Instance as a Reserved word in Registry
- Reference the class with another Keyword


