Android情景案例——Activity与Service通讯交互
前两天去面试,遇到这个知识点,感觉组织的不是很清晰,所以事后梳理下逻辑。
一、案例情景
在service中开启一个下载任务,然后在activity中显示下载进度,如何实现?
分析:
这里考察的就是Service如何与Activity进行交互,我们知道开启一个Service服务有两种方法,startService()、bindService()。第一种方法我们直接开启Service进行使用,没有与它进行交互处理。所以我们只有通过bindService()方法然后借助Binder进行数据交互。
方案一
首先我们创建一个DownLoadService类,在类里面封装我们要执行的方法——下载任务。
    public class DownLoadService extends Service {
        private MyBinder myBinder = new MyBinder();
        private IDownLoad downLoad;
        private int progress;
        @Override
        public IBinder onBind(Intent arg0) {
            return myBinder;
        }

        /** * 开启下载任务 */
        public void startDownLoad(){
            new Thread(new Runnable() {

                @Override
                public void run() {
                    while(progress <100){
                        if(downLoad != null){
                            downLoad.getProgress(progress++);
                        }
                        try {
                            Thread.sleep(1000);
                        } catch (InterruptedException e) {
                            e.printStackTrace();
                        }
                    }
                }
            }).start();
        }

        /** * 设置下载监听 * @return */
        public void setDownLoad(IDownLoad downLoad) {
            this.downLoad = downLoad;
        }

        class MyBinder extends Binder{
            public DownLoadService getDownLoadService(){
                return DownLoadService.this;
            }
        }
    }
在Service类中,我们通过一个IDownLoad回调接口处理下载进度的获取回调事件,通过startDownLoad()方法开启一个线程进行下载。同时,我们实现了Binder类的一个子类MyBinder,然后定义一个方法用于获取该Service的引用,这样我们就可以间接获取该Service实例,然后调用Service内的方法。最后,我们需要在Activity中进行开启服务,我们知道通过bindService()方法进行绑定服务,需要我们实现ServiceConnection类。用于监听我们Service连接状态。
    public class MainActivity extends Activity {
        private Button btn_start;
        private DownLoadService downLoadService;
        private ProgressDialog dialog;
        @Override
        protected void onCreate(Bundle savedInstanceState) {
            super.onCreate(savedInstanceState);
            setContentView(R.layout.activity_main);
            btn_start = (Button) findViewById(R.id.btn_download);
            Intent intent = new Intent(this,DownLoadService.class);
            bindService(intent, serviceConnection, BIND_AUTO_CREATE);
            btn_start.setOnClickListener(new OnClickListener() {

                @Override
                public void onClick(View v) {
                    downLoadService.startDownLoad();
                    createDilog();
                }
            });
        }

        private void createDilog(){
            dialog = new ProgressDialog(this);
            //设置进度条风格,风格为圆形,旋转的
            dialog.setProgressStyle(ProgressDialog.STYLE_HORIZONTAL);
            //设置ProgressDialog 标题
            dialog.setTitle("进度对话框");
            //设置ProgressDialog 提示信息
            dialog.setMessage("圆形进度条");
            //设置ProgressDialog 标题图标
            dialog.setIcon(android.R.drawable.ic_dialog_map);
            //设置ProgressDialog 的进度条是否不明确
            dialog.setIndeterminate(false);
            dialog.setMax(100);
            //设置ProgressDialog 是否可以按退回按键取消
            dialog.setCancelable(true);
            //显示
            dialog.show();
        }

        private ServiceConnection serviceConnection = new ServiceConnection() {

            @Override
            public void onServiceDisconnected(ComponentName name) {

            }

            @Override
            public void onServiceConnected(ComponentName name, IBinder service) {
                MyBinder myBinder = (MyBinder) service;
                downLoadService = myBinder.getDownLoadService();
                downLoadService.setDownLoad(new IDownLoad() {
                    @Override
                    public void getProgress(int progress) {
                        dialog.setProgress(progress);
                    }
                });
            }
        };
    }
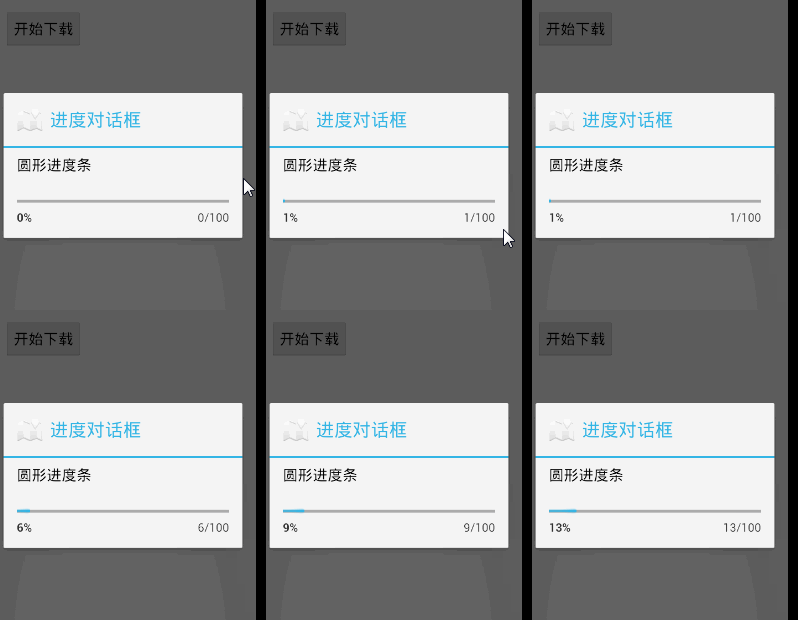
效果图:
总结:
Activity调用bindService (Intent service, ServiceConnection conn, int flags)方法,得到Service对象的一个引用,这样Activity可以直接调用到Service中的方法,如果要主动通知Activity,我们可以利用回调方法。
方案二
在面试回答这个问题的时候,我说可以采用广播的形式就行通讯,但是面试官说不行,我也是醉了。事实上广播可以用于我们Android组件之间的通讯,所以是可以的。我们通过Intent进行数据的封装传递,接下来就是通过广播的形式进行通讯。
首先,我们同样创建一个名为BroadCastService的服务,里面用于模拟我们的下载任务。
    public class BroadCastService extends Service {
        private int progress;
        private Intent intent = new Intent("com.dsw.RECEIVER");
        @Override
        public IBinder onBind(Intent intent) {
            return null;
        }

        @Override
        public void onCreate() {
            super.onCreate();
            startDownLoad();
        }

        /** * 开启下载任务 */
        private void startDownLoad(){
            new Thread(new Runnable() {

                @Override
                public void run() {
                    while(progress <100){
                        //发送进度广播
                        intent.putExtra("Progress", progress++);
                        sendBroadcast(intent);
                        try {
                            Thread.sleep(1000);
                        } catch (InterruptedException e) {
                            e.printStackTrace();
                        }
                    }
                }
            }).start();
        }
    }
我们在下载任务中,将progress进度信息保存在Intent中,然后进行传递。
    public class BroadCastActivity extends Activity {
        private Button btn_start;
        private ProgressDialog dialog;
        private DownLoadReceiver downLoadReceiver = new DownLoadReceiver();
        @Override
        protected void onCreate(Bundle savedInstanceState) {
            super.onCreate(savedInstanceState);
            setContentView(R.layout.activity_main);
            btn_start = (Button) findViewById(R.id.btn_download);

            IntentFilter intentFilter = new IntentFilter();
            intentFilter.addAction("com.dsw.RECEIVER");
            registerReceiver(downLoadReceiver, intentFilter);

            btn_start.setOnClickListener(new OnClickListener() {

                @Override
                public void onClick(View v) {
                    createDilog();
                    Intent intent = new Intent(BroadCastActivity.this,BroadCastService.class);
                    startService(intent);
                }
            });
        }

        /** * 创建进度对话框 */
        private void createDilog(){
            dialog = new ProgressDialog(this);
            //设置进度条风格,风格为圆形,旋转的
            dialog.setProgressStyle(ProgressDialog.STYLE_HORIZONTAL);
            //设置ProgressDialog 标题
            dialog.setTitle("进度对话框");
            //设置ProgressDialog 提示信息
            dialog.setMessage("圆形进度条");
            //设置ProgressDialog 标题图标
            dialog.setIcon(android.R.drawable.ic_dialog_map);
            //设置ProgressDialog 的进度条是否不明确
            dialog.setIndeterminate(false);
            dialog.setMax(100);
            //设置ProgressDialog 是否可以按退回按键取消
            dialog.setCancelable(true);
            //显示
            dialog.show();
        }

        /** * 注册广播接收 * @author Administrator * */
        class DownLoadReceiver extends BroadcastReceiver{

            @Override
            public void onReceive(Context context, Intent intent) {
                int progress = intent.getIntExtra("Progress", 0);
                dialog.setProgress(progress);
            }
        }
    }
这里我们自定义DownLoadReceiver用于接收我们的广播通知。然后将Acitivity进行广播的注册:
    IntentFilter intentFilter = new IntentFilter();
    intentFilter.addAction("com.dsw.RECEIVER");
    registerReceiver(downLoadReceiver, intentFilter);
这里,我们通过广播进行数据的交互,所以不需要持有BroadCastService的引用实例,这里我们就可以采用startService()方法进行开启服务。然后在广播接收者的onReceive()方法中进行进度条的更新。

总结:
Service向Activity发送消息,可以使用广播,当然Activity要注册相应的接收器。比如Service要向多个Activity发送同样的消息的话,用这种方法就更好。
方案三
同样是消息机制处理,我们可以采用EventBus进行,使消息传递更加方便。不熟悉EventBus的使用可以参照EventBus基础教程解析,一分钟学会EventBus的使用。实现的思路就是讲上面我们使用广播的地方替换掉,然后进行处理。
首先创建EventBusActivity用于展示,我们需要在里面进行EventBus的注册以及消息的接收处理。
    public class EventBusActivity extends Activity {
        private Button btn_start;
        private ProgressDialog dialog;

        @Override
        protected void onCreate(Bundle savedInstanceState) {
            super.onCreate(savedInstanceState);
            setContentView(R.layout.activity_main);
            btn_start = (Button) findViewById(R.id.btn_download);
            EventBus.getDefault().registerSticky(this);
            btn_start.setOnClickListener(new OnClickListener() {

                @Override
                public void onClick(View v) {
                    createDilog();
                }
            });
            //开启服务
            Intent intent = new Intent(this,EventBusService.class);
            startService(intent);
        }

        @Override
        protected void onDestroy() {
            super.onDestroy();
            EventBus.getDefault().unregister(this);
        }

        /** * 创建进度对话框 */
        private void createDilog(){
            dialog = new ProgressDialog(this);
            //设置进度条风格,风格为圆形,旋转的
            dialog.setProgressStyle(ProgressDialog.STYLE_HORIZONTAL);
            //设置ProgressDialog 标题
            dialog.setTitle("进度对话框");
            //设置ProgressDialog 提示信息
            dialog.setMessage("圆形进度条");
            //设置ProgressDialog 标题图标
            dialog.setIcon(android.R.drawable.ic_dialog_map);
            //设置ProgressDialog 的进度条是否不明确
            dialog.setIndeterminate(false);
            dialog.setMax(100);
            //设置ProgressDialog 是否可以按退回按键取消
            dialog.setCancelable(true);
            //显示
            dialog.show();
        }

         public void onEvent(ProgressEvent progressEvent){
             dialog.setProgress(progressEvent.getProgress());
         }
    }
上面代码中,EventBus.getDefault().registerSticky(this);用来注册消息接收,然后接收处理在onEvent事件中进行。然后我们需要创建一个服务,用于处理我们的事件EventBusService。
    public class EventBusService extends Service {
        private int progress;
        private ProgressEvent progressEvent = new ProgressEvent();
        @Override
        public IBinder onBind(Intent intent) {
            return null;
        }

        @Override
        public void onCreate() {
            super.onCreate();
            startDownLoad();
        }

        /** * 开启下载任务 */
        private void startDownLoad(){
            new Thread(new Runnable() {

                @Override
                public void run() {
                    while(progress <100){
                        //发送进度广播
                        progressEvent.setProgress(progress++);
                        EventBus.getDefault().post(progressEvent);
                        try {
                            Thread.sleep(500);
                        } catch (InterruptedException e) {
                            e.printStackTrace();
                        }
                    }
                }
            }).start();
        }
    }
最后补充一下我们所传递的事件。ProgressEvent:
    public class ProgressEvent {
        private int progress;

        public int getProgress() {
            return progress;
        }

        public void setProgress(int progress) {
            this.progress = progress;
        }
    }
这样,我们就比较方便的实现了消息的传递,是不是比使用广播方便了很多,这也是推荐使用EventBus进行消息机制传递处理的原因。
至此,几种我们常见的方式已经介绍了,下次面试的时候一定要逻辑理清楚,然后描述。
=================================================
作者:mr_dsw
博客:http://blog.csdn.net/mr_dsw
理念:转载注明出处,进步来源于分分享
=================================================