自定义Dialog,DatePickerDialog,TimePickerDialog,PopupWindow,Notification
自定义Dialog
自定义Dialog就是Dialog的整个View都是自己写的,title,message,按键等。
这里先用LayoutInflater将View实例化,然后用dialog.setContentView(dialog_view);将View导入Dialog中。
代码如下:
switch (v.getId()) {
            case R.id.button1:
                final Dialog dialog =new Dialog(MainActivity.this,R.style.NoDialogTitle);
                LayoutInflater inflater=getLayoutInflater();
                View dialog_view=inflater.inflate(R.layout.dialog_view,null);
                TextView title= (TextView) dialog_view.findViewById(R.id.title);
                TextView message= (TextView) dialog_view.findViewById(R.id.message);
                Button cancel = (Button) dialog_view.findViewById(R.id.cancel);
                Button ok = (Button) dialog_view.findViewById(R.id.ok);
                title.setText("我是标题");
                message.setText("我是内容");
                dialog.setContentView(dialog_view);
                cancel.setOnClickListener(new View.OnClickListener() {
                    @Override
                    public void onClick(View v) {

                        dialog.dismiss();
                    }
                });
                ok.setOnClickListener(new View.OnClickListener() {
                    @Override
                    public void onClick(View v) {
                        Toast.makeText(getApplicationContext(),"您确认了",Toast.LENGTH_LONG).show();
                        dialog.dismiss();
                    }
                });
                dialog.show();
设置Diolog的大小的方法:
 public static void setDialogWidthAndHeight(Context context, Dialog dialog, double widtRate, double heightRate) {
        WindowManager windowManager = (WindowManager) context.getSystemService(Context.WINDOW_SERVICE);
        Display display = windowManager.getDefaultDisplay();
        WindowManager.LayoutParams lp = dialog.getWindow().getAttributes();
        lp.width = (int) (display.getWidth() * widtRate); //设置宽度为屏幕的多少
        lp.height = (int) (display.getHeight() * heightRate);//设置高度为屏幕的多少
        dialog.getWindow().setAttributes(lp);
    }
在 Dialog dialog =new Dialog(MainActivity.this,R.style.NoDialogTitle);中用了style,这是用来取消默认的标题的,它在style中的代码为:
 <style parent="@android:Theme.Dialog" name="NoDialogTitle">

        <item name="android:windowFrame">@null</item>

        <item name="android:windowNoTitle">true</item>

        <item name="android:windowBackground">@android:color/transparent</item>

        <item name="android:windowIsFloating">true</item>

        <item name="android:windowContentOverlay">@null</item>

    </style>
这样结果就没有默认的标题了。
结果如下:
完整的例子:
public class MyDiolag extends BaseActivity {
    private Button mButton;
    @Override
    protected void onCreate(Bundle savedInstanceState) {

        super.onCreate(savedInstanceState);
        setContentView(R.layout.my);
        mButton = (Button) findViewById(R.id.button);
        mButton.setOnClickListener(new View.OnClickListener() {
            @Override
            public void onClick(View view) {
                final Dialog dialog =new Dialog(MyDiolag.this,R.style.NoDialogTitle);
                LayoutInflater inflater=getLayoutInflater();
                View dialog_view=inflater.inflate(R.layout.dialog_view, null);

                Button cancel = (Button) dialog_view.findViewById(R.id.cancel);
                Button ok = (Button) dialog_view.findViewById(R.id.ok);


                cancel.setOnClickListener(new View.OnClickListener() {
                    @Override
                    public void onClick(View v) {

                        dialog.dismiss();
                    }
                });
                ok.setOnClickListener(new View.OnClickListener() {
                    @Override
                    public void onClick(View v) {
                        Toast.makeText(getApplicationContext(), "您确认了", Toast.LENGTH_LONG).show();
                        dialog.dismiss();
                    }
                });
                dialog.setContentView(dialog_view);
                //设置doilog的宽度和高度
                WindowManager windowManager = (WindowManager) MyDiolag.this.getSystemService(Context.WINDOW_SERVICE);
                Display display = windowManager.getDefaultDisplay();
                WindowManager.LayoutParams lp = dialog.getWindow().getAttributes();
                lp.width = (int) (display.getWidth() * 0.7); //设置宽度

                dialog.getWindow().setAttributes(lp);

                dialog.show();
            }
        });
    }
dialog_view:
<?xml version="1.0" encoding="utf-8"?>
<LinearLayout xmlns:android="http://schemas.android.com/apk/res/android" android:orientation="vertical" android:layout_width="match_parent" android:layout_height="match_parent" android:background="@drawable/my_diolog" android:padding="5dp" >

  <TextView  android:id="@+id/title" android:layout_width="match_parent" android:layout_height="wrap_content" android:layout_gravity="center_horizontal" android:text="确认要退出应用吗?" android:gravity="center" android:padding="10dp" />

<View  android:layout_width="match_parent" android:layout_height="0.5dp" android:background="@color/home_line"></View>
    <LinearLayout  android:layout_width="match_parent" android:layout_height="wrap_content" android:orientation="horizontal" android:layout_gravity="center_horizontal" >

        <Button  android:id="@+id/cancel" android:layout_width="0dp" android:layout_weight="1" android:layout_height="wrap_content" android:text="取消" android:background="@color/white" />

        <View  android:layout_width="0.5dp" android:layout_height="match_parent" android:background="@color/home_line"></View>
        <Button  android:id="@+id/ok" android:layout_width="0dp" android:layout_weight="1" android:layout_height="wrap_content" android:text="确认" android:background="@color/white" />
    </LinearLayout>

</LinearLayout>
效果:
时间选择控件
时间选择控件分两种,一种为时间选择,一种为日期选择。
一.日期选择又分为两种:DatePicker,DatePickerDialog。
DatePicker是像一般的控件一样要在XML中定义好,在Activity中引入,这种主要紧贴在屏幕中,DatePickerDialog是一种Dialog即弹窗,不需要在XML中定义,直接在Activity中建立它的对象就可以,不要忘记在最后show。
二.时间选择也分为两种:TimePicker,TimePickerDialog。两者的区别和上面的基本相同。
注意:这一类的控件其实非常简单,就是设置好初始值(一般用Calendar对象获得)和监听器,在控件的日期发生变化的时候会在监听器的方法中得到,并在这个方法中进行一系列的操作。
DatePicker的监听器为:OnDateChangedListener
DatePickerDialog的监听器为:OnDateSetListener
TimePicker的监听器为:OnTimeChangedListener
TimePickerDialog的监听器为:OnTimeSetListener
DatePicker
代码如下:
        datePicker.init(calendar.get(Calendar.YEAR), calendar.get(Calendar.MONTH), calendar.get(Calendar.DAY_OF_MONTH), new DatePicker.OnDateChangedListener() {
            @Override
            public void onDateChanged(DatePicker datePicker, int i, int i1, int i2) {
                setTitle(""+i+"-"+i1+"-"+i2);
            }

});DatePickerDialog
DatePickerDialog是用来显示时间选项的,可以利用Calendar获取当前的时间。
代码如下:
DatePickerDialog dialog =new DatePickerDialog(this, new DatePickerDialog.OnDateSetListener() {
                    @Override
                    public void onDateSet(DatePicker view, int year, int monthOfYear, int dayOfMonth) {
                        calendar.set(year,monthOfYear,dayOfMonth);
                        SimpleDateFormat formatter =new SimpleDateFormat("yyyy年MM月dd日");
                        Toast.makeText(getApplicationContext(),formatter.format(calendar.getTime()),Toast.LENGTH_SHORT).show();

                    }
                },calendar.get(Calendar.YEAR),calendar.get(Calendar.MONTH),calendar.get(Calendar.DAY_OF_MONTH));
                dialog.show();
结果如下:
TimePicker
       timePicker.setOnTimeChangedListener(new TimePicker.OnTimeChangedListener() {
            @Override
            public void onTimeChanged(TimePicker timePicker, int i, int i1) {

                setTitle(i+"-"+i1);//对标题进行设置
            }
        });
TimePickerDialog
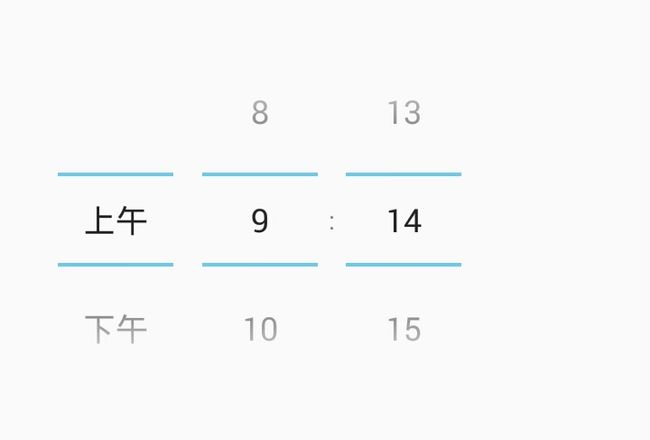
TimePickerDialog的用法与DatePickerDialog的用法基本相同。代码如下:
 calendar=Calendar.getInstance();
                TimePickerDialog dialog =new TimePickerDialog(MainActivity.this, new TimePickerDialog.OnTimeSetListener() {
                    @Override
                    public void onTimeSet(TimePicker view, int hourOfDay, int minute) {
                        calendar.set(Calendar.HOUR,hourOfDay);
                        calendar.set(Calendar.MINUTE,minute);
                        SimpleDateFormat format=new SimpleDateFormat("HH:mm");
                        Toast.makeText(getApplicationContext(),format.format(calendar.getTime()),Toast.LENGTH_SHORT).show();
                    }
                },calendar.get(Calendar.HOUR),calendar.get(Calendar.MINUTE),true);//这里的true是表示是否为24小时制
                dialog.show();
结果如下:
PopupWindow
PopupWindow在指定的地方显示一个显示框,显示几条内容。
利用popupWindow和ListView相结合可以完美的代替spinner
代码如下:
  LayoutInflater inflater=getLayoutInflater();
                View popup_view =inflater.inflate(R.layout.popup_view,null);
                popupWindow =new PopupWindow(MainActivity.this);
                popupWindow.setHeight(ViewGroup.LayoutParams.WRAP_CONTENT);
                popupWindow.setWidth(ViewGroup.LayoutParams.MATCH_PARENT);
                popupWindow.setContentView(popup_view);
                popupWindow.setFocusable(true);
                popupWindow.setOutsideTouchable(true);//设置按别处显示框消失
                popupWindow.showAsDropDown(button4);//设置显示框在的位置为在button4的下面。
重写方法:
/** * 按back键这个显示框消失 * @param keyCode * @param event * @return */
    @Override
    public boolean onKeyDown(int keyCode, KeyEvent event) {
        if(keyCode==KeyEvent.KEYCODE_BACK){
            popupWindow.dismiss();
        }
        return super.onKeyDown(keyCode, event);
    }
写一个例子展示一下Popupwindow代替spinner:
public class TestPopupWndowin extends BaseActivity {
private EditText mEditext;
    private ImageButton mButton;
    private PopupWindow mPW;
    String [] mStatusAdate = {"提出","审批","评估","确认","开发","测试","发布","完成","撤销"};
    PopuWindowAdapter adapter;
    private Boolean mflag=true;
    private EditText mEditext2;
    @Override
    protected void onCreate(Bundle savedInstanceState) {
        super.onCreate(savedInstanceState);
        setContentView(R.layout.test_popupwindow_activity);
        initView();


    }

    private void initView() {
        mEditext = (EditText) findViewById(R.id.edit);
        mButton = (ImageButton) findViewById(R.id.button);
        mEditext2 = (EditText) findViewById(R.id.edit2);
        mPW =new PopupWindow(TestPopupWndowin.this);

       //mPW.dismiss();
        mButton.setOnClickListener(new View.OnClickListener() {
            @Override
            public void onClick(View view) {
                if (!mPW.isShowing()) {
                     initPopupWindow();
                }else {
                    mPW.dismiss();
                }

            }
        });
        }

    private void initPopupWindow() {

        LayoutInflater inflater=getLayoutInflater();
        View popup_view =inflater.inflate(R.layout.popup_window_layout, null);

        ListView list = (ListView) popup_view.findViewById(R.id.list_view);
        adapter = new PopuWindowAdapter(mStatusAdate,getLayoutInflater());
         list.setAdapter(adapter);
        list.setOnItemClickListener(new AdapterView.OnItemClickListener() {
            @Override
            public void onItemClick(AdapterView<?> adapterView, View view, int i, long l) {
                TextView textView = (TextView) view.findViewById(R.id.text);
                mEditext.setText(textView.getText().toString());
                mPW.dismiss();

            }
        });

        mPW.setBackgroundDrawable(getResources().getDrawable(R.color.white));
        mPW.setHeight(ViewGroup.LayoutParams.WRAP_CONTENT);
        mPW.setWidth(ViewGroup.LayoutParams.WRAP_CONTENT);
        mPW.setContentView(popup_view);
        mPW.setFocusable(true);
        mPW.setOutsideTouchable(true);//设置按别处显示框消失
        mPW.showAsDropDown(mButton);//设置显示框在的位置为在button4的下面。


    }


}
popup_window_layout:
<LinearLayout xmlns:android="http://schemas.android.com/apk/res/android" android:orientation="vertical" android:layout_width="wrap_content" android:layout_height="wrap_content" android:background="@color/white" >

    <ListView  android:id="@+id/list_view" android:layout_width="match_parent" android:layout_height="match_parent" android:divider="@color/black" android:dividerHeight="1dp" android:background="@drawable/popup_window_backdround" android:layout_margin="1dp" ></ListView>

    <TextView  android:layout_width="wrap_content" android:layout_height="0dp" android:textSize="18dp" android:text="需求及总体方案处" />

</LinearLayout>
注意:上面的TextView是用来提供Popuwindow的最大宽度的,由于Popupwindow中有ListView所以不能自适应内容的大小去改变popupwindow的宽度,所以这是一个不错的方法。
PopuWindowAdapter:
public class PopuWindowAdapter extends BaseAdapter {
    private String mDate[];
    private LayoutInflater inflater;

    public PopuWindowAdapter(String[] mDate, LayoutInflater inflater) {
        this.mDate = mDate;
        this.inflater = inflater;
    }

    @Override
    public int getCount() {
        return mDate.length;
    }

    @Override
    public Object getItem(int i) {
        return i;
    }

    @Override
    public long getItemId(int i) {
        return i;
    }


    @Override
    public View getView(int i, View convertView, ViewGroup viewGroup) {

        ViewHolder vh;

        if(convertView==null) {
            vh=new ViewHolder();
            convertView = inflater.inflate(R.layout.popu_window_item, null);


            vh.textView= (TextView) convertView.findViewById(R.id.text);

            convertView.setTag(vh);
        }else{
            vh= (ViewHolder) convertView.getTag();
        }


        vh.textView.setText(mDate[i]);
        /** * 这是CheckBox的一个点击事件,当CheckBox按键状态发生变化时这个变化的状态会直接传入 * 数据中,这样Checked的状态就可以直接从数据中获取 */


        return convertView;
    }

    class ViewHolder{

        TextView textView;
    }
}
popu_window_item:
<?xml version="1.0" encoding="utf-8"?>
<RelativeLayout xmlns:android="http://schemas.android.com/apk/res/android" android:orientation="vertical" android:layout_width="wrap_content" android:layout_height="wrap_content">

    <TextView  android:id="@+id/text" android:layout_width="wrap_content" android:layout_height="wrap_content" android:background="@color/white" android:gravity="center" android:layout_centerInParent="true" android:layout_margin="3dp" />

</RelativeLayout>
Notification
Notification是显示通知信息的,这里有两种写法,一种是以前的写法,一种是现在的写法。
以前的写法
以前的写法是直接赋值,
代码如下:
 mNotificationManager= (NotificationManager) getSystemService(Context.NOTIFICATION_SERVICE);
        Notification notification =new Notification();
        notification.icon= R.mipmap.caomei;
        notification.tickerText="哈哈,我来了!";
        notification.flags=Notification.FLAG_AUTO_CANCEL;
        Intent intent =new Intent(getApplicationContext(),MainActivity.class);
        PendingIntent pendingIntent =PendingIntent.getActivity(getApplicationContext(),1,intent,PendingIntent.FLAG_ONE_SHOT);
        notification.setLatestEventInfo(getApplicationContext(),"我是标题","我是内容",pendingIntent);
        notification.when=System.currentTimeMillis();
        mNotificationManager.notify(1,notification);//1是一个通知的代号,可以是任何值但不可以相同。
现在的做法:
步骤:
1)建立一个builder:Notification.Builder builder = new Notification.Builder(this);通过这个builder设置一系列的信息,例如,图标,title,内容,时间,来信息时的提示等等
2)利用 Notification notification = builder.build();建立一个Notification的实例。
3)建立NotificationManager的实例:NotificationManager manager = (NotificationManager) getSystemService(Context.NOTIFICATION_SERVICE);,并通过这个实例发送消息:manager.notify(1,notification);//这里的1,为这个信息对应的码值,可以随便取。
4)可以利用manger取消notification的发送。
完整代码如下:
public class MainActivity extends Activity implements View.OnClickListener {
    private Button sendButton;
    private Button  cancelButton;
    private NotificationManager manager;
    @Override
    protected void onCreate(Bundle savedInstanceState) {
        super.onCreate(savedInstanceState);
        setContentView(R.layout.activity_main);
        sendButton = (Button) findViewById(R.id.send);
        cancelButton = (Button) findViewById(R.id.cancel);
        sendButton.setOnClickListener(this);
        cancelButton.setOnClickListener(this);
        manager = (NotificationManager) getSystemService(Context.NOTIFICATION_SERVICE);
    }


    @Override
    public void onClick(View view) {
        switch (view.getId()){
            case R.id.send:
                Intent intent = new Intent(this,MainActivity.class);
                PendingIntent pendingIntent = PendingIntent.getActivity(this,0,intent,PendingIntent.FLAG_ONE_SHOT);

                Notification.Builder builder = new Notification.Builder(this);
                builder.setSmallIcon(R.mipmap.ic_launcher);//设置图标
                builder.setTicker("我来了");//手机状态栏提示
                builder.setWhen(System.currentTimeMillis());//设置时间
                builder.setContentTitle("我是标题");//设置标题
                builder.setContentText("我是内容");//设置内容
                builder.setContentIntent(pendingIntent);//设置点击后的动作
                builder.setDefaults(Notification.DEFAULT_ALL);//设置来信息的提示的全部
// builder.setDefaults(Notification.DEFAULT_LIGHTS);//设置提示灯
// builder.setDefaults(Notification.DEFAULT_SOUND);//设置提示声音
// builder.setDefaults(Notification.DEFAULT_VIBRATE);//设置提示震动
                Notification notification = builder.build();
                manager.notify(1,notification);
                break;
            case R.id.cancel:
                    manager.cancel(1);
                break;
        }
    }
}

