在之前的一篇文章中,介绍了balancer会声明使用分布式锁来协调分布式环境下的信息沟通并确保事务一致性,有关分布式锁的一些原理性信息可以参见这几篇文章:
http://wenku.baidu.com/view/19ce3085b9d528ea81c77982.html
http://wenku.baidu.com/view/d94ac11ffc4ffe473368ab27.html
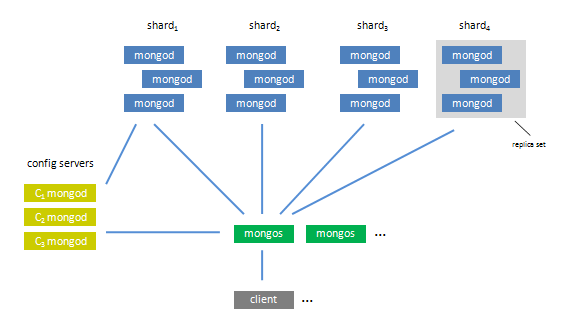
下图是mongod使用sharding机制时的一个系统架构图(有关如果配置sharding并进行数据存储参见我的这篇文章 ):

这里Mongod实现的比较简单,它主要是通过在config服务器结点上创建并维护两个lock集合(lockpings和lock),并 mongos启动时会在这两个集合中各创建一条数据记录,然后通过维护该记录的状态(包括时间戳,state)来标识当前mongos结点的锁使用情况。 如果多台机器之间想使用一个锁,只要确保锁的名称一致就行,这里就会在configsvr结点的相应集合中共享这一条记录以确保只有一个mongos结点 获得了该锁。
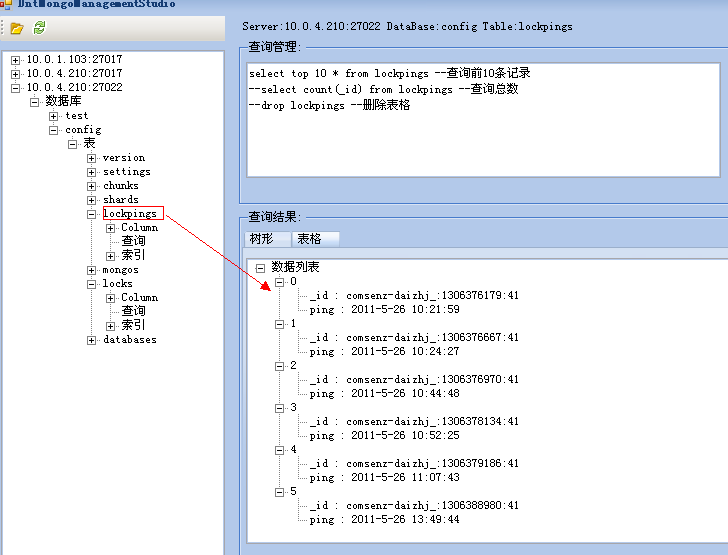
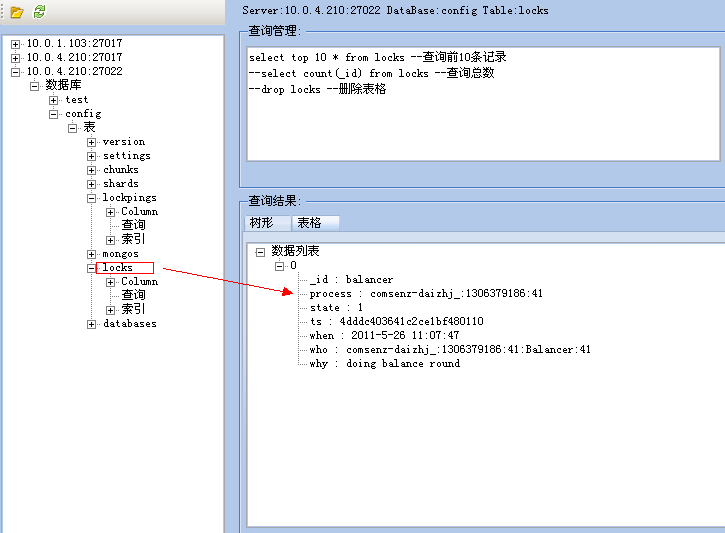
首先mongod会在配置为configsvr结点上创建并维护两个集合,如下图:


config.lockpings:
_id: 存储mongos发送来的balancer的标识信息(格式=> "机器名称:时间戳:随机数")
ping: 以及发送ping指令时的时间(日期时间格式)
config.lock:
_id: 存储锁的名称(如balancer)
process: 关联config.lockpings中_id的字段(并与其保持一致)
state: 锁状态(是否有操作使用该锁)。0为未锁定,1为锁定。
ts: 锁转为使用状态时的时间戳
when :锁转为使用状态时的时间(日期时间格式)
who: 谁使用了该锁(格式为process + 线程名称 + 随时数)
why: 使用锁的原因(如:doing balancer round)
了解上面内容之后,我们看一下mongos分布式锁的类关系图:

其中DistributedLock类就是分布式锁的结构,它包括如下信息:
_name:锁名称,与config.lock中的_id相绑定
_conn:要链接到的mongod服务器地址
_ns: 使用的锁集合名称,构造函数将其初始化为"config.locks"
_takeoverMinutes: 强制接管的时间(当某个lock长时间不被解锁或无响应信息时),这时系统会回收该lock(通过将state置1)
lock_entry() : 当系统开始获取lock时所执行的操作
unlock():解除锁定
dist_lock_try类主要用于对上面的DistributedLock类操作进行封装,以便于使用.
其构造函数和析构函数与DistributedLock类的lock_entry()和unlock()方法对应。
下面我们就通过源码来进一步分析其底层的实现原理, 首先我们看一下DistributedLock的构造函数:
// distlock.cpp DistributedLock::DistributedLock( const ConnectionString & conn , const string & name , unsigned takeoverMinutes ) : _conn(conn),_name(name),_takeoverMinutes(takeoverMinutes) { _id = BSON( " _id " << name /* balancer */ ); _ns = " config.locks " ; // 清理"config.lockpings"集合中旧的(不再持有lock)entry信息,同时构造该集合索引 distLockPinger.got( conn ); }
上面的构造方法主要是完成初始化conn,name,takeoverMinutes等相关属性,之后它会调用 distLockPinger.got()来向mongod发送ping指令,如下:
// distlock.cpp class DistributedLockPinger { public : DistributedLockPinger() : _mutex( " DistributedLockPinger " ) { } void got( const ConnectionString & conn ) { string s = conn.toString(); scoped_lock lk( _mutex ); if ( _seen.count( s ) > 0 ) return ; // 线程方式执行distLockPingThread()方法 boost::thread t( boost::bind( & distLockPingThread , conn ) ); _seen.insert( s ); } set < string > _seen; mongo::mutex _mutex; } distLockPinger;
它使用线程方式来执行distLockPingThread()方法来发送ping指令,并最终执行下面方法:
// distlock.cpp void _distLockPingThread( ConnectionString addr ) { // 设置当前线程名称 setThreadName( " LockPinger " ); log() << " creating dist lock ping thread for: " << addr << endl; static int loops = 0 ; while ( ! inShutdown() ) { // "机器名称:时间戳:随机数"的process标识 string process = getDistLockProcess(); log( 4 ) << " dist_lock about to ping for: " << process << endl; try { ScopedDbConnection conn( addr ); // refresh the entry corresponding to this process in the lockpings collection conn -> update( lockPingNS , BSON( " _id " << process ) , BSON( " $set " << BSON( " ping " << DATENOW ) ) , true ); string err = conn -> getLastError(); if ( ! err.empty() ) { warning() << " dist_lock process: " << process << " pinging: " << addr << " failed: " << err << endl; conn.done(); sleepsecs( 30 ); continue ; } // (主要用于当一个process卸载且没有新实例接着使用该entries时) // replace it for a quite a while) // if the lock is taken, the take-over mechanism should handle the situation auto_ptr < DBClientCursor > c = conn -> query( locksNS , BSONObj() ); vector < string > pids; while ( c -> more() ) { BSONObj lock = c -> next(); if ( ! lock [ " process " ].eoo() ) { // 找出process信息 pids.push_back( lock [ " process " ].valuestrsafe() ); } } Date_t fourDays = jsTime() - ( 4 * 86400 * 1000 ); // 4 days // 移除超过4天的且非当前process的entries记录 conn -> remove( lockPingNS , BSON( " _id " << BSON( " $nin " << pids ) << " ping " << LT << fourDays ) ); err = conn -> getLastError(); if ( ! err.empty() ) { warning() << " dist_lock cleanup request from process: " << process << " to: " << addr << " failed: " << err << endl; conn.done(); sleepsecs( 30 ); continue ; } // 构造索引,让remove执行更快 if ( loops ++ == 0 ) { conn -> ensureIndex( lockPingNS , BSON( " ping " << 1 ) ); } conn.done(); } catch ( std::exception & e ) { warning() << " dist_lock exception during ping: " << e.what() << endl; } log( loops % 10 == 0 ? 0 : 1 ) << " dist_lock pinged successfully for: " << process << endl; sleepsecs( 30 ); } }
上面的方法首先会更新config.lockpings集合中ping的时间信息,之后从config.lock集合中找出还在持有lock的 process信息,并从lockpings集合中去掉除process之外的且时间超过4天的lockping信息。最后为lockpings创建索 引,来为后面的更新操作提升效率(该集合中的数据会越来越多)。
我们可以将上面方法简单的理解为在获取使用lock之前的准备和维护工作。
到目前DistributedLock的初始化工作就完成了,下面看一下它的使用流程。在之前的文章中介绍过,当构造分布式锁之后,它会使用下面代码来尝试获取相应的锁:
// mongos项目balance.cpp文件 void Balancer::run() { ...... DistributedLock balanceLock( config , " balancer " ); ..... dist_lock_try lk( & balanceLock , " doing balance round " ); ...... }
上面的dist_lock_try()就是开始尝试获取当使用该锁(balanceLock)的代码,其构造函数如下:
// dist_lock.cpp dist_lock_try( DistributedLock * lock , string why ) : _lock( lock ) { _got = _lock -> lock_try( why , & _other ); }
它会持有传入的DistributedLock实例指针绑定到其自己的_lock(DistributedLock)属性上,然后使用该_lock来执行 DistributedLock的lock_try()方法,这里持有该_lock的主要目的还包括在其析构函数中调用该_lock的unlock()方 法,如下:
// dist_lock.cpp ~ dist_lock_try() { if ( _got ) { _lock -> unlock(); } }
下面我们分别来看一下lock_try()和unlock()方法:
// distlockk.cpp bool DistributedLock::lock_try( string why , BSONObj * other ) { // write to dummy if 'other' is null BSONObj dummyOther; if ( other == NULL ) other = & dummyOther; ScopedDbConnection conn( _conn ); // 如果要更新当前lock信息时,用于构造查询条件 BSONObjBuilder queryBuilder; queryBuilder.appendElements( _id ); queryBuilder.append( " state " , 0 ); { // make sure its there so we can use simple update logic below // 在"config.locks"集合中查找"balancer"对象 BSONObj o = conn -> findOne( _ns , _id ).getOwned(); // 如不存在则添加 if ( o.isEmpty() ) { try { log( 4 ) << " dist_lock inserting initial doc in " << _ns << " for lock " << _name << endl; // 添加相应lock信息,注:其余如ts信息会在后面以update方式进行绑定 conn -> insert( _ns , BSON( " _id " << _name << " state " << 0 << " who " << "" ) ); } catch ( UserException & e ) { log() << " dist_lock could not insert initial doc: " << e << endl; } } // 当前entry为有效状态时则强制接管(让其过期state=0) else if ( o[ " state " ].numberInt() > 0 ) { BSONObj lastPing = conn -> findOne( lockPingNS , o[ " process " ].wrap( " _id " ) ); if ( lastPing.isEmpty() ) { // if a lock is taken but there's no ping for it, we're in an inconsistent situation // if the lock holder (mongos or d) does not exist anymore, the lock could safely be removed // but we'd require analysis of the situation before a manual intervention error() << " config.locks: " << _name << " lock is taken by old process? " << " remove the following lock if the process is not active anymore: " << o << endl; * other = o; conn.done(); return false ; } unsigned long long now = jsTime(); unsigned long long pingTime = lastPing[ " ping " ].Date(); // config服务器与本机时间产生偏移时则无法获取锁 if ( now < pingTime ) { // clock skew warning() << " dist_lock has detected clock skew of " << ( pingTime - now ) << " ms " << endl; * other = o; conn.done(); return false ; } // 计算从ping开始到现在所用时间 unsigned long long elapsed = now - pingTime; elapsed = elapsed / ( 1000 * 60 ); // convert to minutes // 边界值判断,如大于100年 if ( elapsed > ( 60 * 24 * 365 * 100 ) /* 100 years */ ) { warning() << " distlock elapsed time seems impossible: " << lastPing << endl; } // 如果lock的elapsed时间未超过强制接管的时间,则false if ( elapsed <= _takeoverMinutes ) { log( 1 ) << " dist_lock lock failed because taken by: " << o << " elapsed minutes: " << elapsed << endl; * other = o; conn.done(); return false ; } log() << " dist_lock forcefully taking over from: " << o << " elapsed minutes: " << elapsed << endl; conn -> update( _ns , _id , BSON( " $set " << BSON( " state " << 0 ) ) ); string err = conn -> getLastError(); if ( ! err.empty() ) { warning() << " dist_lock take over from: " << o << " failed: " << err << endl; * other = o.getOwned(); other -> getOwned(); conn.done(); return false ; } } else if ( o[ " ts " ].type() ) { queryBuilder.append( o[ " ts " ] ); // 获取当前lock记录的timestamp } } OID ts; ts.init(); bool gotLock = false ; BSONObj now; // lock要更新的详细信息 BSONObj lockDetails = BSON( " state " << 1 << " who " << getDistLockId() << " process " << getDistLockProcess() << " when " << DATENOW << " why " << why << " ts " << ts ); // 将上面信息绑定到$set操作 BSONObj whatIWant = BSON( " $set " << lockDetails ); try { log( 4 ) << " dist_lock about to aquire lock: " << lockDetails << endl; // 更新指定条件的lock信息 conn -> update( _ns , queryBuilder.obj() , whatIWant ); BSONObj o = conn -> getLastErrorDetailed(); // 查询指定lock信息(可能是上面刚insert添加) now = conn -> findOne( _ns , _id ); if ( o[ " n " ].numberInt() == 0 ) { // 如出现问题 * other = now; other -> getOwned(); log() << " dist_lock error trying to aquire lock: " << lockDetails << " error: " << o << endl; gotLock = false ; } else { // 成功获取该锁 gotLock = true ; } } // 当dist_lock未被恰当的获取传递(即一个事务结束锁后,另一事务获取该锁) catch ( UpdateNotTheSame & up ) { // this means our update got through on some, but not others log( 4 ) << " dist_lock lock did not propagate properly " << endl; for ( unsigned i = 0 ; i < up.size(); i ++ ) { ScopedDbConnection temp( up[i].first ); BSONObj temp2 = temp -> findOne( _ns , _id ); if ( now.isEmpty() || now[ " ts " ] < temp2[ " ts " ] ) { // 获取最新的lock信息 now = temp2.getOwned(); } temp.done(); } // 如时间戳与本地时间戳一致,表示锁被成功传递 if ( now[ " ts " ].OID() == ts ) { log( 4 ) << " dist_lock completed lock propagation " << endl; gotLock = true ; conn -> update( _ns , _id , whatIWant ); } else { log() << " dist_lock error trying to complete propagation " << endl; gotLock = false ; } } conn.done(); log( 2 ) << " dist_lock lock gotLock: " << gotLock << " now: " << now << endl; return gotLock; }
上面的方法首先要尝试在config.locks集合中找到相应的锁记录信息,如没有则会创建一条记录。
如有则判断记录的state状态(如果为1表示其正在被使用),如果使用期限未超过强制接管期限(elapsed <= _takeoverMinutes)或未超过100年则,则无法获取当前锁。
当可以修改锁状态时,则使用update去更新lock记录的相关信息(包括state, when,who,why,ts等),同时对异常情况(一个事务结束锁后,另一事务未及时获取该锁)也做了容错处理。
如果上面方法成功执行后,会更新config.locks中的相应数据记录,并返回true,表示当前进程已获取了该lock.
在成功执行锁定的代码段之后,就需要对当前代码段解锁,这是通过下面方法进行的:
// 解除锁定 void DistributedLock::unlock() { const int maxAttempts = 3 ; int attempted = 0 ; // 尝试3次解锁 while ( ++ attempted <= maxAttempts ) { try { ScopedDbConnection conn( _conn ); // 解锁即更新lock信息: state=1 conn -> update( _ns , _id, BSON( " $set " << BSON( " state " << 0 ) ) ); log( 2 ) << " dist_lock unlock: " << conn -> findOne( _ns , _id ) << endl; conn.done(); return ; } catch ( std::exception & e) { log( LL_WARNING ) << " dist_lock " << _name << " failed to contact config server in unlock attempt " << attempted << " : " << e.what() << endl; sleepsecs( 1 << attempted); } } log( LL_WARNING ) << " dist_lock couldn't consumate unlock request. " << " Lock " << _name << " will be taken over after " << _takeoverMinutes << " minutes timeout " << endl; }
mongos会在解锁出现问题(如远程服务器停止响应等)尝试执行三次解锁,解锁主要就是将远程服务器的config.locks中相应锁记录字段state置为0即可。
好了,今天的内容就先到这里了。
原文链接:http://www.cnblogs.com/daizhj/archive/2011/05/30/mongodb_source_distlock.html
作者: daizhj, 代震军
微博: http://t.sina.com.cn/daizhj
Tags: mongodb,c++,balance,DistributedLock, 分布式锁


