【DirectX11-Tutorial】运行第一个win32程序A Primer of Basic Windows
<span style="font-family:Microsoft YaHei;font-size:14px;">#include <stdio.h>
// include the standard input/output header file

void main(void)
// our program starts here
{
    printf("Hello World!");
 // print "Hello World!" into the console
    return;
// return void to windows
}
 </span>
上述是我们学习C语言时开始的控制台程序,以下通过对比来开始写第一个WIN32应用程序。代码中,函数中main()用来启动应用程序,简单来说main()会告诉计算机开始程序,同时系统可以给你需要的参数来启动应用。在windows程序中,不同的是它具有两个功能。第一个是win32控制台main()函数,另一个是允许Windows程序事件驱动。当事件发生时,windows将会记录信息,并且将信息放在队列中。
为了开始写我们的windows程序,我能需要在功能前面加上WinMain()。
The WinMain() Function相当于控制台中的main()函数。他是应用程序开始的地方,在这里可以进行基本的初始化。通常只是用代码创建一个窗口,而且是一些基本回路。
以下是 WinMain() 应用的示例:
<span style="font-family:Microsoft YaHei;font-size:14px;">int WINAPI WinMain(HINSTANCE hInstance,
                   HINSTANCE hPrevInstance,
                   LPSTR lpCmdLine,
                   int nCmdShow);</span>
理解代码之前先了解一下在int和WinMain 之间WINAPI这个词,这是一个传递 Fortran and Pascal参数的方法。就是反向传递参数。它们通常从右至左的传递,但是WINAPI可以使它们从左至右传递。细节原因不是特别重要,Windows需要这种传递方式。
<span style="font-family:Microsoft YaHei;font-size:14px;">HINSTANCE hInstance,</span>
第一个语句中HINSTANCE 是“handle to an instance”的缩写。Handle是一个32为整数识别对象。instance是应用的一个复制实例。由于多任务处理和运行一个程序的多个副本的能力,Windows需要一种方法来跟踪程序。通过给每个实例程序"handle to an instance",或者从其他程序中标识每一个程序。当开始程序的时候,Windows选取一个号码并且把它放到这个参数之中。
<span style="font-family:Microsoft YaHei;font-size:14px;">HINSTANCE hPrevInstance,</span>
第二个语句代表着处理过去的实例,如果存在打开多个应用副本的情况,从理论上讲,hPrevInstance将会组织过去的实例被打开。
之前的32位处理器、Windows95版本之前的方式,从同样应用复制的多个实例被阻住去占用同样的内存空间。当很多程序员想要从运行多个副本中保证他们的程序正常运行的时候,会变特很复杂。为了避免这一点,hPrevInstance 将会处理以前的实例同时在只有一个实例的情况下返回空值,这允许程序员监测任何正在运行的副本。虽然现在我们依然使用32位的应用,但是Windows为每一个应用提供他们自己的内存空间,所以hPrevInstance 已经过时了。它仅仅由于向后兼容性而存在,这在每一个程序中等同于空值,而非其他副本的存在。
<span style="font-family:Microsoft YaHei;font-size:14px;">LPSTR lpCmdLine,</span>
这个语句是一个string型的长指针,负责命令行调用应用程序。举个例子,如果想要创建一个名为 "MyApp.exe" 的应用,并且在开始菜单中运行命令行,你需要运行"MyApp.exe" 、"MyApp.exe RunA"或者"MyApp.exe RunB"。在任何一种情况下, lpCmdLine将存储整个输入的内容,允许程序检测特定的参数。这在一个游戏的程序运行类似安全模式这种特殊情况下非常有用的方式,Windowed模式、软件渲染模式、作弊模式或者任何想要实现的模式。
<span style="font-family:Microsoft YaHei;font-size:14px;">int nCmdShow</span>
这个语句指的是window在创建的时候如何显示。例如,可以实现窗口最大化、最小化或正常显示,或者即便是打开一个窗口,它可以在后台运行。不一定非要使用这些功能,但是它们可以在你需要的时候使用。下面是一些常见的参数值:
| Value |
Description |
| SW_SHOWNORMAL |
Activates and displays a window. If the window is minimized or maximized, the system restores it to its original size and position. An application should specify this flag when displaying the window for the first time. |
| SW_SHOW |
Activates the window and displays it in its current size and position. |
| SW_HIDE |
Hides the window and activates another window. |
| SW_MAXIMIZE |
Maximizes the specified window. |
| SW_MINIMIZE |
Minimizes the specified window and activates the next top-level window in the Z order. |
| SW_RESTORE |
Activates and displays the window. If the window is minimized or maximized, the system restores it to its original size and position. An application should specify this flag when restoring a minimized window. |
| SW_SHOWMAXIMIZED |
Activates the window and displays it as a maximized window. |
| SW_SHOWMINIMIZED |
Activates the window and displays it as a minimized window. |
| SW_SHOWMINNOACTIVE |
Displays the window as a minimized window. This value is similar to SW_SHOWMINIMIZED, except the window is not activated. |
| SW_SHOWNA |
Displays the window in its current size and position. This value is similar to SW_SHOW, except the window is not activated. |
| SW_SHOWNOACTIVATE |
Displays a window in its most recent size and position. This value is similar to SW_SHOWNORMAL, except the window is not actived. |
下面将在VS2015中实现运行第一个win32程序。
打开VS2015,在菜单栏中点击文件-新建项目,在模板中选择WIN32控制台应用程序。
这里其实有一些疑惑,照理说应该创建窗口模式而非控制台模式,但是在选项过程中如果直接在应用程序类型中选择Windows应用程序,结果显示的并不正确。
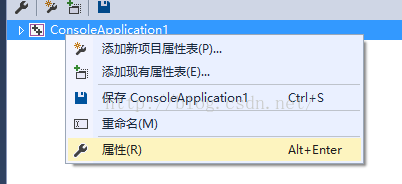
而最终实现的方式是新建的时候创建控制台应用程序,然后在创建好的项目中单击项目名称右键-属性打开项目的属性页。
然后再连接器(linker)-系统(system)中点击子系统选择窗口,这样的方式实现的最终效果。
以下是实现的代码。
<span style="font-family:Microsoft YaHei;font-size:14px;">// ConsoleApplication1.cpp : 定义控制台应用程序的入口点。
//

#include "stdafx.h"
#include <windows.h>    // include the basic windows header file

// the entry point for any Windows program
int WINAPI WinMain(HINSTANCE hInstance,
	HINSTANCE hPrevInstance,
	LPSTR lpCmdLine,
	int nShowCmd)
{
	// create a "Hello World" message box using MessageBox()
	MessageBox(NULL,
		L"Hello World!",
		L"Just another Hello World program!",
		MB_ICONEXCLAMATION | MB_OK);

	// return 0 to Windows
	return 0;
}

</span>
结果如下图所示:
<span style="font-family:Microsoft YaHei;font-size:14px;">#include <windows.h></span>
这个windows.h头文件只是一个包含许多Windows程序可用头文件的容器,这样就不需要手段去添加许多头文件了。
<span style="font-family:Microsoft YaHei;font-size:14px;">MessageBox()</span>
这个函数创建了在demo中可见的信息盒子。以下是创建的代码部分。
<span style="font-family:Microsoft YaHei;font-size:14px;">int MessageBox(HWND hWnd,
               LPCTSTR lptext,
               LPCTSTR lpcaption,
               UINT utype);</span>
下面我们可以快速的了解一下各个语句含义:
<span style="font-family:Microsoft YaHei;font-size:14px;">HWND hWnd,</span>
HWND是一个窗口的handle,上面提到handle是整数标识对象,在这种情况下,识别一个窗口。由于没有手动创建的窗口,设置为空值,同时系统知道没有除了桌面以外的窗口传递来的信息。
<span style="font-family:Microsoft YaHei;font-size:14px;">LPCTSTR lptext,</span>
16位string型的指针,其中指向信息盒子中的文字。
<span style="font-family:Microsoft YaHei;font-size:14px;">LPCTSTR lpcaption,</span>
16位string型指针指向标题文字,及信息的说明文字。
<span style="font-family:Microsoft YaHei;font-size:14px;">UINT utype</span>
此参数确定消息框的样式,以下是可以在这个参数添加的常用值列表。
| Value |
Description |
| MB_CANCELTRYCONTINUE |
The message box contains three push buttons: Cancel, Try Again, Continue. |
| MB_OK |
The message box contains one push button: OK. This is the default. |
| MB_OKCANCEL |
The message box contains two push buttons: OK and Cancel. |
| MB_RETRYCANCEL |
The message box contains two push buttons: Retry and Cancel. |
| MB_YESNO |
The message box contains two push buttons: Yes and No. |
| MB_YESNOCANCEL |
The message box contains three push buttons: Yes, No, and Cancel. |
要在消息框中显示一个图标,需要指定下列值之一:
| Value |
Description |
| MB_ICONINFORMATION |
An icon consisting of a lowercase letter i in a circle appears in the message box. |
| MB_ICONEXCLAMATION |
An exclamation-point icon appears in the message box. |
| MB_ICONERROR |
A stop-sign icon appears in the message box. |
Return Value
在游戏程序中,通常不需要返回值,因为错误的信息仅仅有一个去处。然而,返回值仍然是需要知道的。下列是返回值列表:
| Value |
Button Pressed |
| IDCANCEL |
The 'Cancel' button was selected. |
| IDTRYAGAIN |
The 'Try Again' button was selected. |
| IDCONTINUE |
The 'Continue' button was selected. |
| IDNO |
The 'No' button was selected. |
| IDYES |
The 'Yes' button was selected. |
| IDOK |
The 'OK' button was selected. |

