iOS 9 by Tutorials 笔记(十三)Testing
这几年 Apple 在 iOS 测试上改进不少,越来越简单快捷了:
- Xcode 5 苹果推出了 XCTest 框架的第一个版本,相较上一版 SenTestingKit 增加了很多现代化的实现
- Xcode 6 增加了异步 asynchronous 和性能 performance 测试
- 今年随着 Xcode 7 面世 Apple 又推出了 code coverage reports(测试覆盖率报告)和 UI testing
关于测试我之前专门写过两篇文章详述,具体可以看这里:
Unit Testing for iOS Part Ⅰ,
Unit Testing for iOS Part Ⅱ
本章就挑摘要记录下,不做具体的深入了
Code coverage
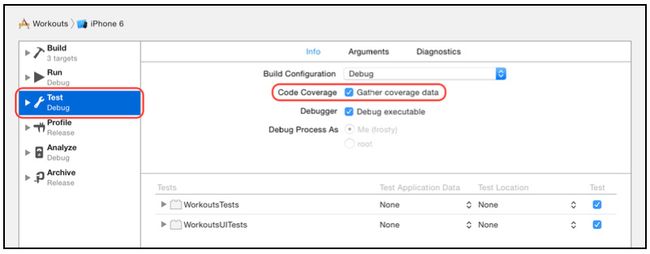
开启代码覆盖率可以让你知道整个工程当前的测试情况,开启很简单:在Product\Scheme\Edit Scheme... 下选择 Test,勾选 Code Coverage — Gather coverage data 就 OK 了
运行测试,在 Xcode 左侧导航栏切换到 report navigator,点击 test action
切换到 Coverage tab,你就能看到测试覆盖率报告了
这个报告展示了基于当前文件的方法测试覆盖情况,你甚至可以进入单独的类中去查看单个方法被测试的次数
@testable imports and access control
通常我们在 test target 中要测试 model 的时候,都要先导入相应的 module,这是因为你的 app 和 test bundle 一般是分离的,但仅仅这样做还不够。
这涉及到了访问控制的概念,通常很多语言都会对从一个代码区块访问另一个代码区块做出限制, Swift 也不例外,在 Swift 中这种访问控制模式基于 modules 和 source files 的概念。
一个 module 是一个独立的代码分发单元,这可以是一个应用或一个框架,在本例子中,所有在
Workouts app 里的源代码是一个 module,而所有在 testing bundle 中代码是另外一个独立的 module;而一个 source file 是 module 中的一个 Swift 源代码文件,比如 Workout.swift
Swift 提供了三种等级的访问控制:
- Public access 本权限下的实例允许任意 module 的代码访问
- Internal access 本权限的实例仅允许同一 module 的代码访问
- Private access 本权限的实例仅允许在当前 source file 中使用
默认的是 internal,所以想要从 test bundle 访问 app 中的实例是不可能的(因为跨了 module),全部设为 Public 又不现实,苹果审时度势在 Swift 2.0 推出了 @testable,可以让 internal 在 test bundle 中访问到
现在你只需要在 DataModelTests.swift 中将
@testable 对 Private access 不起作用
UI testing
如果你的工程是用 Xcode 7 之前版本创建的,那么在写 UI test 之前先要添加 UItesting target
Run your first UI test
第一步将我们要测试的 View 先标记出来
然后来写我们的 UI 测试方法
当运行测试的时候,你会发现模拟器会自动启动并模拟整个操作过程。你也许又会问为什么没有 assertions,因为如果界面上某个 UI 元素不存在,测试就会失败。所以执行 UI test 其实暗含了 asserts
UI test classes
在 UI testing 中主要有这三种独立的类
- XCUIApplication 表示代理当前 App
- XCUIElement 表示代理当前 UI 元素
- XCUIElementQuery 用做查询
- descendantsMatchingType(_

- childrenMatchingType(:_)
- containingType(_

- descendantsMatchingType(_
记住 XCUIApplication 和 XCUIElement 都仅仅是 proxies(代理人),并不是真正的 UI 对象
UI testing convenience methods
现在添加另一个测试,在具体某一项 Workout 详情页面,滚动到底部,点击 Select & Workout 按钮,此时会弹一个警告框,我们点 OK 来 dismiss 掉,最后返回到之前的 list 界面 同样是在 viewDidLoad() 中先标记 detail 页面的 table
- 获取到所有 cells,然后根据 identifier 筛选出来对应的 cell,点击进入详情页面
- 向上滚动 table,找到 Select & Workout 按钮点击,弹出的对话框点 OK
- 最后点击 navigation bar 上的 Workouts 按钮返回到 list 主页面
运行测试,失败了...
一般有三种方式向下查找到需要的 UI 元素
- 如果你有一个唯一的标识可以使用下标,buttonsQuery["OK"]
- 使用索引 tables.cells.elementAtIndex(0)
- 如果能确保查询到只有一个元素,可以使用 XCUIElementQuery 的 element 属性
如果使用以上三种方法最后找到多个 XCUIElement,那么测试就会失败,这是因为 UI testing framework 不知道你到底想要与哪个 UI 元素进行交互。
而上面的测试失败是因为下面这行找到了两个以 Workouts 命名的按钮
注意黄圈圈出来的 Button,修正也很简单,指明我们要点击的按钮是导航栏上的 Workouts 就好
UI recording
这个比较简单,新建一个空白的测试方法,光标移到方法内部起始位置,点击红色的 Record UI Test 小圆点会启动模拟器,此时你在模拟器上的操作会被 Xcode 记录下来转换成操作代码,也就是上一步写过的那些代码。
更多的内容: http://bbs.a-coder.cn/thread-42-1-1.html


