IOS开发之实现App消息推送(最新)
http://blog.csdn.net/shenjie12345678/article/details/41120637
好久没有写过博客啦,今天就由本菜鸟给大家做一个简单的IOSApp消息推送教程吧!一切从0开始,包括XCode6, IOS8, 以及苹果开发者中心最新如何注册应用,申请证书以及下载配置概要文件,相信很多刚开始接触ios的人会很想了解一下。(ps:网上看了一下虽然有很多讲述推送的好教程,我也是看着一步步学会的,但是这些教程的时间都是去年或者更早时期的,对引导新手来说不是很合适)
第一部分
首先第一步当然是介绍一下苹果的推送机制(APNS)咯(ps:其实每一篇教程都有),先来看一张苹果官方对其推送做出解释的概要图。
Provider是给你手机应用发出推送消息的服务器,而APNS(Apple Push Notification Service)则是苹果消息推送服务器。你本地的服务器当需要给应用推送一条消息的时候,先要将消息发出到苹果推送服务器,然后再由苹果推送服务器将消息发到安装了该应用的手机。
接下来再看一张解释图:
根据上图的逻辑我来给大家解释一下:
1.你的IOS应用需要去注册APNS消息推送功能。
2.当苹果APNS推送服收到来自你应用的注册消息就会返回一串device token给你(很重要)
3.将应用收到的device Token传给你本地的Push服务器。
4.当你需要为应用推送消息的时候,你本地的推送服务器会将消息,以及Device Token打包发送到苹果的APNS服
5.APNS再将消息推送给目的iphone
第二部分
1.从证书颁发机构颁发证书
就填写你苹果开发者账号的名称即可(应该是一个邮件名称),点击保存到磁盘的选项,点击继续,显示如下
点击存储,文件名为:CertificateSigningRequest.certSigningRequest 随后将他放在一个文件夹中我们取名push吧!
第三部分
访问苹果开发者网址:https://developer.apple.com/
选中MemberCenter选项,进入登陆页面,用你的苹果开发者账号登陆,过一会网页就会自动跳转到下图。
内容进行下一步的操作。
选择Certificates选项,设置证书,如图所示先解释一下
Development选项的作用顾名思义就是用来作为开发使用的证书,Production选项则
是用来发布产品使用的,名称很陌生是不是,之前的开发者网页是没有这一选项的,可能是苹果把他修改了,用这个名称更加能让人
理解吧(字面上解释就是产品么)。两个选项生成证书的步骤是一样的,现在我们使用开发者的选项进行证书的制作,步骤如下:
选择Development选项
点击上面的加号选项,
选择APNS选项(开发么当然是在沙盒环境下了,模拟真实情况),然后Continue
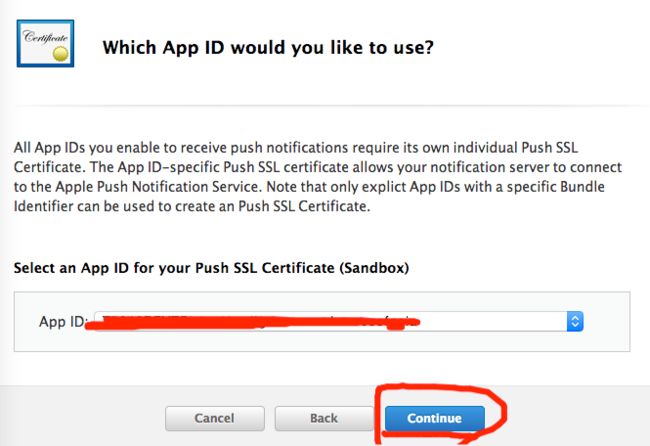
这个AppID我们在下一部分讲如何生成,现在我用的是已经生成好的一个应用ID,继续Continue
这边就要选择在钥匙串访问环节下载下来的CertificateSigningRequest.certSigningRequest文件了,选择并生成
点击下载,得到aps_development .cer,保存到push文件中去。
第四部分
新建一个AppID,选择网页上的AppIDs,然后点击右上角的 “加号”
App的取名只要按照苹果要求的就可以了
然后BundleID是比较重要的,在提交审核以及测试(苹果的TestFlight)和付费环节都需要用到,也只需按照苹果要求来写就好了。
接下来就是对你的应用需要使用苹果的哪些服务进行选择就行了,例如广告,游戏中心,推送,付费等等情况。
最后选择“Submit”选项,在下一个界面中选择“done”选项,这样我们设置AppID的步骤我们就完成了。
第五部分:生成Provisioning Profiles
这个配置概要文件分为两种,一种是为开发使用的,还有一种则是为发布到appStore上面。
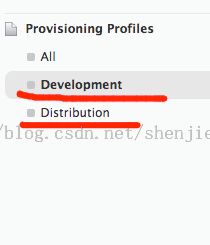
创建发布版的ProvisioningProfile与开发版的流程相同,点击Development然后点击右上角的加号
会进入选择何种配置概要文件的界面
我们现在时测试,所以选择“IOS App Development”的选项,在下面的Distribution发布选项中有两个选择,“App Store”以及“Ad hoc”,你可以根据下面的描述
选择你发布所需的选项。点击Continue进入下一步。
选择你上一步创建的AppID,点击Continue 进行下一步
选择你的开发者账号,Continue进行下一步
在这一步上选择你的设备(你只有在这一步上勾选了你的设备,你才能在设备上用这个签名进行调试)。关于如何将你的设备号添加进去也是非常
简单的,选择左侧的"Devices",然后点击右上角的加号,在随后出来的页面上添加你设备的UUID(在XCode中可以查看到)以及name( 可以随便取,自己看的懂就行)
然后Register一下,照着流程走到最后一步就完成了。
好咋们继续回到上面的Provisioning Profile配置环节,当你选好了你的设备后点击“Continue”进入下一页,
输入一个文件名(最好是起的能看懂是干嘛的,当然也可以随便起),点击“Generate”进入下一个页面,在这个页面中就会有一个下载按钮让你下载这个文件,
我们把它下载下来放在Push文件夹中。
第六部分
好了,前期的准备工作都已经做完了,现在让我们开始推送吧!(吼吼)
首先双击我们生成的 “aps_development .cer” 文件,进入钥匙串访问,找到我们的专用秘钥(根据在第二部分中从证书机构颁发证书操作中填写的常用名)
我在第二部分填写的是“silicon”,由于换了一台mac之前安装的没有了,之前没有截图,所以随便找了个图给大家看一下,凭大家的聪明才智应该不难理解吧。
然后右击导出,会弹出如下所示的图。
将他存储到push文件夹中,命名为“push.p12”,在这一步中导出会让你输入密码并验证,你可以自定义一个密码,例如abc123 。
。
现在push文件夹中应该有几个文件“aps_development .cer” ,"push.p12",“CertificateSigningRequest.certSigningRequest”以及刚才下下来的配置概要文件。
接下来我们打开终端将他们生成.pem文件
1.把aps_development .cer文件生成.pcm文件,cd到push文件夹下
2.把push.p12文件生成为.pem文件
上边输入的密码则是你导出证书所设的密码,即abc123.接着还会让你输入.pem文件的密码,还是使用abc123好了,防止混淆。
这样我们在push文件夹中就又得到了两个文件,PushChatCert.pem和PushChatKey.pem。
3.把PushChatCert.pem和PushChatKey.pem合并为一个pem文件,
![]()
在push文件夹中又多了一个ck.pem文件,以上我们把需要使用的文件都准备好了
接下来就要测试一下啦,是不是很激动~
为了测试证书工作的状况,我们可以使用“telnet gateway.sandbox.push.apple.com 2195”来检测一下,如果显示
则表示成功了。
然后,我们使用我们生成的证书和私钥来设置一个安全的链接去链接苹果服务器
在终端输入如下命令:openssl s_client -connect gateway.sandbox.push.apple.com:2195 -cert PushChatCert.pem -key PushChatKey.pem
需要输入密码(abc123 我们刚才所设置的)。
然后他会返回一系列的数据,这里我就粘贴一部分啦:
CONNECTED(00000003)
depth=1 /C=US/O=Entrust, Inc./OU=www.entrust.net/rpa is incorporated by reference/OU=(c) 2009 Entrust, Inc./CN=Entrust Certification Authority - L1C
verify error:num=20:unable to get local issuer certificate
verify return:0
---
Certificate chain
。。。。。(省略)。。。。。(省略)
。。。。。(省略)
Start Time: 1416389389
Timeout : 300 (sec)
Verify return code: 0 (ok)
---
测试就到这里啦。。。
第七部分
1.建立推送项目
- //
- // AppDelegate.m
- // TestPushNotifiy
- //
- // Created by silicon on 14-10-30.
- // Copyright (c) 2014年 silicon. All rights reserved.
- //
- #import "AppDelegate.h"
- @implementation AppDelegate
- @synthesize mainView = _mainView;
- - (BOOL)application:(UIApplication *)application didFinishLaunchingWithOptions:(NSDictionary *)launchOptions
- {
- if ([application respondsToSelector:@selector(isRegisteredForRemoteNotifications)])
- {
- //IOS8
- //创建UIUserNotificationSettings,并设置消息的显示类类型
- UIUserNotificationSettings *notiSettings = [UIUserNotificationSettings settingsForTypes:(UIUserNotificationTypeBadge | UIUserNotificationTypeAlert | UIRemoteNotificationTypeSound) categories:nil];
- [application registerUserNotificationSettings:notiSettings];
- } else{ // ios7
- [application registerForRemoteNotificationTypes:(UIRemoteNotificationTypeBadge |UIRemoteNotificationTypeSound |UIRemoteNotificationTypeAlert)];
- }
- self.window = [[UIWindow alloc] initWithFrame:[[UIScreen mainScreen] bounds]];
- // Override point for customization after application launch.
- self.window.backgroundColor = [UIColor whiteColor];
- [self.window makeKeyAndVisible];
- self.mainView = [[MainViewController alloc] initWithNibName:@"MainViewController" bundle:nil];
- self.window.rootViewController = self.mainView;
- return YES;
- }
- - (void)application:(UIApplication *)application didRegisterForRemoteNotificationsWithDeviceToken:(NSData *)pToken{
- NSLog(@"---Token--%@", pToken);
- }
- - (void)application:(UIApplication *)application didReceiveRemoteNotification:(NSDictionary *)userInfo{
- NSLog(@"userInfo == %@",userInfo);
- NSString *message = [[userInfo objectForKey:@"aps"]objectForKey:@"alert"];
- UIAlertView *alert = [[UIAlertView alloc] initWithTitle:@"提示" message:message delegate:self cancelButtonTitle:@"取消" otherButtonTitles:@"确定", nil nil];
- [alert show];
- }
- - (void)application:(UIApplication *)application didFailToRegisterForRemoteNotificationsWithError:(NSError *)error{
- NSLog(@"Regist fail%@",error);
- }
- - (void)applicationWillResignActive:(UIApplication *)application
- {
- // Sent when the application is about to move from active to inactive state. This can occur for certain types of temporary interruptions (such as an incoming phone call or SMS message) or when the user quits the application and it begins the transition to the background state.
- // Use this method to pause ongoing tasks, disable timers, and throttle down OpenGL ES frame rates. Games should use this method to pause the game.
- }
- - (void)applicationDidEnterBackground:(UIApplication *)application
- {
- // Use this method to release shared resources, save user data, invalidate timers, and store enough application state information to restore your application to its current state in case it is terminated later.
- // If your application supports background execution, this method is called instead of applicationWillTerminate: when the user quits.
- }
- - (void)applicationWillEnterForeground:(UIApplication *)application
- {
- // Called as part of the transition from the background to the inactive state; here you can undo many of the changes made on entering the background.
- }
- - (void)applicationDidBecomeActive:(UIApplication *)application
- {
- // Restart any tasks that were paused (or not yet started) while the application was inactive. If the application was previously in the background, optionally refresh the user interface.
- }
- - (void)applicationWillTerminate:(UIApplication *)application
- {
- // Called when the application is about to terminate. Save data if appropriate. See also applicationDidEnterBackground:.
- }
- @end
在appdelegate.m中加入以上代码,
- if ([application respondsToSelector:@selector(isRegisteredForRemoteNotifications)])
- {
- //IOS8
- //创建UIUserNotificationSettings,并设置消息的显示类类型
- UIUserNotificationSettings *notiSettings = [UIUserNotificationSettings settingsForTypes:(UIUserNotificationTypeBadge | UIUserNotificationTypeAlert | UIRemoteNotificationTypeSound) categories:nil];
- [application registerUserNotificationSettings:notiSettings];
- } else{ // ios7
- [application registerForRemoteNotificationTypes:(UIRemoteNotificationTypeBadge |UIRemoteNotificationTypeSound |UIRemoteNotificationTypeAlert)];
- }
函数:
- - (void)application:(UIApplication *)application didRegisterForRemoteNotificationsWithDeviceToken:(NSData *)pToken{
- NSLog(@"---Token--%@", pToken);
- }
- - (void)application:(UIApplication *)application didReceiveRemoteNotification:(NSDictionary *)userInfo{
- NSLog(@"userInfo == %@",userInfo);
- NSString *message = [[userInfo objectForKey:@"aps"]objectForKey:@"alert"];
- UIAlertView *alert = [[UIAlertView alloc] initWithTitle:@"提示" message:message delegate:self cancelButtonTitle:@"取消" otherButtonTitles:@"确定", nil nil];
- [alert show];
- }
这个函数则是当设备接收到来自苹果推送服务器的消息时触发的,用来显示推送消息。
- - (void)application:(UIApplication *)application didFailToRegisterForRemoteNotificationsWithError:(NSError *)error{
- NSLog(@"Regist fail%@",error);
- }
2.PHP服务端
将simplepush.php这个推送脚本也放在push文件夹中
- <?php
- // ??????????deviceToken???????????????
- $deviceToken = 'c95f661371b085e2517b4c12cc76293522775e5fd9bb1dea17dd80fe85583b41';
- // Put your private key's passphrase here:
- $passphrase = 'abc123';
- // Put your alert message here:
- $message = 'My first push test!';
- ////////////////////////////////////////////////////////////////////////////////
- $ctx = stream_context_create();
- stream_context_set_option($ctx, 'ssl', 'local_cert', 'ck.pem');
- stream_context_set_option($ctx, 'ssl', 'passphrase', $passphrase);
- // Open a connection to the APNS server
- //??????????
- //$fp = stream_socket_client(?ssl://gateway.push.apple.com:2195?, $err, $errstr, 60, //STREAM_CLIENT_CONNECT, $ctx);
- //?????????????appstore??????
- $fp = stream_socket_client(
- 'ssl://gateway.sandbox.push.apple.com:2195', $err,
- $errstr, 60, STREAM_CLIENT_CONNECT|STREAM_CLIENT_PERSISTENT, $ctx);
- if (!$fp)
- exit("Failed to connect: $err $errstr" . PHP_EOL);
- echo 'Connected to APNS' . PHP_EOL;
- // Create the payload body
- $body['aps'] = array(
- 'alert' => $message,
- 'sound' => 'default'
- );
- // Encode the payload as JSON
- $payload = json_encode($body);
- // Build the binary notification
- $msg = chr(0) . pack('n', 32) . pack('H*', $deviceToken) . pack('n', strlen($payload)) . $payload;
- // Send it to the server
- $result = fwrite($fp, $msg, strlen($msg));
- if (!$result)
- echo 'Message not delivered' . PHP_EOL;
- else
- echo 'Message successfully delivered' . PHP_EOL;
- // Close the connection to the server
- fclose($fp);
- ?>
此刻就是见证奇迹的时候了
使用终端进入到push文件夹,在终端输入 php simplepush.php
若显示以上提示则表示推送成功了。
附上一张成功图。
推送就到这边吧!
感谢这篇博客的指导:http://blog.csdn.net/showhilllee/article/details/8631734
simplepush.php以及XCode工程我会上传到我的资源里去,大家可以去那边下载。有什么不明白的地方大家可以留言或者私信我,我会第一之间回复的~


