Linux下PXE和KickStart实现自动化安装系统
博主的公司是一家线下金融支付公司,项目、需求非常的多,经常性的有新服务器、存储、加密机、火墙、交换机上架,测试环境还好,虚拟机直接cp,但是物理机就没办法了,一年下来从博主手上溜过的硬件没有100也有80,刚开始刻录光盘、或者ilo口安装。记得又一次新到了28台服务器(华为8台,hpGen9 20台),经理直接让博主全装,安装了3天及bios的调整,早上开始下午从测试机房来一天啥事也没干,竟搬砖了。(博主的新机器先在测试机房配好,然后再去生产机房上电)博主心里那是一个委屈啊,后来一想这样也不是个事,周周月月的上机器都让博主装,那不是要累死老子啊,我来时做系统运维的,不是装机工啊,后来想想干脆花点时间搞个pxe 自动去装,接着就有了下面的故事!
pex的搭建,主要由这几部分构成,KickStart配置文件,apache服务,dhcp服务,tftpboot服务,搭建这个还不是手到擒来的事:
首先KickStart配置文件怎么来,两个方法:
1、之前安装好的操作系统,/root下anaconda-ks.cfg文件修改修改。
2、KickStart图形化下的配置,最后保存配置文件就行。
博主是在自己的测试机上搭建的ip:192.168.1.33,系统是redhat6.6_64的
博主是第一种方法,下面是博主的ks.cfg文件:
:/root>vim ks.cfg //直接将博主的ks.cfg文件复制贴贴就好
#platform=x86, AMD64, or Intel EM64T
#version=DEVEL
# Firewall configuration
firewall --disabled
# Install OS instead of upgrade
install
# Use network installation
url --url="http://192.168.1.33/rhel6"
# Root password
rootpw --iscrypted $1$dTxHUip8$CqLk/8zhzBiFxLJExcTK81
# System authorization information
auth --useshadow --passalgo=sha512
# Use graphical install
graphical
# System keyboard
keyboard us
# System language
lang en_US
# SELinux configuration
selinux --disabled
# Do not configure the X Window System
skipx
# Installation logging level
logging --level=info
# Reboot after installation
reboot
# System timezone
timezone Asia/Shanghai
# Network information
network --bootproto=dhcp --device=eth0 --onboot=on
# System bootloader configuration
bootloader --location=mbr
# Clear the Master Boot Record
zerombr
# Partition clearing information
#clearpart --all --initlabel
# Disk partitioning information
#part /boot --fstype="ext4" --size=200 //这块的分区是固定大小的分区,没有做lvs博主之前做的,后来发现装虚拟机可以,物理机硬盘大小不一,所以不可用
#part swap --fstype="swap" --size=4000
#part / --fstype="ext4" --grow --size=1
#//下面的是分区配置,boot 500M,swap分区 1g-4g 装出来都是4g,其余的全部给/
clearpart --all --drives=sda
part /boot --fstype=ext4 --size=500
part pv.008002 --grow --size=1
volgroup VolGroup --pesize=4096 pv.008002
#logvol /home --fstype=ext4 --name=lv_home --vgname=VolGroup --grow --size=100
logvol / --fstype=ext4 --name=lv_root --vgname=VolGroup --grow --size=1024 --maxsize=512000
logvol swap --name=lv_swap --vgname=VolGroup --grow --size=1024 --maxsize=4096
%post
rm -rf /etc/yum.repos.d/*
echo "nameserver 210.22.84.3" > /etc/resolv.conf
%end
%packages
@base
%end
首先是apche服务器安装:
yum install httpd -y
cd /var/www/html/
将 ks.cfg 文件放在apache的发布目录下,启动apache服务。
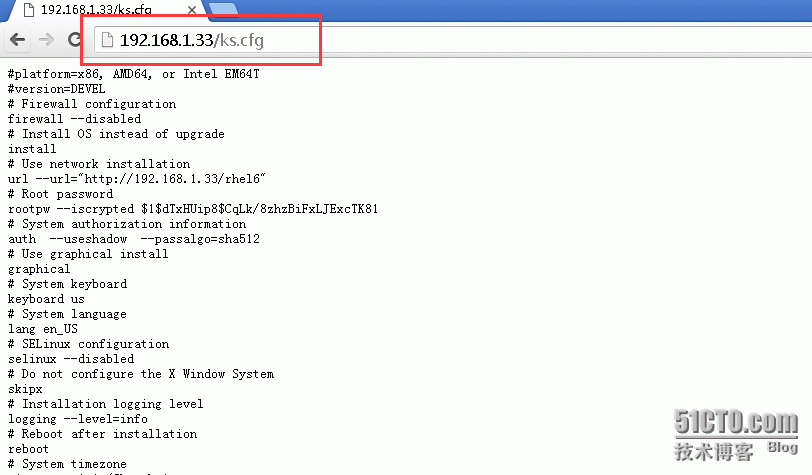
浏览器输入:http://192.168.1.33是可以看到配置文件内容的,如图
下面是dhcp的搭建,yum install dhcpd* 安装下就好,配置文件如下:
dhcp服务器默认可能没有dhcpd.conf文件,需要cp模板修改:
cp /usr/share/doc/dhcp-4.1.1/dhcpd6.conf.sample ./dhcpd.conf
要是懒得话,直接复制粘贴博主的配置文件,稍作修改:
:/root>cat dhcpd.conf
option domain-name "test.com";
option domain-name-servers 192.168.1.33;
default-lease-time 60000;
max-lease-time 7200;
ddns-update-style none;
subnet 192.168.1.0 netmask 255.255.255.0 {
range 192.168.1.10 192.168.1.230;
option routers 192.168.1.33;
next-server 192.168.1.33;
option subnet-mask 255.255.255.0;
filename "pxelinux.0";
option broadcast-address 192.168.1.255;
}
host boss {
hardware ethernet 00:0C:29:9D:62:48;
fixed-address 192.168.1.33;
}
/etc/init.d/dhcpd restart
chkconfig dhcpd on
tftp服务配置
yum intall -y tftp-server
tftp服务是xinetd的子服务:
:/root>cat tftp
# default: off
# description: The tftp server serves files using the trivial file transfer \
# protocol. The tftp protocol is often used to boot diskless \
# workstations, download configuration files to network-aware printers, \
# and to start the installation process for some operating systems.
service tftp
{
socket_type = dgram
protocol = udp
wait = yes
user = root
server = /usr/sbin/in.tftpd
server_args = -s /var/lib/tftpboot
disable = no
per_source = 11
cps = 100 2
flags = IPv4
}
tftpserver 的目录在/var/lib/tftpboot
/etc/init.d/xinetd restart
chkconfig xinetd on
下面就是pxe的安装了,首先我们把iso文件挂在到服务器上,博主将系统镜像挂在/mnt下:
由于pxelinux.0为系统内置命令,我们使用:
# yum whatprovides */pxelinux.0 //查找pxelinux.0的安装包,还有文件的路径
# yum install syslinux-4.02-7.el6.i686 -y
pxelinux的目录在/usr/share/syslinux下,网络引导安装系统时,读取的pxelinux.0是在tftp目录/var/lib/tftpboot下,根本不在/usr/share/syslinux目录下:
:/root>cd /var/lib/tftpboot/
:/root>cp /usr/share/syslinux/pxelinux.0 .
切换到/mnt/isolinux目录下:注意:vmlinuz、initrd.img、isolinux.cfg这三项是有版本的,这三项版本一定要一样,否则实验成果不了。
:/root>cd /mnt/isolinux
:/root>cp -a ./* /var/lib/tftpboot/
:/root>cd /var/lib/tftpboot/
:/root>ls
boot.cat grub.conf isolinux.bin memtest splash.jpg vesamenu.c32
boot.msg initrd.img isolinux.cfg pxelinux.0 TRANS.TBL vmlinuz
现在建一个目录pxelinux.cfg,还是在/var/lib/tftpboot/目录下(博主的PS1修改了,所以看起来不是很明显)
mkdir pxelinux.cfg
cp isolinux.cfg pxelinux.cfg/default,然后修改default配置文件:
:/root>cat default
default vesamenu.c32
#prompt 1
timeout 600
display boot.msg
menu background splash.jpg
menu title Welcome to Red Hat Enterprise Linux 6.6!
menu color border 0 #ffffffff #00000000
menu color sel 7 #ffffffff #ff000000
menu color title 0 #ffffffff #00000000
menu color tabmsg 0 #ffffffff #00000000
menu color unsel 0 #ffffffff #00000000
menu color hotsel 0 #ff000000 #ffffffff
menu color hotkey 7 #ffffffff #ff000000
menu color scrollbar 0 #ffffffff #00000000
(cp下面5行做修改,博主直接修改)
label ks
menu label ^Install pxelinux0_rhel6.6_64
menu default
kernel vmlinuz
append ks=http://192.168.1.33/ks.cfg initrd=initrd.img ksdevice=eth0 ip=dhcp //网络引导使用apache服务的ks.cfg文件,多块网卡是选择使用eth0安装,ip默认dhcp
label vesa
menu label Install system with ^basic video driver
kernel vmlinuz
append initrd=initrd.img xdriver=vesa nomodeset
label rescue
menu label ^Rescue installed system
kernel vmlinuz
append initrd=initrd.img rescue
label local
menu label Boot from ^local drive
localboot 0xffff
label memtest86
menu label ^Memory test
kernel memtest
append -
注意项:使用pxe网络引导安装系统将会开启dhcp服务器,最好不要选择在公司局域网或生产网同一网段,要不可能会造成以下后果:
局域网已经有dhcp服务器,那就会出现ip冲突或是dhcp获取ip的服务器ip可能飘走。
