Appium学习-IOS初窥
背景
最近安卓那边做起来有点烦躁,主要还是我们的安卓第三方包用多了,导致超过了谷歌的上限,打不出包了,很多H5部分不好测试,我们的安卓开发总是习惯的禁掉webview句柄,给Activity加权限,导致跑出来的结果各种报错,换一个口味,玩玩IOS的自动化。
条件
测试IOS必须要Mac OS X系统,请不要问可不可以用Windows来测试IOS这种问题。
我电脑都是最新的版本,比如系统、比如xcode、比如Appium。
初衷
我是比较懒,不太想自己去看那些英文,结果搜索出来的结果,基本上都不是我想要的东西,好像整个网络上都是大神,并没有人来写这么一个手把手指导怎么跑官方demo的教程,只好自己去跑一下感觉感觉。
官方Demo
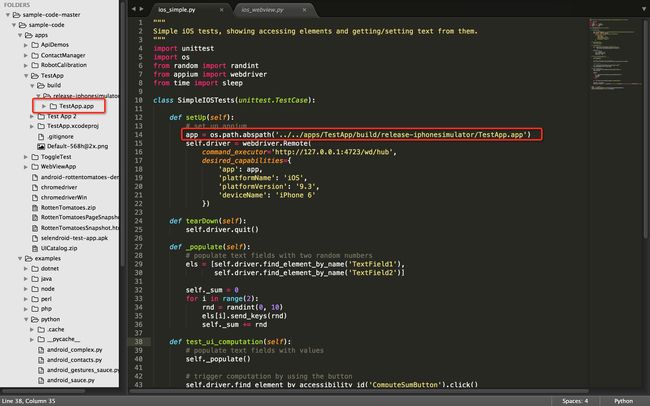
官方Demo当然是最好的一个东西,无奈官方的介绍也很短,还都是英文的。Github上有完整的官方Demo源码。全部一次性Down下来。在apps里面就能找到IOS的测试包了。就是下图这个东西了。
跑起来
跑起来很简单,如果Appium的环境是正常的,那么只要启动Appium的服务,然后执行Python的demo代码就行了。
官方的说明是这样的:
These are simple samples of how to use Python to run Appium tests. It is suggested that you use a test runner such as pytest or nose.
Sauce Labs examples require at least version 0.12 of the Appium Python Client, which includes the appium.SauceTestCase base class.
Usage:

py.test ios_simple.py
py.test -n2 --boxed ios_simple.py
成功执行后结果长这个样子。
不同的bash展示的是不一样的,在执行过程中你可以看到在IOS模拟器启动,然后启动官方demo,执行这两条用例的整个过程
Demo的说明
其实官方的Demo是非常简单的,你不需要知道IOS的代码是怎么跑起来的。demo是基于unittest测试框架写的。不懂的请在我的博客翻翻他们是如何运行的。
初始化驱动
class SimpleIOSTests(unittest.TestCase):

    def setUp(self):
        # set up appium
        app = os.path.abspath('../../apps/TestApp/build/release-iphonesimulator/TestApp.app')
        self.driver = webdriver.Remote(
            command_executor='http://127.0.0.1:4723/wd/hub',
            desired_capabilities={
                'app': app,
                'platformName': 'iOS',
                'platformVersion': '9.3',
                'deviceName': 'iPhone 6'
            })
可以看到在初始化中比较重要的几个参数,app路径、系统名称、系统版本、设备名称。
从这些参数来看,用模拟器测试IOS就必须要有源码,如果没有源码你第一个app路径也都没办法填写。
第一条测试用例
def test_scroll(self):
        els = self.driver.find_elements_by_class_name('UIAButton')
        els[5].click()

        sleep(1)
        try:
            el = self.driver.find_element_by_accessibility_id('OK')
            el.click()
            sleep(1)
        except:
            pass

        el = self.driver.find_element_by_xpath('//UIAMapView[1]')

        location = el.location
        self.driver.swipe(start_x=location['x'], start_y=location['y'], end_x=0.5, end_y=location['y'], duration=800)
这条用例就没什么好解释的了,和安卓上使用Appium基本上是一致的使用方式。首先找到classname是UIAButton的元素点击。然后再做一个滑动的操作。
第二条测试用例
def _populate(self):
        # populate text fields with two random numbers
        els = [self.driver.find_element_by_name('TextField1'),
               self.driver.find_element_by_name('TextField2')]

        self._sum = 0
        for i in range(2):
            rnd = randint(0, 10)
            els[i].send_keys(rnd)
            self._sum += rnd

    def test_ui_computation(self):
        # populate text fields with values
        self._populate()

        # trigger computation by using the button
        self.driver.find_element_by_accessibility_id('ComputeSumButton').click()

        # is sum equal ?
        # sauce does not handle class name, so get fourth element
        sum = self.driver.find_element_by_name('Answer').text
        self.assertEqual(int(sum), self._sum)
简单来说就是两个输入框随机输入10以内的数字,求和,然后下一个断言。代码看起来还是比较简单的,难怪没人会愿意写这么一个教程,因为这基本上就是Down下来直接跑就行了。。。。。。
最后
Appium无论执行Android还是IOS都有一个通病。效率很低。官方的两个Demo这么简单的例子,执行起来需要1分半,要是测试案例多了,一跑就是一整天啦!

