Android基础——TabHost使用(自定义按钮菜单)
TabHost使用场景
在实际开发中,我们主要使用TabHost实现菜单,最典型的就是有些电商app下面的按钮(如下图)这篇主要就是介绍这个效果在实际开发中是如何实现的同时还会介绍一点本人在实际开发中使用的一种方式,分享一下,哪里说的不对请指出来,大家一起学习进步。
步骤
- 创建TabHost XML布局文件。
- 创建TabItem XML布局文件。
- 创建实现类,并使其继承TabActivity,如果需要监听Tab改变的监听事件,在该类中实现OnTabChangeListener接口,设置监听事件,实现onTabChanged() 方法。
- 在类中获取TabHost。
- 在类中获取TabWidget。
- 添加TabItem。
详细步骤
- 创建TabHost XML布局文件 在XML布局文件中使用TabHost为节点的布局文件,该节点的id必须命名为
android:id="@android:id/tabhost",然后在该节点内添加FrameLayout和TabWidget,FrameLayout是展示内容的,其id必须命名为android:id="@android:id/tabcontent",TabWidget 是TabItem 内容存放的地方,其id 必须命名为android:id="@android:id/tabs"。
代码如下:
<?xml version="1.0" encoding="utf-8"?>
<TabHost xmlns:android="http://schemas.android.com/apk/res/android"
    android:id="@android:id/tabhost"
    android:layout_width="match_parent"
    android:layout_height="match_parent">
    <RelativeLayout
        android:layout_width="match_parent"
        android:layout_height="wrap_content">

        <FrameLayout
            android:layout_above="@android:id/tabs"
            android:id="@android:id/tabcontent"
            android:layout_width="match_parent"
            android:layout_height="match_parent"/>

        <TabWidget
            android:divider="@android:color/transparent"
            android:layout_alignParentBottom="true"
            android:id="@android:id/tabs"
            android:layout_width="match_parent"
            android:layout_height="wrap_content"/>
    </RelativeLayout>
</TabHost>
- 创建TabItem XML布局文件。
这个就不介绍了,直接上代码吧!
<?xml version="1.0" encoding="utf-8"?>
<LinearLayout xmlns:android="http://schemas.android.com/apk/res/android"
    android:orientation="vertical"
    android:id="@+id/tab_item_ler"
    android:gravity="center"
    android:layout_width="match_parent"
    android:layout_height="match_parent">

    <TextView
        android:id="@+id/tab_Item_content_tv"
        android:layout_width="wrap_content"
        android:layout_height="wrap_content" />

</LinearLayout>
- 创建实现类,并使其继承TabActivity,如果需要监听Tab改变的监听事件,在该类中实现OnTabChangeListener接口,设置监听事件,实现onTabChanged() 方法。
- 在类中获取TabHost。
- 在类中获取TabWidget。
- 添加TabItem。
以上四个步骤将在下面代码中体现
代码如下:
public class MyTabHost extends TabActivity implements TabHost.OnTabChangeListener{

    private List<TabItem> tabItems;

    private TabHost mTabHost;
    private TabWidget mTabWidget;
    private LayoutInflater mLayouInflater;

    @Override
    protected void onCreate(Bundle savedInstanceState) {
        super.onCreate(savedInstanceState);

        setContentView(R.layout.activity_my_tabhost);

        mTabHost = getTabHost();                //获取TabHost
        mTabWidget = getTabWidget();            //获取TabWidget
        mLayouInflater = getLayoutInflater();

        initTabItem();
        initTabSpec();
        mTabHost.setOnTabChangedListener(this);
        mTabHost.setCurrentTab(0);
    }


    private void initTabItem() {
        tabItems = new ArrayList<TabItem>();
        TabItem tabItemOne = new TabItem();
        tabItemOne.setTitle("oneItem");
        tabItemOne.setIcon(R.mipmap.ic_launcher);
        tabItemOne.setIntent(new Intent(this, TabItemOneActivity.class));

        TabItem tabItemTwo = new TabItem();
        tabItemTwo.setTitle("twoItem");
        tabItemTwo.setIcon(R.mipmap.ic_launcher);
        tabItemTwo.setIntent(new Intent(this, TabItemTwoActivity.class));

        tabItems.add(tabItemOne);
        tabItems.add(tabItemTwo);
    }


    private void initTabSpec() {
        for(int i = 0 ; i < tabItems.size(); i ++){
            View view = mLayouInflater.inflate(R.layout.item_tab,null);
            TextView textView = (TextView) view.findViewById(R.id.tab_Item_content_tv);
            textView.setText(tabItems.get(i).getTitle());
            Drawable image = getResources().getDrawable(tabItems.get(i).getIcon());
            textView.setCompoundDrawablesWithIntrinsicBounds(null, null, null, image);

            //设置tabspec
            TabHost.TabSpec tabSpec = mTabHost.newTabSpec(tabItems.get(i).getTitle());
            //把TabItem view 添加到 TabSpec
            tabSpec.setIndicator(view);
            //添加选择后的Intent
            tabSpec.setContent(tabItems.get(i).getIntent());

            //将TabSpec添加到TabHost
            mTabHost.addTab(tabSpec);
        }
    }

    @Override
    public void onTabChanged(String tabId) {
        Toast.makeText(this,"" + tabId, Toast.LENGTH_SHORT).show();
    }
}
以上代码运行效果如下下图:

下面是我在一个项目中使用TabHost 完成自定义TabItem 效果,在开发中我们需要对TabItem 样式进行自定义,但是有些时候由于UI要求过于复杂,TabWidget 无法满足开发需要,这时候,我们就得想一下别的办法了。
下面是本人从项目中提炼出来的一个demo。
实现思路
- 将原有的TabWidget隐藏。
- TabHost页面中自定义一个TabItem。
- 将自定义的TabItem 中的 View 控件设置点击事件。
- 在点击事件中调用TabHost 中的 setCurrentTabByTag() 方法进行切换。
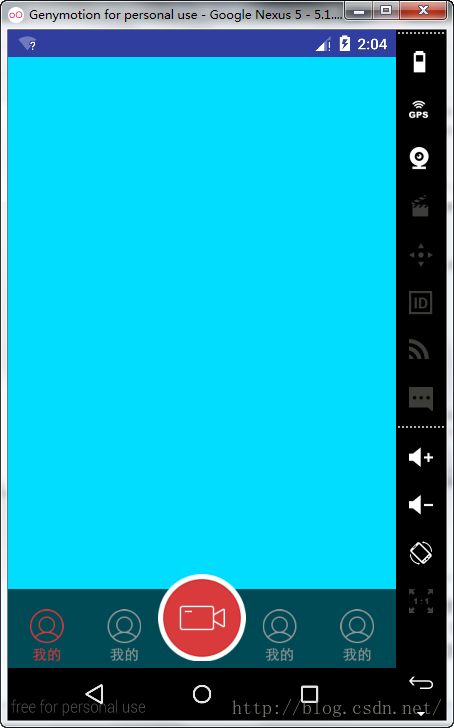
实现效果
实现代码:
TabItem 的状态列表:
TabHost XML布局文件:<?xml version="1.0" encoding="utf-8"?> <selector xmlns:android="http://schemas.android.com/apk/res/android"> <item android:state_selected="true" android:drawable="@mipmap/menu_me_selected"/> <item android:state_selected="false" android:drawable="@mipmap/menu_me_unselected"/> <item android:drawable="@mipmap/menu_me_unselected"/> </selector>
<?xml version="1.0" encoding="utf-8"?>
<TabHost xmlns:android="http://schemas.android.com/apk/res/android"
    android:id="@android:id/tabhost"
    android:layout_width="match_parent"
    android:layout_height="match_parent">

    <RelativeLayout
        android:layout_width="match_parent"
        android:layout_height="wrap_content">

        <FrameLayout
            android:background="@android:color/holo_red_dark"
            android:id="@android:id/tabcontent"
            android:layout_width="match_parent"
            android:layout_height="match_parent">
        </FrameLayout>

        <TabWidget
            android:layout_alignParentBottom="true"
            android:id="@android:id/tabs"
            android:layout_width="match_parent"
            android:layout_height="wrap_content"
            android:visibility="gone"
            />

        <LinearLayout
            android:background="#aa000000"
            android:id="@+id/menu_tabs"
            android:layout_alignParentBottom="true"
            android:gravity="center"
            android:orientation="horizontal"
            android:layout_width="match_parent"
            android:layout_height="wrap_content">

            <TextView
                android:paddingTop="10dp"
                android:id="@+id/btn_circle_tv"
                android:layout_width="0dp"
                android:layout_height="wrap_content"
                android:gravity="center"
                android:textColor="@color/color_main_menu_tab_text"
                android:layout_weight="1"
                />
            <TextView
                android:id="@+id/btn_classroom_tv"
                android:layout_width="0dp"
                android:layout_height="wrap_content"
                android:gravity="center"
                android:textColor="@color/color_main_menu_tab_text"
                android:layout_weight="1"
                />
            <TextView
                android:layout_width="0dp"
                android:gravity="center"
                android:layout_height="wrap_content"
                android:textColor="@color/color_main_menu_tab_text"
                android:layout_weight="1"
                />
            <TextView
                android:id="@+id/btn_shop_tv"
                android:layout_width="0dp"
                android:layout_height="wrap_content"
                android:textColor="@color/color_main_menu_tab_text"
                android:gravity="center"
                android:layout_weight="1"
                />
            <TextView
                android:id="@+id/btn_my_tv"
                android:layout_width="0dp"
                android:textColor="@color/color_main_menu_tab_text"
                android:layout_height="wrap_content"
                android:gravity="center"
                android:layout_weight="1"
                />
        </LinearLayout>

        <LinearLayout
            android:layout_alignParentBottom="true"
            android:background="@drawable/image_main_menu_tab_camera"
            android:layout_width="wrap_content"
            android:layout_centerHorizontal="true"
            android:layout_height="wrap_content">
            <TextView
                android:id="@+id/btn_camera_tv"
                android:layout_width="0dp"
                android:gravity="center"
                android:layout_height="wrap_content"
                android:textColor="@color/color_main_menu_tab_text"
                android:layout_weight="1"
                />
        </LinearLayout>
    </RelativeLayout>
</TabHost>
如上代码是在LinearLayout 中使用五个TextView实现的五个TabItem 效果,这个一来,我们就可以按照我们自己想要的样式开工了。
TabHost 的Java 代码部分: 我在实现时使用了两个类,MenuActivity和MainActivity,在MainActivity 中主要是对TabItem 中数据和点击事件的设置,MenuActivity类继承了TabActivity ,在该类中主要实现了TabItem 中数据的绑定。
代码如下:
-
MenuActivity 代码:
public abstract class MenuActivity extends TabActivity implements View.OnClickListener {

    private Context mContext;
    private TabHost mTabHost;
    private TabWidget mTabWidget;
    private LayoutInflater mlayoutInflater;
    private View mViewBox;

    @Override
    protected void onCreate(Bundle savedInstanceState) {
        super.onCreate(savedInstanceState);
        setContentView(R.layout.activity_main_menu);

        mContext = AppApplication.sContext;
        mlayoutInflater = getLayoutInflater();
        mTabHost = getTabHost();
        mTabWidget = getTabWidget();
        mTabWidget.setStripEnabled(false);
        initTabItem();
        initTabView();
        initTabSpace();
    }

    protected void initTabItem(){}
    protected void initTabView(){}

    private void initTabSpace(){

        if(getTabItemCount() != getTabViewCount()){
            return;
        }

        for(int i = 0 ; i < getTabItemCount() ; i ++){
            getTabView(i).setTag(getTabItemId(i));
            setTabItemTextView(getTabView(i), i);

            String tabItemId = getTabItemId(i);
            TabHost.TabSpec tabSpec = mTabHost.newTabSpec(tabItemId);
            tabSpec.setIndicator(tabItemId);
            tabSpec.setContent(getTabItemIntent(i));
            mTabHost.addTab(tabSpec);
        }
    }

    abstract protected int getTabItemCount();
    abstract protected int getTabViewCount();

    abstract protected Intent getTabItemIntent(int position);
    abstract protected View getTabView(int position);
    abstract protected String getTabItemId(int posotion);
    abstract protected void setTabItemTextView(View view,int position);

    protected void setCurrentTab(int index){

        mTabHost.setCurrentTab(index);
    }

    protected void initFirstViewPage(){
        updateTab(getTabView(0));
    }

    public void updateTab(View v){
        mTabHost.setCurrentTabByTag((String) v.getTag());
        v.setSelected(true);
        if(mViewBox != null){
            mViewBox.setSelected(false);
        }
        mViewBox = v;
    }
}
-
MianActivity 代码:
public class MainActivity extends MenuActivity {
    private List<TabItem> mTabItem;
    private List<View> mTabView;

    private TextView mTvBtnCircle, mTvBtnClassroom, mTvBtnCamera, mTvBtnShop, mTvBtnMy;

    @Override
    protected void onCreate(Bundle savedInstanceState) {
        super.onCreate(savedInstanceState);
        initFirstViewPage();
    }

    @Override
    protected void initTabItem() {
        mTabItem = new ArrayList<TabItem>();

        TabItem circleItem = new TabItem("圈子", R.drawable.image_main_menu_tab_circular,new Intent(this,CircleActivity.class));
        TabItem classroomItem = new TabItem("课堂", R.drawable.image_main_menu_tab_circular,new Intent(this,ClassroomActivity.class));
        TabItem cameraItem = new TabItem("相机", R.mipmap.menu_show_normal,new Intent(this,CameraActivity.class));
        TabItem shopItem = new TabItem("商城", R.drawable.image_main_menu_tab_circular,new Intent(this,ShopActivtiy.class));
        TabItem myItem = new TabItem("我的", R.drawable.image_main_menu_tab_circular,new Intent(this,MyActivity.class));

        mTabItem.add(circleItem);
        mTabItem.add(classroomItem);
        mTabItem.add(cameraItem);
        mTabItem.add(shopItem);
        mTabItem.add(myItem);
    }

    @Override
    protected void initTabView() {

        mTabView = new ArrayList<View>();
        mTvBtnCircle = (TextView) findViewById(R.id.btn_circle_tv);
        mTvBtnClassroom = (TextView) findViewById(R.id.btn_classroom_tv);
        mTvBtnCamera = (TextView) findViewById(R.id.btn_camera_tv);
        mTvBtnShop = (TextView) findViewById(R.id.btn_shop_tv);
        mTvBtnMy = (TextView) findViewById(R.id.btn_my_tv);
        mTvBtnCircle.setOnClickListener(this);
        mTvBtnClassroom.setOnClickListener(this);
        mTvBtnCamera.setOnClickListener(this);
        mTvBtnShop.setOnClickListener(this);
        mTvBtnMy.setOnClickListener(this);

        mTabView.add(mTvBtnCircle);
        mTabView.add(mTvBtnClassroom);
        mTabView.add(mTvBtnCamera);
        mTabView.add(mTvBtnShop);
        mTabView.add(mTvBtnMy);
    }

    @Override
    protected void setTabItemTextView(View view, int position) {

        view.setPadding(20, 0, 20, 20);
        Drawable image = getResources().getDrawable(mTabItem.get(position).getIcon());
        ((TextView)view).setCompoundDrawablesWithIntrinsicBounds(null, null, null, image);
    }

    @Override
    protected int getTabItemCount() {
        return mTabItem.size();
    }

    @Override
    protected int getTabViewCount() {
        return mTabView.size();
    }

    @Override
    protected Intent getTabItemIntent(int position) {
        return mTabItem.get(position).getIntent();
    }

    @Override
    protected View getTabView(int position) {
        return mTabView.get(position);
    }

    @Override
    public void onClick(View v) {
        updateTab(v);
    }

    @Override
    protected String getTabItemId(int position) {
        return mTabItem.get(position).getTitle();
    }
}
-
TabItem 代码:
-
public class TabItem {
    private String title;
    private int icon;
    private Intent intent;

    public  TabItem(){

    }

    public  TabItem(String title,int icon,Intent intent){
        this.title = title;
        this.icon = icon;
        this.intent = intent;
    }
	//下面是get 和 set 方法......
}
Demo 源码下载地址: http://download.csdn.net/detail/u013501637/9456890