Android进阶——属性动画Property Animation详解与应用(二)
引言
前一篇Android进阶——属性动画Property Animation详解(一)总结了属性动画的绝大部分核心知识点,这篇主要是补充下欠缺的知识点——Layout布局动画和View的动画相关知识、自定义TypeEvaluator属性动画的应用。
一、布局Layout改变时应用动画
首先我们必须先把对应的ViewGrop的android:animateLayoutchanges属性设置为true。
1、使用Java代码应用Layout change 动画步骤
ViewGroup中的子元素可以通过setVisibility使其Visible、Invisible或Gone;当有子元素可见性改变时(VISIBLE、GONE),可以向其应用动画,通过LayoutTransition类(该类是Android 提供的用于动画显示ViewGroup中的Layout的帮助类,我们可以使用该类设置动画并绑定目标Layout)应用,当ViewGroup的视图层次发生变化时产生过渡的动画效果。
| 方法 | 用法释义 |
|---|---|
| LayoutTransition() | 构造方法 |
| void addTransitionListener(LayoutTransition.TransitionListener listener) | 添加监听 |
| void setAnimator(int transitionType, Animator animator) | 设置指定的Animator |
| void setInterpolator(int transitionType, TimeInterpolator interpolator) | 设置Interpolator |
| void setStagger(int transitionType, long duration) | 设置延迟时间 |
~~~~~~~~~~~~~~~~~~~~~~~~~~~~~~~~~~~~~~~~~
| LayoutTransition Type | 用法释义 |
|---|---|
| APPEARING | 当一个元素在其父元素中变为Visible时对这个元素应用动画 |
| CHANGE_APPEARING | 当一个元素在其父元素中变为Visible时,因系统要重新布局有一些元素需要移动,对这些要移动的元素应用动画 |
| CHANGE_DISAPPEARING | 当一个元素在其父元素中变为GONE时,因系统要重新布局有一些元素需要移动,对这些要移动的元素应用动画 |
| CHANGING | 不是因为View被添加或消失而造成对其他View位置造成影响,对其他View应用动画 |
| DISAPPEARING | 当一个元素在其父元素中变为GONE时对其应用动画 |
1.1、首先通过构造方法得到LayoutTransition对象
LayoutTransition transition = new LayoutTransition(); 1.2、setAnimator设置Animator和监听(如果业务需求的话)
需要注意的是传递的Animator应用的对象的属性必须具有完整的getter和setter。
transition.setAnimator(LayoutTransition.DISAPPEARING, customDisappearingAnim);//其中animator为null则表示没有任何动画效果transition.addTransitionListener(new LayoutTransition.TransitionListener() {
@Override
public void startTransition(LayoutTransition transition, ViewGroup container, View view, int transitionType) {
}
@Override
public void endTransition(LayoutTransition transition, ViewGroup container, View view, int transitionType) {
}
});1.3、ViewGroup对象调用setLayoutTransition即可。
mLayout.setLayoutTransition(transition);2、使用xml形式应用Layout change 动画步骤
Layout change动画的xml文件的根节点是layout-animation。
- android:delay表示动画播放的延时,既可以是百分比,也可以是float小数。
- android:animationOrder表示动画的播放顺序,有三个取值normal(顺序)、reverse(反序)、random(随机),当然也可以自定义。
- android:animation指向了子控件所要播放的动画。
<layoutAnimation xmlns:android="http://schemas.android.com/apk/res/android" android:delay="30%" android:animationOrder="reverse" android:animation="@anim/slide_right"/>就可以将layout-animation应用到ViewGroup中,xml布局添加下面一行就
android:layoutAnimation="@animator/animator_main_layout"也可以代码配置,如果在xml中文件已经写好LayoutAnimation,可以使用AnimationUtils直接加载:
AnimationUtils.loadLayoutAnimation(context, id)LayoutAnimationController控制动画的显示顺序
 //通过加载XML动画设置文件来创建一个Animation对象;
   Animation animation=AnimationUtils.loadAnimation(this, R.anim.slide_right); //得到一个LayoutAnimationController对象;
   LayoutAnimationController controller = new LayoutAnimationController(animation); //设置控件显示的顺序;
   controller.setOrder(LayoutAnimationController.ORDER_REVERSE); //设置控件显示间隔时间;
   controller.setDelay(0.3); //为ListView设置LayoutAnimationController属性;
   listView.setLayoutAnimation(controller);
   listView.startLayoutAnimation();
3、Keyframes
keyFrame是一个 时间/值 对,通过它可以定义一个在特定时间的特定状态,即关键帧,而且在两个keyFrame之间可以定义不同的Interpolator,就好像多个动画的拼接,第一个动画的结束点是第二个动画的开始点。KeyFrame是抽象类,要通过ofInt(),ofFloat(),ofObject()获得适当的KeyFrame,然后通过PropertyValuesHolder.ofKeyframe获得PropertyValuesHolder对象。
例:设置btn2对象的width属性值使其:
/*第一个参数为时间百分比,第二个参数是在第一个参数的时间时的属性值。*/
Keyframe kf0 = Keyframe.ofInt(0, 400);//开始时 Width=400
Keyframe kf1 = Keyframe.ofInt(0.25f, 200);//动画开始1/4时 Width=200
Keyframe kf2 = Keyframe.ofInt(0.5f, 400);//动画开始1/2时 Width=400
Keyframe kf4 = Keyframe.ofInt(0.75f, 100);//动画开始3/4时 Width=100
Keyframe kf3 = Keyframe.ofInt(1f, 500);//动画结束时 Width=500
PropertyValuesHolder pvhRotation = PropertyValuesHolder.ofKeyframe("width", kf0, kf1, kf2, kf4, kf3);
ObjectAnimator rotationAnim = ObjectAnimator.ofPropertyValuesHolder(btn2, pvhRotation);
rotationAnim.setDuration(2000);
定义了一些Keyframe后,通过PropertyValuesHolder类的方法ofKeyframe一个PropertyValuesHolder对象,然后通过ObjectAnimator.ofPropertyValuesHolder获得一个Animator对象。
/*等效于*/
ObjectAnimator oa=ObjectAnimator.ofInt(btn2, "width", 400,200,400,100,500);
oa.setDuration(2000);
oa.start();
4、ViewPropertyAnimator
当需要对一个View的多个属性进行动画可以用ViewPropertyAnimator类,该类对多属性动画进行了优化,会合并一些invalidate()来减少刷新视图。
PropertyValuesHolder pvhX = PropertyValuesHolder.ofFloat("x", 260f);
PropertyValuesHolder pvhY = PropertyValuesHolder.ofFloat("y", 260f);
ObjectAnimator.ofPropertyValuesHolder(mImg, pvhX, pvyY).start();
mImg.animate().x(50f).y(100f);
5、Layout改变动画的实例
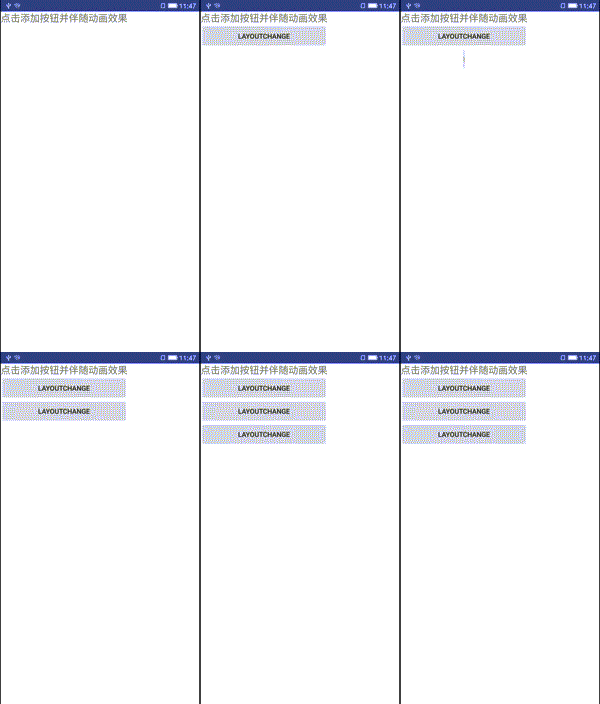
例1,首先看一个简单一点的添加按钮的时候产生宽度逐渐变大的动画

<!--主界面布局文件activity_layoutchange.xml-->
<?xml version="1.0" encoding="utf-8"?>
<LinearLayout xmlns:android="http://schemas.android.com/apk/res/android" android:id="@+id/rootLinearLayout" android:layout_width="wrap_content" android:layout_height="match_parent" android:orientation="vertical" android:animateLayoutChanges="true" >
    <TextView  android:id="@+id/id_addbtn_txt" android:layout_width="match_parent" android:layout_height="wrap_content" android:text="点击添加按钮并伴随动画效果" />
</LinearLayout>
<!--应用的动画效果属性动画文件-->
<?xml version="1.0" encoding="utf-8"?>
<objectAnimator xmlns:android="http://schemas.android.com/apk/res/android" android:duration="3000" android:propertyName="alpha" android:valueFrom="0" android:valueTo="1"> >
</objectAnimator>package com.crazymo.anim;
public class LayoutChangeActivity extends Activity {
private LinearLayout mRootLinearLayout;
private Context mContext;
private TextView mTextView;
@Override
public void onCreate(Bundle savedInstanceState) {
super.onCreate(savedInstanceState);
setContentView(R.layout.activity_layoutchange);
init();
}
private void init() {
mContext = this;
mRootLinearLayout = (LinearLayout) findViewById(R.id.rootLinearLayout);
mTextView = (TextView) findViewById(R.id.id_addbtn_txt);
mTextView.setOnClickListener(new OnClickListener() {
@Override
public void onClick(View v) {
Button addedButton = new Button(mContext);
addedButton.setText("LayoutChange");
//属性动画ObjectAnimator
ObjectAnimator objectAnimator = (ObjectAnimator) AnimatorInflater.loadAnimator(mContext, R.animator.animator_scale);
objectAnimator.setTarget(addedButton);
LayoutTransition layoutTransition = new LayoutTransition();
//指定为新加View出现时展示动画
layoutTransition.setAnimator(LayoutTransition.APPEARING, objectAnimator);
//为布局添加LayoutTransition
mRootLinearLayout.setLayoutTransition(layoutTransition);
mRootLinearLayout.addView(addedButton);
}
});
}
}例2,上例中,当Layout改变时应用的只是一种动画效果,如果直接把动画文件改为set节点的动画集,运行是报错的(java.lang.ClassCastException: android.animation.AnimatorSet cannot be cast to android.animation.ObjectAnimator),接下来我们应用多种效果,包含添加和删除View时的动画。
<LinearLayout xmlns:android="http://schemas.android.com/apk/res/android" xmlns:tools="http://schemas.android.com/tools" android:layout_width="match_parent" android:layout_height="match_parent" android:orientation="vertical" >
    <LinearLayout  android:layout_width="match_parent" android:layout_height="wrap_content" android:orientation="horizontal" >
        <Button  android:layout_width="0dp" android:layout_weight="1" android:layout_height="wrap_content" android:text="Add Button" android:id="@+id/layout_animator_addbutton" />
        <Button  android:layout_width="0dp" android:layout_weight="1" android:layout_height="wrap_content" android:text="Reset Button" android:id="@+id/layout_animator_resetbutton" />
    </LinearLayout>
    <ScrollView  android:layout_width="match_parent" android:layout_height="match_parent" >
        <GridLayout  android:layout_width="match_parent" android:layout_height="match_parent" android:columnCount="4" android:animateLayoutChanges="true" android:id="@+id/layout_animator_gridview" />
    </ScrollView>
</LinearLayout>
package com.crazymo.anim;
import android.animation.Animator;
import android.animation.AnimatorListenerAdapter;
import android.animation.Keyframe;
import android.animation.LayoutTransition;
import android.animation.ObjectAnimator;
import android.animation.PropertyValuesHolder;
import android.app.Activity;
import android.graphics.Color;
import android.os.Bundle;
import android.util.Log;
import android.view.View;
import android.widget.Button;
import android.widget.GridLayout;
import android.widget.LinearLayout;
public class ComplexLayoutAnimActivity extends Activity implements View.OnClickListener {
private Button mButtonAdd;
private Button mButtonReset;
private GridLayout mGridLayout;
private int buttonNumbers = 1;
private LayoutTransition mLayoutTransition;
@Override
protected void onCreate(Bundle savedInstanceState) {
super.onCreate(savedInstanceState);
setContentView(R.layout.activity_complexanim);
initViews();
}
private void getViews() {
mButtonAdd = (Button) findViewById(R.id.layout_animator_addbutton);
mButtonAdd.setOnClickListener(this);
mButtonReset = (Button) findViewById(R.id.layout_animator_resetbutton);
mButtonReset.setOnClickListener(this);
mGridLayout = (GridLayout) findViewById(R.id.layout_animator_gridview);
}
public void initViews() {
getViews();
mLayoutTransition = new LayoutTransition();
//为GridLayout设置mLayoutTransition对象
mGridLayout.setLayoutTransition(mLayoutTransition);
mLayoutTransition.setStagger(LayoutTransition.CHANGE_APPEARING, 30);
mLayoutTransition.setStagger(LayoutTransition.CHANGE_DISAPPEARING, 30);
//设置每个动画持续的时间
mLayoutTransition.setDuration(300);
//初始化自定义的动画效果
customLayoutTransition();
}
@Override
public void onClick(View v) {
switch (v.getId()) {
case R.id.layout_animator_addbutton:
Log.d("TAG", "add btn");
addButton();
break;
case R.id.layout_animator_resetbutton:
Log.d("TAG", "reset btn");
resetButton();
break;
default:
break;
}
}
/** * 增加Button */
public void addButton() {
Button mButton = new Button(this);
LinearLayout.LayoutParams mLayoutParams = new LinearLayout.LayoutParams(270, 150);
mButton.setLayoutParams(mLayoutParams);
mButton.setText("Button" + String.valueOf(buttonNumbers++));
mButton.setTextColor(Color.rgb(0, 0, 0));
if (buttonNumbers % 2 == 1) {
mButton.setBackgroundColor(Color.GREEN);
} else {
mButton.setBackgroundColor(Color.RED);
}
mButton.setOnClickListener(new View.OnClickListener() {
@Override
public void onClick(View v) {
mGridLayout.removeView(v);
}
});
mGridLayout.addView(mButton, Math.min(1, mGridLayout.getChildCount()));
}
/** * 删除所有的Button,重置GridLayout */
public void resetButton() {
mGridLayout.removeAllViews();
buttonNumbers = 1;
}
public void customLayoutTransition() {
/** * Add Button * LayoutTransition.APPEARING * 增加一个Button时,设置该Button的动画效果 */
ObjectAnimator mAnimatorAppearing = ObjectAnimator.ofFloat(null, "rotationY", 90.0f, 0.0f)
.setDuration(mLayoutTransition.getDuration(LayoutTransition.APPEARING));
//为LayoutTransition设置动画及动画类型
mLayoutTransition.setAnimator(LayoutTransition.APPEARING, mAnimatorAppearing);
mAnimatorAppearing.addListener(new AnimatorListenerAdapter() {
@Override
public void onAnimationEnd(Animator animation) {
super.onAnimationEnd(animation);
View view = (View) ((ObjectAnimator) animation).getTarget();
view.setRotationY(0.0f);
}
});
/** * Add Button * LayoutTransition.CHANGE_APPEARING * 当增加一个Button时,设置其他Button的动画效果 */
PropertyValuesHolder pvhLeft =
PropertyValuesHolder.ofInt("left", 0, 1);
PropertyValuesHolder pvhTop =
PropertyValuesHolder.ofInt("top", 0, 1);
PropertyValuesHolder pvhRight =
PropertyValuesHolder.ofInt("right", 0, 1);
PropertyValuesHolder pvhBottom =
PropertyValuesHolder.ofInt("bottom", 0, 1);
PropertyValuesHolder mHolderScaleX = PropertyValuesHolder.ofFloat("scaleX", 1.0f, 0.0f, 1.0f);
PropertyValuesHolder mHolderScaleY = PropertyValuesHolder.ofFloat("scaleY", 1.0f, 0.0f, 1.0f);
ObjectAnimator mObjectAnimatorChangeAppearing = ObjectAnimator.ofPropertyValuesHolder(this, pvhLeft,
pvhTop, pvhRight, pvhBottom, mHolderScaleX, mHolderScaleY).setDuration(mLayoutTransition
.getDuration(LayoutTransition.CHANGE_APPEARING));
mLayoutTransition.setAnimator(LayoutTransition.CHANGE_APPEARING, mObjectAnimatorChangeAppearing);
mObjectAnimatorChangeAppearing.addListener(new AnimatorListenerAdapter() {
@Override
public void onAnimationEnd(Animator animation) {
super.onAnimationEnd(animation);
View view = (View) ((ObjectAnimator) animation).getTarget();
view.setScaleX(1f);
view.setScaleY(1f);
}
});
/** * Delete Button * LayoutTransition.DISAPPEARING * 当删除一个Button时,设置该Button的动画效果 */
ObjectAnimator mObjectAnimatorDisAppearing = ObjectAnimator.ofFloat(null, "rotationX", 0.0f, 90.0f)
.setDuration(mLayoutTransition.getDuration(LayoutTransition.DISAPPEARING));
mLayoutTransition.setAnimator(LayoutTransition.DISAPPEARING, mObjectAnimatorDisAppearing);
mObjectAnimatorDisAppearing.addListener(new AnimatorListenerAdapter() {
@Override
public void onAnimationEnd(Animator animation) {
super.onAnimationEnd(animation);
View view = (View) ((ObjectAnimator) animation).getTarget();
view.setRotationX(0.0f);
}
});
/** * Delete Button * LayoutTransition.CHANGE_DISAPPEARING * 当删除一个Button时,设置其它Button的动画效果 */
//Keyframe 对象中包含了一个时间/属性值的键值对,用于定义某个时刻的动画状态。
Keyframe mKeyframeStart = Keyframe.ofFloat(0.0f, 0.0f);
Keyframe mKeyframeMiddle = Keyframe.ofFloat(0.5f, 180.0f);
Keyframe mKeyframeEndBefore = Keyframe.ofFloat(0.999f, 360.0f);
Keyframe mKeyframeEnd = Keyframe.ofFloat(1.0f, 0.0f);
PropertyValuesHolder mPropertyValuesHolder = PropertyValuesHolder.ofKeyframe("rotation",
mKeyframeStart, mKeyframeMiddle, mKeyframeEndBefore, mKeyframeEnd);
ObjectAnimator mObjectAnimatorChangeDisAppearing = ObjectAnimator.ofPropertyValuesHolder(this, pvhLeft, pvhTop, pvhRight, pvhBottom, mPropertyValuesHolder)
.setDuration(mLayoutTransition.getDuration(LayoutTransition.CHANGE_DISAPPEARING));
mLayoutTransition.setAnimator(LayoutTransition.CHANGE_DISAPPEARING, mObjectAnimatorChangeDisAppearing);
mObjectAnimatorChangeDisAppearing.addListener(new AnimatorListenerAdapter() {
@Override
public void onAnimationEnd(Animator animation) {
super.onAnimationEnd(animation);
View view = (View) ((ObjectAnimator) animation).getTarget();
view.setRotation(0.0f);
}
});
}
}二、View 的animate系方法
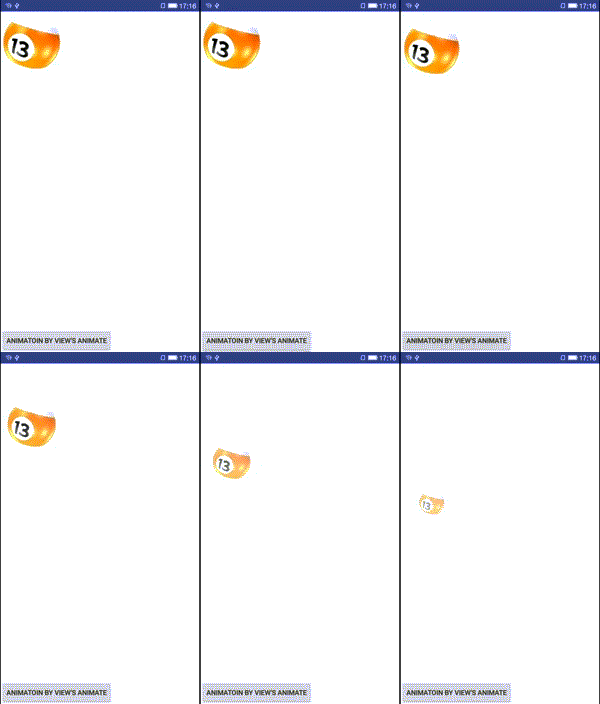
使用其实很简单通过View的animate()方法构造一个ViewPropertyAnimator对象,然后设置动画效果。

package com.crazymo.anim;

public class ViewAnimActivity extends Activity {
    private final String TAG="ViewAnimActivity";
    private ImageView mBall;
    private float mScreenHeight;
    @Override
    protected void onCreate(Bundle savedInstanceState){
        super.onCreate(savedInstanceState);
        setContentView(R.layout.layout);
        DisplayMetrics outMetrics = new DisplayMetrics();
        getWindowManager().getDefaultDisplay().getMetrics(outMetrics);
        mScreenHeight = outMetrics.heightPixels;
        mBall = (ImageView) findViewById(R.id.id_ball);

    }

    public void viewAnim(View view){
        //API12时,animate()返回的是一个ViewPropertyAnimator
        mBall.animate()
                .alpha(0)//在2s内透明度逐渐变为0
                .scaleX(0.1f)//缩小为原来的0.1倍
                .scaleY(0.1f)
                .setInterpolator(new AccelerateDecelerateInterpolator())//设置Interpolator
                .y(mScreenHeight / 2).setDuration(2000)
                //API12时,添加的动画开始时触发
                .withStartAction(new Runnable(){
                    @Override
                    public void run(){
                        Log.e(TAG, "START");
                    }
                })
        //API 16之后添加的动画结束后触发
        .withEndAction(new Runnable(){
            @Override
            public void run(){
                Log.e(TAG, "END");
                runOnUiThread(new Runnable() {
                    @Override
                    public void run(){
                        mBall.setY(0);
                        mBall.setAlpha(1.0f);
                    }
                });
            }
        }).start();
    }                                                                                                                                                  }
三、属性动画的应用例子
1、采用ValueAnimator,监听动画过程,自己实现属性的改变
private void performAnimate(final View target, final int start, final int end) {
    ValueAnimator valueAnimator = ValueAnimator.ofInt(1, 100);

    valueAnimator.addUpdateListener(new AnimatorUpdateListener() {

        //新建IntEvaluator对象,方便下面估值的时候使用
        private IntEvaluator mEvaluator = new IntEvaluator();

        @Override
        public void onAnimationUpdate(ValueAnimator animator) {
            //获得当前动画的进度值,整型,1-100之间
            int currentValue = (Integer)animator.getAnimatedValue();
            Log.d(TAG, current value:  + currentValue);

            //计算当前进度占整个动画过程的比例,浮点型,0-1之间
            float fraction = currentValue / 100f;
            //直接调用整型估值器通过比例计算出宽度,然后再设给Button
            target.getLayoutParams().width = mEvaluator.evaluate(fraction, start, end);
            target.requestLayout();
        }
    });
    valueAnimator.setDuration(5000).start();
}

@Override
public void onClick(View v) {
    if (v == mButton) {
        performAnimate(mButton, mButton.getWidth(), 500);
    }
}
ValueAnimator我要再说一下,拿上例来说,它会在5000ms内将一个数从1变到100,然后动画的每一帧会回调onAnimationUpdate方法,在这个方法里,我们可以获取当前的值(1-100),根据当前值所占的比例(当前值/100),我们可以计算出Button现在的宽度应该是多少,比如时间过了一半,当前值是50,比例为0.5,假设Button的起始宽度是100px,最终宽度是500px,那么Button增加的宽度也应该占总增加宽度的一半,总增加宽度是500-100=400,所以这个时候Button应该增加宽度400*0.5=200,那么当前Button的宽度应该为初始宽度+ 增加宽度(100+200=300)。上述计算过程很简单,其实它就是整型估值器IntEvaluator的内部实现。
2、使用ObjectAnimator对View的任意属性使用属性动画
例:对Button的宽度实现从当前宽度增加到屏幕的一半宽度。

/** 如果只是使用这个方法你会发现,为什么我们对Button的width属性做了动画却没有效果?上一篇讲过使用属性动画必须满足几个前提,Button内部虽然提供了getWidth和setWidth方法,但是这个setWidth方法并不是改变视图的大小,它继承自TextView新添加的方法,View是没有这个setWidth方法的。阅读了下源码,追踪发现总之,TextView和Button的setWidth和getWidth对应的对象不同,getWidth是可以获取到View 的宽度,然而setWidth设置的确不是View的宽度,而是设置TextView及其子类的宽度。 */
private void buttonAnimate() {
    WindowManager wm = (WindowManager)getApplicationContext()
                .getSystemService(Context.WINDOW_SERVICE);
    int mScreenWidth= wm.getDefaultDisplay().getWidth()/2;
    ObjectAnimator.ofInt(mButton, width, mScreenWidth).setDuration(4000).start();
}
网上查到,对任何属性做动画有三种方案:
修改SDK,给对应的对象加上get和set方法
二次封装,用一个类来包装原始对象,间接为其提供get和set方法
package com.crazymo.anim;

/** * Created by cmo on 16-4-7. */
public class BtnPropertyAnimActivity extends Activity {
    private Button mBtn;
    @Override
    protected void onCreate(Bundle savedInstanceState) {
        super.onCreate(savedInstanceState);
        setContentView(R.layout.activity_button);
        mBtn= (Button) findViewById(R.id.id_anim_btn);
        mBtn.setOnClickListener(new View.OnClickListener() {
            @Override
            public void onClick(View v) {
                ViewWrapper viewWrapper=new ViewWrapper(mBtn);
                WindowManager wm = (WindowManager)getApplicationContext()
                        .getSystemService(Context.WINDOW_SERVICE);
                int mScreenWidth= wm.getDefaultDisplay().getWidth();
                int width=mBtn.getMeasuredWidth();
                ObjectAnimator.ofInt(viewWrapper, "width",width, mScreenWidth).setDuration(4000).start();
            }
        });
    }

    private static class ViewWrapper {
        private View mTarget;

        public ViewWrapper(View target) {
            mTarget = target;
        }

        public int getWidth() {
            return mTarget.getLayoutParams().width;
        }

        public void setWidth(int width) {
            mTarget.getLayoutParams().width = width;
            mTarget.requestLayout();
        }
    }
}
- 采用ValueAnimator,监听动画过程,自己实现属性的改变
/** 它会在4000ms内将一个数从1变到100,然后动画的每一帧会回调onAnimationUpdate方法,在这个方法里,我们可以获取当前的值(1-100),根据当前值所占的比例(当前值/100),我们可以计算出Button现在的宽度应该是多少,比如时间过了一半,当前值是50,比例为0.5,假设Button的起始宽度是100px,最终屏幕宽度是500px,那么Button增加的宽度也应该占总增加宽度的一半,总增加宽度是500-100=400,所以这个时候Button应该增加宽度400*0.5=200,那么当前Button的宽度应该为初始宽度+ 增加宽度(100+200=300)。 */
private void buttonAnimate(final View target, final int start, final int end) {
    ValueAnimator valueAnimator = ValueAnimator.ofInt(1, 100);
    valueAnimator.addUpdateListener(new AnimatorUpdateListener() {

        //new 一个IntEvaluator对象,方便下面估值的时候使用
        private IntEvaluator mEvaluator = new IntEvaluator();
        @Override
        public void onAnimationUpdate(ValueAnimator animator) {
            //获得当前动画的进度值,整型,1-100之间
            int currentValue = (Integer)animator.getAnimatedValue();
            //计算当前进度占整个动画过程的比例,浮点型,0-1之间
            float fraction = currentValue / 100f;
            //直接调用整型估值器通过比例计算出宽度,然后再设给Button
            target.getLayoutParams().width = mEvaluator.evaluate(fraction, start, end);
            target.requestLayout();
        }
    });
    valueAnimator.setDuration(4000).start();
}
3、自定义动画展示顺序
我们都知道LayoutAnimation默认只有三种顺序,即顺序、逆序和随机,有时候并不能满足需求。比如说将动画顺序改为左上到右下角展开,例如Material Design中这个样子。(虽然一个个按顺序播放页可以实现)但是。去翻翻源码看它是怎么实现的,有没有提供方法自定义顺序?结果翻到了一个LayoutAnimationController#getTransformedIndex(AnimationParameters params)方法,返回值就是播放动画的顺序。并且这个方法是protected的,明显就是可由子类来扩展。
/** * custom LayoutAnimationController for playing child animation in any order. */
public class CustomLayoutAnimationController extends LayoutAnimationController {

    public static final int ORDER_CUSTOM  = 7;
    private Callback onIndexListener;
    public void setOnIndexListener(OnIndexListener onIndexListener) {
        this.onIndexListener = onIndexListener;
    }
    public CustomLayoutAnimationController(Animation anim) {
        super(anim);
    }

    public CustomLayoutAnimationController(Animation anim, float delay) {
        super(anim, delay);
    }
    public CustomLayoutAnimationController(Context context, AttributeSet attrs) {
        super(context, attrs);
    }
    /** * override method for custom play child view animation order */
    protected int getTransformedIndex(AnimationParameters params) {
        if(getOrder() == ORDER_CUSTOM && onIndexListener != null) {
            return onIndexListener.onIndex(this, params.count, params.index);
        } else {
            return super.getTransformedIndex(params);
        }
    }
    /** * callback for get play animation order */
    public static interface Callback{

        public int onIndex(CustomLayoutAnimationController controller, int count, int index);
    }
}
//通过加载XML动画设置文件来创建一个Animation对象;
Animation animation=AnimationUtils.loadAnimation(this, R.anim.slide_right); //得到一个LayoutAnimationController对象;
CustomLayoutAnimationController controller = new LayoutAnimationController(animation); //设置控件显示的顺序;
controller.setOrder(CustomLayoutAnimationController.ORDER_COSTOM); //设置控件显示间隔时间;
controller.setDelay(0.3); //为ListView设置LayoutAnimationController属性;
listView.setLayoutAnimation(controller);
listView.startLayoutAnimation();通过复写getTransformedIndex方法,添加自定义顺序ORDER_CUSTOM,让callback自定义控件播放动画的顺序,即可以达到任何想要的效果。