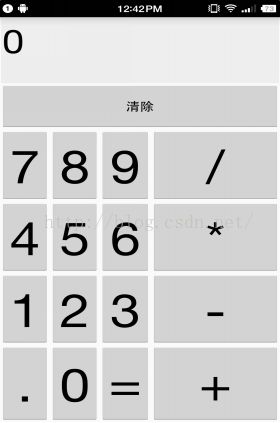
表格布局—计算器
<? xml version= "1.0" encoding= "utf-8" ?>
<GridLayout xmlns: android ="http://schemas.android.com/apk/res/android"
android :id= "@+id/root"
android :layout_width= "match_parent"
android :layout_height= "match_parent"
android :columnCount= "4"
android :rowCount= "6">
<!--计算器界面-->
<!--设置文本框的前景色,背景色等属性-->
<TextView
android :layout_width= "match_parent"
android :layout_height= "100dp"
android :layout_columnSpan= "4"
android :layout_gravity= "right"
android :layout_marginLeft= "4px"
android :layout_marginRight= "4px"
android :background= "#eee"
android :padding= "5px"
android :text= "0"
android :textColor= "#000"
android :textSize= "50sp" />
<!--定义一个横跨实列的按钮-->
<Button
android :layout_width= "match_parent"
android :layout_height= "70dp"
android :layout_columnSpan= "4"
android :text= "清除" />
</GridLayout>
package com.eson.gridlayouttest ;
import android.app.Activity ;
import android.os.Bundle ;
import android.view.Gravity ;
import android.widget.Button ;
import android.widget.GridLayout ;
public class MainActivity extends Activity {
GridLayout gridLayout ;
String[] chars =new String[]{
"7" , "8", "9" ,"/" ,
"4" , "5", "6" ,"*" ,
"1" , "2", "3" ,"-" ,
"." , "0", "=" ,"+"
} ;
@Override
public void onCreate (Bundle savedInstanceState) {
super .onCreate(savedInstanceState) ;
setContentView(R.layout. gridlayout );
gridLayout = (GridLayout) findViewById(R.id. root );
for ( int i = 0 ; i <chars . length ; i++) {
Button button = new Button( this );
button.setText( chars [i]);
//设置该按钮的字号大小
button.setTextSize( 70 );
//指定该组所在的行
GridLayout.Spec rowSpec = GridLayout. spec(i / 4 + 2 ) ;
//指定该组所在的列
GridLayout.Spec columnSpec = GridLayout. spec(i % 4 );
GridLayout.LayoutParams params = new GridLayout.LayoutParams(rowSpec , columnSpec) ;
//指定该组件占满父容器
params.setGravity(Gravity. FILL );
gridLayout .addView(button ,params) ;
}
}
}
