如何创建一个Sencha Touch 2应用_笔记本案例(第二部分)
这篇文章很好,包括5部分,但在网上只找到了第一部分的中文版,只有自己一点一点翻译。本人英语不好,所以将原文也贴上来,翻译不通顺的地方请大家参考。
In this second part of the tutorial on how to build a Sencha Touch 2 application we will continue building a small application that allows people to save notes on the device running the app.
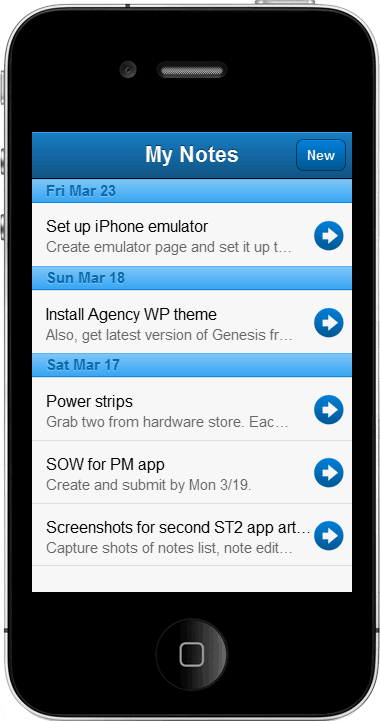
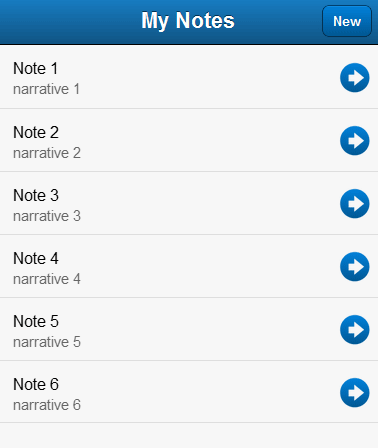
So far, we have been working on the View that renders(呈现) the list of notes cached on the device:
在如何建立一个ST2应用程序(第二部分),我们将继续建立一个小的应用,使人们能够将笔记保存在设备上。一直以来,我们努力将缓存在设备上的笔记呈现在列表上,正如下图:
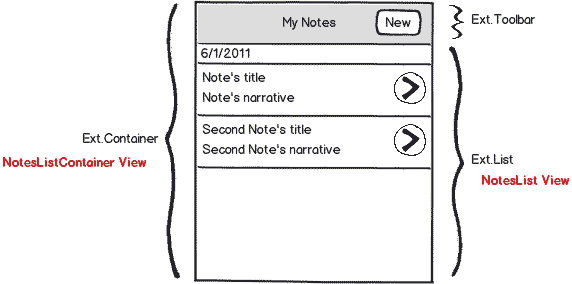
While building this View, we defined the NotesListContainer Class. We are going to start this article with a modification to this Class. This modification will promote encapsulation, and make the app easier to change and maintain.
We had previously defined the NotesListContainer Class as follows:
(在上一篇)建立视图时,我们定义了NotesListContainer这个类。这篇文章中我们将开始修改这个类。此修改将促进封装,使应用程序更易于更改和维护。
我们以前的NotesListContainer类定义如下:
Ext.define("NotesApp.view.NotesListContainer", {
    extend: "Ext.Container",
    config: {
        items: [{
            xtype: "toolbar",
            docked: "top",
            title: "My Notes",
            items: [{
                xtype: "spacer"
            }, {
                xtype: "button",
                text: "New",
                ui: "action",
                id:"new-note-btn"
            }]
        }]
    }
});
The changes we will make to this View consist of (包括)using the Class’s initialize() function to define its components. We will begin creating a new Class definition like so:
我们对这个类的改动包括使用类的initialize()函数来定义它的组件。我们将创建一个新的类,定义如下:
Ext.define("NotesApp.view.NotesListContainer", {
    extend: "Ext.Container",
    alias: "widget.noteslistcontainer",//别号,别名
    initialize: function () {
  this.callParent(arguments);
}
});
Notice how we are using the alias(别号,别名) config. This config is very helpful, as it effectively defines an xtype for our Class. Thanks to the alias, we can now refer to the NotesListContainer Class with the xtype=”noteslistcontainer” config. We will use this construct to instantiate the Class later in the article,
In Sencha Touch 2, every Class has an initialize() function. Initialize() can be used to perform logic right after the Class is instantiated, it replaces the initComponent() function that exists in Sencha Touch 1, and we can use it to add the toolbar with the New button:
请注意我们是如何配置别名(alias)。这个配置非常有用,因为它为我们的类定义一个xtype。由于别名的配置,我们现在可以通过
xtype =“noteslistcontainer”来引用NotesListContainer类。我们将在本文后面使用此构造函数来实例化这个类。
(var notesList = {xtype:noteslistcontainer})【xtype:""的语义是创建一个此类型的实例】
在ST2中,每个类都有一个initialize()函数。initialize()函数在类实例化之后执行业务逻辑代码,它取代了ST1中的InitComponent()函数,我们可以在初始化函数中添加工具栏上的新建按钮:
Ext.define("NotesApp.view.NotesListContainer", {
    extend: "Ext.Container",
    alias: "widget.noteslistcontainer",
    initialize: function () {
        this.callParent(arguments);
        var newButton = {
            xtype: "button",
            text: 'New',
            ui: 'action',
            handler: this.onNewButtonTap,//this代表此类,也就是这个container扩展(子类)
            scope: this
        };
        var topToolbar = {
            xtype: "toolbar",
            title: 'My Notes',
            docked: "top",
            items: [
                { xtype: 'spacer' },
                newButton
            ]
        };
        this.add([topToolbar]);
    },
    onNewButtonTap: function () {
        console.log("newNoteCommand");
        this.fireEvent("newNoteCommand", this);
    },
    config: {//config不在指定items
        layout: {
            type: 'fit'
        }
    }
});
In the initialize() function, after invoking callParent(), we define the New button variable, along with the Toolbar. As you already know from the previous chapter, the Toolbar’s items are the spacer and the Button.
Our last step within initialize() consists of adding the Toolbar to the View’s items via(通过) a call to the add() function.
If you go back to the newButton definition, you will notice that we’ve added a tap handler using the handler config:
在initialize()函数中,调用callParent()之后,我们定义按钮及工具栏。和上一篇一样,工具栏上的空间包括一个空白(spacer)和一个按钮(button)。initialize()中最后一个步骤是通过调用add()函数向视图中添加工具栏。
如果你回到的newButton定义,你会发现,我们使用handler配置了按钮的点击事件处理。
var newButton = {
    xtype: "button",
    text: 'New',
    ui: 'action',
    handler: this.onNewButtonTap,
    scope: this
};
This function will capture(捕获) tap events(点击事件) on the button, and transform them into an event that is more specific(具体) and descriptive(描述的 a.) of the application’s business logic. We will call this event newNoteCommand. Here’s the handler’s implementation:
这个函数将捕获按钮的点击事件,并把它们转化为应用程序更具体的业务逻辑。我们将此事件命名为newNoteCommand。下面是事件处理的实现:
onNewButtonTap: function () {
    console.log("newNoteCommand");
    this.fireEvent("newNoteCommand", this);
}
This is one of the important changes we are making to the NotesListContainer Class. Inthe first article of the series, the tap event on the button was captured by the Controller:
这是我们对NotesListContainer类的一个重要改变。在本系列的第一篇文章中,按钮的点击事件被控制器捕获:
Ext.define("NotesApp.controller.Notes", {
    extend: "Ext.app.Controller",
    config: {
        refs: {
            newNoteBtn: "#new-note-btn"
        },
        control: {
            newNoteBtn: {
                tap: "onNewNote"//按钮的tap事件被控制器捕获
            }
        }
    },
    onNewNote: function () {
        console.log("onNewNote");
    }
    // Rest of the controller's code omitted for brevity.
});
Now, we’re capturing the event within the View, and broadcasting a new event, newNoteCommand, which will be captured by the Controller:
现在,我们在视图中捕获事件,并广播一个新的的事件,newNoteCommand,它将会被控制器捕获:
onNewButtonTap: function () {
    console.log("newNoteCommand");
    this.fireEvent("newNoteCommand", this);//按钮的点击事件触发另外一个事件,这个事件被控制器捕获
}
Although both approaches are valid, there are important benefits derived from the second approach:
§ The View’s interface is cleaner. It now fires events(触发事件) that are more in line with the business logic of the application.
§ The View is easier to modify and maintain, as the Controller does not need intimate knowledge of the View’s inner workings.
As long as the View’s public events remain(保留) the same, the Controller will be able to work with the View. For example, we can change the elements used to trigger(触发、扳机) the creation(创建) of a new note in the View without affecting the Controller. The Controller only needs to listen to the newNoteCommand event fired from the view.
The next step of this refactoring(重构) will take place in the app.js file, where we will modify the application() function so we create our NoteListContainer instance using the Class’s alias:
虽然这两种方法都是有效的,但第二个方法更有好处:
§ 视图的界面清洁。现在触发事件,更符合应用程序的业务逻辑。
§ 视图更容易被维护,控制器不需要知道View的内部运作细节。
只要View的公共事件保持不变,控制器将能够与视图协同运行。例如,我们可以改变触发创建新笔记的控件,而不会影响控制器。控制器只需要监听在view中触发的newNoteCommand事件。
下一步将重构app.js文件,在这里我们将修改application()函数,之后我们可以使用类的别名创建NoteListContainer实例:
Ext.application({
    name: "NotesApp",
    controllers: ["Notes"],
    views: ["NotesListContainer"],
    launch: function () {
        var notesListContainer = {
            xtype: "noteslistcontainer"
        };
        Ext.Viewport.add(notesListContainer);
    }
});
And finally, we will switch over to the controller and modify the refs section just so we lookup our ref by xtype instead of by id:
最后,我们将切换到控制器,修改引用部分,使用xtype代替id引用:
Ext.define("NotesApp.controller.Notes", {
    extend: "Ext.app.Controller",
    config: {
        refs: {
            // We're going to lookup our views by xtype.
            notesListContainer: "noteslistcontainer"
        },
        control: {
            notesListContainer: {
                // The commands fired by the notes list container.
                newNoteCommand: "onNewNoteCommand",
                editNoteCommand: "onEditNoteCommand"
            }
        }
    },
    // Commands.
    onNewNoteCommand: function () {
        console.log("onNewNoteCommand");
    },
    onEditNoteCommand: function (list, record) {
        console.log("onEditNoteCommand");
    },
    // Base Class functions.
    launch: function () {
        this.callParent(arguments);
        console.log("launch");
    },
    init: function () {
        this.callParent(arguments);
        console.log("init");
    }
});
Notice that we also added the onEditNoteCommand event and editNoteCommand handler to the controller. We will define the onEditNoteCommand in the next section of the tutorial(教程), when we create the Notes List View.
After these changes, we can open the index.html page in our favorite WebKit browser, to confirm that everything is working as expected. Tapping the New button should produce the console message we added to the onNewButtonTap function:
注意,我们还在控制器中添加了onEditNoteCommand事件和editNoteCommand处理代码。本教程的下一节创建笔记列表的时候,我们将定义onEditNoteCommand。
在这些更改后,我们可以在我们最喜欢的WebKit浏览器中打开index.html页面,确认一切按预期工作正常。点击“New”按钮,控制台将会打印出onNewButtonTap函数中的消息:
Creating The Notes List View(创建笔记列表)
The Notes List View is the component that will render the cached notes. Its file is NotesList.js, which we will place in the view folder. To create this component, we will extend the Sencha Touch’s Ext.dataview.List Class:
列表是读取缓存数据的控件。它对应的文件是NotesList.js,它将放置在view文件夹中。为了创建这个组件,我们将扩展 Ext.dataview.List类:
Ext.define("NotesApp.view.NotesList", {
    extend: "Ext.dataview.List",
    alias: "widget.noteslist",
    config: {
        loadingText: "Loading Notes...",
        emptyText: '</pre>
<div class="notes-list-empty-text">No notes found.</div>
<pre>',
        onItemDisclosure: true,//开启disclose事件
        itemTpl: '</pre>//子项样式
<div class="list-item-title">{title}</div>//标题栏样式
<div class="list-item-narrative">{narrative}</div>//叙述栏样式
<pre>',
    }
});
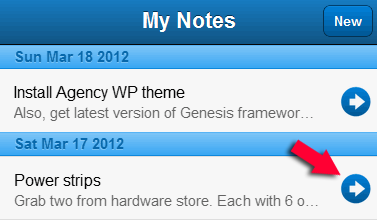
In this definition, we are setting the onItemDisclosure config to true, which means that we want the list to display a disclosure button next to each item:
在这个定义中,我们设置onItemDisclosure的配置为true,这意味着,我们要在列表中显示每个项目旁边的按钮:
A tap on the disclosure(披露、泄露) button will trigger(触发) the Note editing feature of the application. We will create the disclosure handler function in a few minutes.
In the NotesList Class, pay attention to the different CSS classes we use in the itemTpl and emptyText configs. They will allow us to nicely format both the list items, and the message the list will show when there are no items to display.
Before creating these styles we need to create the app.css file. We will place the file in the resources/css directory:
disclose按钮会触发编辑功能。我们将创建这个事件处理函数。
在NotesList类中,要注意我们在itemTpl和emptyText的configs中使用的不同的CSS类。他们能够很好地格式化列表项,并在没有记录的时候显示信息。
在创建这些样式之前,我们需要创建app.css文件,并且把它放到resources/ css目录中:
Here are the styles we need:
以下是我们所需要的样式:
/* Increase height of list item so title and narrative lines fit */
.x-list .x-list-item .x-list-item-label
{
     min-height: 3.5em!important;
}
/* Move up the disclosure button to account for the list item height increase */
.x-list .x-list-disclosure {
position: absolute;
bottom: 0.85em;
right: 0.44em;
}
.list-item-title
{
    float:left;
    width:100%;
    font-size:90%;
    white-space: nowrap;
    overflow: hidden;
    text-overflow: ellipsis;
    padding-right:25px;
    line-height:150%;
}
.list-item-narrative
{
    float:left;
    width:95%;
    color:#666666;
    font-size:80%;
    white-space: nowrap;
    overflow: hidden;
    text-overflow: ellipsis;
    padding-right:25px;
}
.x-item-selected .list-item-title
{
    color:#ffffff;
}
.x-item-selected .list-item-narrative
{
    color:#ffffff;
}
.notes-list-empty-text
{
    padding:10px;
}
In order to render(给予) the NotesList instance, we first need to add the Class name to the views config of the application:
为了呈现NotesList的实例,我们首先需要把类名添加到应用程序的views config配置中:
views: ["NotesList", "NotesListContainer"]
Then, we need to add it to the NotesListContainer Class. Back in(早在,回到) the NotesListContainer.js file, we will add the notesList variable to the initialize() function:
然后,我们需要将它添加到的NotesListContainer类中。回到NotesListContainer.js文件中,我们将把notesList变量添加到initialize() 函数中:
Ext.define("NotesApp.view.NotesListContainer", {
    extend: "Ext.Container",
    alias: "widget.noteslistcontainer",
    initialize: function () {
        this.callParent(arguments);
        var newButton = {
            xtype: "button",
            text: 'New',
            ui: 'action',
            handler: this.onNewButtonTap,
            scope: this
        };
        var topToolbar = {
            xtype: "toolbar",
            title: 'My Notes',
            docked: "top",
            items: [
                { xtype: 'spacer' },
                newButton
            ]
        };
        var notesList = {
            xtype: "noteslist",
            listeners: {
                disclose: { fn: this.onNotesListDisclose, scope: this }
            }
        };
        this.add([topToolbar, notesList]);
    },
    onNewButtonTap: function () {
        console.log("newNoteCommand");
        this.fireEvent("newNoteCommand", this);
    },
    config: {
        layout: {
            type: 'fit'
        }
    }
});
Notice how we are setting a listener for the disclose event of the list:
请注意我们是如何为列表的事件设置监听器:
var notesList = {
    xtype: "noteslist",
    listeners: {
        disclose: { fn: this.onNotesListDisclose, scope: this }//监听disclose事件
    }
};
Now we can define the onNotesListDisclose() function as follows:
现在,我们可以定义onNotesListDisclose()函数如下:
onNotesListDisclose: function (list, record, target, index, evt, options) {
    console.log("editNoteCommand");
    this.fireEvent('editNoteCommand', this, record);
}
Here we are taking the approach(途径) we followed earlier with the New button. Instead of having the Controller listen to the disclose event of the List, we are hiding this event, and creating the editNoteCommand event, which we will expose(暴露) to the Controller. This is another step towards making the application more flexible and easier to maintain.
在这里,我们仿照以前“New”按钮的方法。创建editNoteConmmand事件来取代使用控制器监听列表的disclose事件。这使应用更灵活,更易于维护。
Creating a Sencha Touch Data Model To Represent (代表)a Note(创建一个代表笔记的ST数据模型)
The Notes List requires a data store, which will supply the information for its list items. In order to create this store, we first need to define a data model that will represent a note.
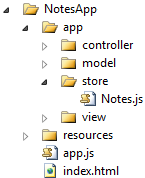
Let’s go ahead and define the Note Class. We will place this Class in the Note.js file, which we will save in the model directory:
笔记列表需要一个提供列表项信息的Store(数据仓库)。为了创建这个Store,我们首先需要定义一个代表笔记实体的数据模型(Model)。
接着定义Note类。这个类定义在Note.js中,它被放在model文件夹中:
A note will have four fields: id, date created, title and narrative. We will start with the following definition:
Note类将有四个字段:id,创建日期,标题和叙述。此类定义如下:
Ext.define("NotesApp.model.Note", {
    extend: "Ext.data.Model",
    config: {
        idProperty: 'id',
        fields: [
            { name: 'id', type: 'int' },
            { name: 'dateCreated', type: 'date', dateFormat: 'c' },
            { name: 'title', type: 'string' },
            { name: 'narrative', type: 'string' }
        ]
    }
});
We will use the idProperty config to establish(确定) that the id field is actually(其实,事实上) the field the framework can use to uniquely(唯一的) identify a note. This seems trivial(细小的,微不足道的,鸡毛蒜皮的) in our case because we have total control over the names of the fields of the data model. However, you might encounter cases where, for example, the data model’s fields are tightly coupled to column names in an existing database, and the name of the column that uniquely identifies a record is not “id”. This is why the idProperty config is important.
我们使用idProperty属性配置实体的标识列。但在我们的例子中,这似乎是不太重要的,因为我们拥有对于数据模型所有字段的绝对控制权。但是,您可能遇到其他的一些情况,例如,数据模型的字段和一个现有的数据库中的列名紧密耦合,标识列的名称不是“ID”。这就是idProperty配置的重要性。???
Setting Up Model Validation In Sencha Touch(在ST中建立模型验证)
The id, dateCreated and title fields in our Note Model are mandatory(强制性的). We will express(表达) this requirement using the validations config:
ID,dateCreated和title字段是强制性的。我们将用validations配置项表明需求:
Ext.define("NotesApp.model.Note", {
    extend: "Ext.data.Model",
    config: {
        idProperty: 'id',
        fields: [
            { name: 'id', type: 'int' },
            { name: 'dateCreated', type: 'date', dateFormat: 'c' },
            { name: 'title', type: 'string' },
            { name: 'narrative', type: 'string' }
        ],
        validations: [
            { type: 'presence', field: 'id' },
            { type: 'presence', field: 'dateCreated' },
            { type: 'presence', field: 'title', message: 'Please enter a title for this note.' }
        ]
    }
});
For the title field, we are taking advantage of (利用)the message config to define the message the user will see when she tries to save a note without typing in its title.
Before moving on to create the data store, we need to add the model to the models config of the application:
title字段,我们利用的message配置文件中定义的消息,当用户没有输入title时将看到。
创建store之前,我们需要将数据模型添加到应用程序中:
Ext.application({
    name: "NotesApp",
    models: ["Note"],
    // Rest of the app's definition omitted for brevity...
});
Creating a Sencha Touch Data Store(创建一个ST Store)
This is all we need for our data model at this point. Now we can focus on creating the data store that will feed(填充) the List. The Notes store goes in a new file. We will place this file in the store directory:
我们们完成了model的创建。现在,我们可以专注于创建将填充list的Store。这个类将会放到一个新文件中而且我们将会把这个文件放到store目录中:
For now, the store will simply contain a few hard-coded records:
现在,store将只包含一些硬编码的数据:
Ext.define("NotesApp.store.Notes", {
    extend: "Ext.data.Store",
    config: {
        model: "NotesApp.model.Note",
        data: [
            { title: "Note 1", narrative: "narrative 1" },
            { title: "Note 2", narrative: "narrative 2" },
            { title: "Note 3", narrative: "narrative 3" },
            { title: "Note 4", narrative: "narrative 4" },
            { title: "Note 5", narrative: "narrative 5" },
            { title: "Note 6", narrative: "narrative 6" }
        ]
    }
});
Worth highlighting(高光的,需要注意的) here is the model config, which we use to establish that this store will contain instances of the Note model.We want the Notes List to render(呈现) the notes sorted by creation date. This is why we will add the sorters config to the store’s definition:
这里值得强调的是Model的配置,我们使用这个配置确定Store包含了Note模型的一个实例。
我们希望列表通过创建时间排序。这就是我们增加sorter配置项的原因:
Ext.define("NotesApp.store.Notes", {
    extend: "Ext.data.Store",
    requires: "Ext.data.proxy.LocalStorage",
    config: {
        model: "NotesApp.model.Note",
        data: [
            { title: "Note 1", narrative: "narrative 1" },
            { title: "Note 2", narrative: "narrative 2" },
            { title: "Note 3", narrative: "narrative 3" },
            { title: "Note 4", narrative: "narrative 4" },
            { title: "Note 5", narrative: "narrative 5" },
            { title: "Note 6", narrative: "narrative 6" }
        ],
        sorters: [{ property: 'dateCreated', direction: 'DESC'}]
    }
});
Now we can jump back to the NotesListContainer.js file, and add the store to the notesList declaration in the NotesListContainer Class:
现在,我们回到NotesListContainer.js文件,在NotesListContainer类中的list实例中添加store的声明:
  var notesList = {
      xtype: "noteslist",
      store: Ext.getStore("Notes"),//has no method getStore
      listeners: {
          disclose: { fn: this.onNotesListDisclose, scope: this }
      }
  };
Before we check how we are doing, let’s quickly switch over to the Controller’s definition in the controller/Notes.js file, locate the launch() function, and invoke the store’s load() function as follows:
让我们切换到controller/ Notes.js文件中控制器的定义,找到launch() 函数,调用Store的load()函数如下:
launch: function () {
    this.callParent(arguments);
    Ext.getStore("Notes").load();
    console.log("launch");
}
We really don’t need this call now – remember that the data is hard-coded – but we are adding in preparation for the next chapter of the tutorial, where we will discontinue the use of hard-coded data, and begin using data stored in the browser’s cache.
What we need to do, though, is add a reference to the store in the app.js file:
我们现在还不需要这个调用 - 还记得数据是硬编码的么 - 这是为教程的下一章作准备,届时我们将停止使用硬编码的数据,并开始使用浏览器的缓存中的Store。我们必须要做的是在app.js中添加Store的引用:
Excellent! At this point we should be able to see the hard-coded notes rendered on the screen. Let’s start our emulator, where we should see something like this:
好极了!现在,我们应该能够看到在屏幕上呈现的硬编码的数据。启动仿真器,我们应该看到:
Summary(总结)
We began this article making a modification to the main View of the application. One change consisted of adding an initialize() function to the NotesListContainer Class, and using this function to instantiate the Toolbar and Notes List.
这篇文章我们以修改应用的主视图文件开始。修改包括为NotesListContainer类增加一个initialize()函数,并且使用这个函数实例化toolbar和列表。
The second and more important change is the introduction of two new events, newNoteCommand and editNoteCommand, which will be fired by this View when our users need to create or edit a note. This change increases the maintainability and reliability of the View, and the application in general.
第二点,也是更重要的一个变化是引入了两个新的的事件,newNoteCommand和editNoteCommand,当我们的用户需要创建或编辑笔记时将触发。这种变化一般上提高了应用的可维护性和可靠性。
After modifying the NotesListContainer Class, we proceeded to create the NotesList Class. Inheriting from the Ext.dataview.List Class, this is the component that we will use to render the cached notes. This Class needs a data store to keep a cache of the existing notes, therefore we created the Notes store, along with the Note data model, which represents a note.
修改NotesListContainer类之后,我们创建了NotesList类。它继承Ext.dataview.List类,我们将使用这个控件呈现缓存中的数据。这个类需要一个数据仓库(Store)来保存已经存在的数据的缓存,因此,我们创建了Note 的Store,还有Note数据实体,它代表一个笔记实体。
In the next chapter of this tutorial we will start working on the View that our users will utilize to edit and delete notes. While working on this View, we will become familiar with Sencha Touch forms, model validation, and client side caching using local storage.
Stay tuned!
在本教程的下一章,我们将开始创建用户编辑和删除笔记的界面。同时,我们将学习到ST的表单,模型验证,使用本地存储和客户端缓存。
敬请期待!
Downloads
Download the source code for this article: NotesApp-ST2-Part2.zip
The Entire Series
§ How to Create a Sencha Touch 2 App, Part 1
§ How to Create a Sencha Touch 2 App, Part 2
§ How to Create a Sencha Touch 2 App, Part 3
§ How to Create a Sencha Touch 2 App, Part 4
§ How to Create a Sencha Touch 2 App, Part 5
Want To Learn More?
My Sencha Touch books will teach you how to create an application from scratch.
§ Sencha Touch 2 Book
§ Sencha Touch 1 Book
TAGGED WITH: SENCHA TOUCH TUTORIAL 96 COMMENTS
About Jorge
Jorge is the author of Building a Sencha Touch Application, How to Build a jQuery Mobile Application, and the Ext JS 3.0 Cookbook. He runs a software development and developer education shop that focuses on mobile, web and desktop technologies.
If you'd like to work with Jorge, contact him at ramonj[AT]miamicoder.com.
