如何创建一个Sencha Touch 2应用_记事本案例(第四部分)
This is the fourth part of my tutorial on how to create a Sencha Touch 2 application. In this article, we are going to complete the following tasks:
- Add the delete note feature to the Note Editor View.
- Implement the navigation back to the Notes List Container View when the Home button in the Note Editor View is tapped.
- Modify the Notes List Container View so it renders the notes grouped by date.
这是本系列教程的第四部分,在此节中我们完成一下任务:
- 添加删除功能
- 点击home回到NoteList视图
- 修改列表视图来实现日记按日期分组
Deleting Records from a Sencha Touch Data Store(从数据集中删除记录)
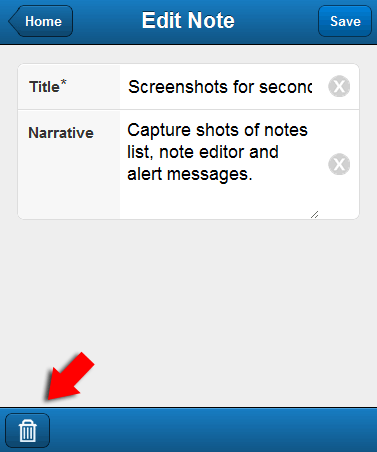
The Delete Note workflow begins when a user taps the Delete Button on the Note Editor View:
删除日记的动作在用户点击删除按钮时触发:
This Button needs a tap handler, which we will add to the NoteEditor Class, in the NoteEditor.js file:
这个按钮需要一个点击事件的处理函数,我们把它添加到NoteEditor类中:
var deleteButton = {
    xtype: "button",
    iconCls: "trash",
    iconMask: true,
    handler: this.onDeleteButtonTap,
    scope: this
};
As we did with the Save Button, we are using the handler and scope configs to map the function that will handle tap events on the Button, as well as to pass the View as the scope for the handler function.
Of course, we need to add the onDeleteButtonTap() function to the NoteEditor Class:
就像我们在saveButton上做的一样,我们使用handler和scope配置项来映射处理按钮事件的函数。as well as to pass the View as the scope for the handler function.(这句话该怎么翻译,请教大家)
onDeleteButtonTap: function () {
    console.log("deleteNoteCommand");
    this.fireEvent("deleteNoteCommand", this);
}
This is the same pattern we’ve used to emit(发射,发出) events from the Views throughout the application. We capture(捕获) the event triggered(触发) from a control in the View, and create a View event that is in turn(反过来) captured by the Controller.
Over in(过去在) the Notes Controller, we are going to map a handler function to the deleteNoteCommand event fired by the Note Editor View. We will do this in the control config, under(根据,之下) the noteEditor key:
这是一个在应用的视图之间传递事件的机制。我们捕获一个在视图的下发出的事件,然后广播一个反过来被控制器捕获的事件。在控制器中,我们把在Eidtor视图中激发的事件映射到onDeleteCommand函数。
control: {
    notesListContainer: {
        // The commands fired by the notes list container.
        newNoteCommand: "onNewNoteCommand",
        editNoteCommand: "onEditNoteCommand"
    },
    noteEditor: {
        // The commands fired by the note editor.
        saveNoteCommand: "onSaveNoteCommand",
        deleteNoteCommand: "onDeleteNoteCommand"
    }
}
Now we can implement the onDeleteNoteCommand() function like so:
现在我们可以实现DeleteNoteCommand()了:
onDeleteNoteCommand: function () {
    console.log("onDeleteNoteCommand");
    var noteEditor = this.getNoteEditor();
    var currentNote = noteEditor.getRecord();
    var notesStore = Ext.getStore("Notes");
    notesStore.remove(currentNote);
    notesStore.sync();
    this.activateNotesList();
}
Here, we acquire(获得) references to the Note Editor, the note loaded into the editor, and the Notes Store. Remember that the getNoteEditor() function is a routine the framework created for us when we declared the editor in the refs config:
这里我们获取noteEditor的引用,note被加载在noteEditor和noteStore中。记住:getNoteEditor()函数是在你配置了refs之后由ST框架为你自动生成的。
refs: {
    // We're going to lookup our views by xtype.
    notesListContainer: "noteslistcontainer",
    noteEditor: "noteeditor"
}
Our next steps in onDeleteNoteCommand() are to remove the current note from the store and make the changes permanent(持久的,永久的):
我们下一步是从数据集中彻底删除当前note,并且使更新持久化。
notesStore.remove(currentNote);
notesStore.sync();
Finally, we activate the Notes List Container View:
最后我们回到NotesList界面。
this.activateNotesList();
Another quick check on the emulator should confirm that at this point we are able to delete notes.
...
Navigating Back To the Main View(回到主界面)
In order to navigate from the Note Editor View back to the Notes List Container View without making any changes to a note, we need to add a tap handler for the Home Button in the Note Editor Class:
为了从NoteEditor界面回到NotesListContainer界面(也就是应用的主界面),我们需要给home按钮添加事件处理:
var backButton = {
    xtype: "button",
    ui: "back",
    text: "Home",
    handler: this.onBackButtonTap,
    scope: this
};
We will define the onBackButtonTap() function as follows:
这样定义onBcakButtonTap()函数:
onBackButtonTap: function () {
    console.log("backToHomeCommand");
    this.fireEvent("backToHomeCommand", this);
}
In the Controller, we will map this event to the onBackToHomeCommand() handler function:
在控制器中,我们将事件映射到onBackToHomeCommand()函数:
control: {
    notesListContainer: {
        // The commands fired by the notes list container.
        newNoteCommand: "onNewNoteCommand",
        editNoteCommand: "onEditNoteCommand"
    },
    noteEditor: {
        // The commands fired by the note editor.
        saveNoteCommand: "onSaveNoteCommand",
        deleteNoteCommand: "onDeleteNoteCommand",
        backToHomeCommand: "onBackToHomeCommand"
    }
}
And the onBackToHomeCommand() function will look like this:
onBackToHomeCommand()函数如下:
onBackToHomeCommand: function () {
console.log("onBackToHomeCommand");
this.activateNotesList();
}
At this point, we can use the emulator to check that a tap on the Home Button activates the Notes List Container View.
现在可以从noteEditor界面回到主界面了
Setting Up Grouping in a Sencha Touch List(在ST的list中设置分组)
One important usability detail we are missing is the ability to render the cached notes grouped by date. It’s amazing how easily we can accomplish this in Sencha Touch. Let’s first define a grouper config for the Notes Store:
到此为止我们错过了一个很重要的东西,那就是将缓存数据分组显示在列表上。我们可以用ST轻松实现。现在首先在Store类定义一个grouper配置项:
Ext.define("NotesApp.store.Notes", {
    extend: "Ext.data.Store",
    requires:"Ext.data.proxy.LocalStorage",
    config: {
        model: "NotesApp.model.Note",
        proxy: {
            type: 'localstorage',
            id: 'notes-app-store'
        },
        sorters: [{ property: 'dateCreated', direction: 'DESC'}],
        grouper: {
            sortProperty: "dateCreated",
            direction: "DESC",
            groupFn: function (record) {
                if (record && record.data.dateCreated) {
                    return record.data.dateCreated.toDateString();
                } else {
                    return '';
                }
            }
        }
    }
});
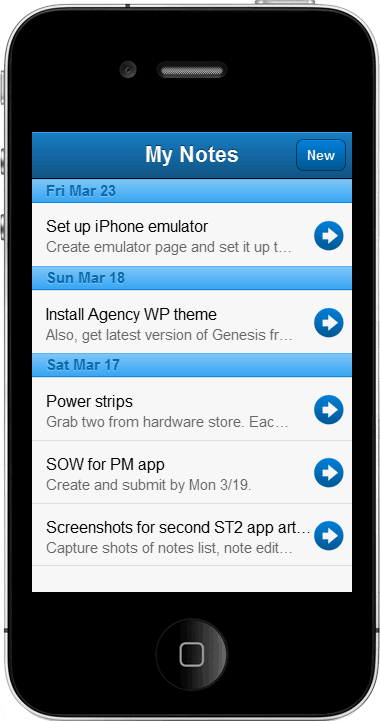
As of this writing, groupers are not explained very well in Sencha Touch’s documentation. However, it is not difficult to make sense of (理解)this config’s properties. The groupFn config is the function used to generate the label for the group. In our case, the label will be the date the notes were taken:
在ST的文档中对于以上代码解释的不是很清楚,但是不难理解这些配置的意义。groupFn配置用于生成如下图的分组标签,在我们的案例中是以时间来分组。
The sortProperty config defines the value that will be used to sort the groups. If you do not include this config, the fields will be sorted based on the value returned by the function defined with the groupFn config. The direction config specifies the direction to sort the groups.
The last change needed to implement grouping consists of adding the grouped config to the NotesList Class:
sortProperty配置定义了用于分组的值。如果你不写这个配置项的话,会以groupFn函数中返回的值分组。Direction配置了分组排序的顺序方向。最后需要把grouped配置添加到notesList类中:
Ext.define("NotesApp.view.NotesList", {
    extend: "Ext.dataview.List",
    alias: "widget.noteslist",
    config:{
        scrollable:'vertical'
    },
    config: {
        loadingText: "Loading Notes...",
        emptyText: "</pre>
<div class="\"notes-list-empty-text\"">No notes found.</div>
<pre>
",
        onItemDisclosure: true,
        grouped: true,
        itemTpl: "</pre>
<div class="\"list-item-title\"">{title}</div>
<div class="\"list-item-narrative\"">{narrative}</div>
<pre>
"
    }
});
When we set the grouped config to true, the List will use the groups defined in its store, through the grouper config, to render its items appropriately.
Let’s check how the list looks after we turned on grouping. Start the emulator and confirm that the notes list has date groups similar to the following screenshot:
如果我们配置正确,列表将会采取在Store中定义的分组来显示数据。
Summary
We just finished building all the features of the Note Editor View by adding both, the ability to delete notes, and the ability to navigate back to the Notes List Container View when the Home Button is tapped.
我们实现了删除数据以及从noteEditor界面回到home界面。
We also modified the Notes List so the notes are rendered in groups based on the date the notes were saved. This makes it easier for our users to find their notes.
我们也修改了notesList使之能够分组显示数据。
In the next chapter of this series we are going to create a version of the app where the Notes List and Notes Editor Views are defined using config objects, instead of initialize functions.
下一节我们将会实现此应用的另一个版本,在这个版本中我们不在使用初始化函数来配置视图而是使用config对象。
Stay tuned!
Downloads
Download the source code for this article: NotesApp-ST2-Part4.zip
The Entire Series
§ How to Create a Sencha Touch 2 App, Part 1
§ How to Create a Sencha Touch 2 App, Part 2
§ How to Create a Sencha Touch 2 App, Part 3
§ How to Create a Sencha Touch 2 App, Part 4
§ How to Create a Sencha Touch 2 App, Part 5
Want To Learn More?
My Sencha Touch books will teach you how to create an application from scratch.
§ Sencha Touch 2 Book
§ Sencha Touch 1 Book
TAGGED WITH: SENCHA TOUCH TUTORIAL 65 COMMENTS
About Jorge
Jorge is the author of Building a Sencha Touch Application, How to Build a jQuery Mobile Application, and the Ext JS 3.0 Cookbook. He runs a software development and developer education shop that focuses on mobile, web and desktop technologies.
If you'd like to work with Jorge, contact him at ramonj[AT]miamicoder.com.

