分享下去年底写的分库分表中间件heisenberg
好久没有写博了,去年年底的时候写了一个分库分表中间件服务器,当时正在看绝命毒师,觉得heisenberg这个名字很叼,然后就以这个命名了,炼毒也要精益求精啊。。。
公司在java分布式这块的基础设施很差,然后之前也看过一些老东家的tddl,cobar之类的东东;但是灵活性和语言通用性方面不是太好,所以当时就想做一款比较通用性,并且低侵入性的分库分表中间件,于是想法诞生了
目前代码只在googlecode上维护,虽然有点不稳定,其实我是不知道github怎么打版本包,虽然github也上传了,但是没有更新了。
https://code.google.com/p/heisenberg/
其优点: 分库分表与应用脱离,分库表如同使用单库表一样
减少db 连接数压力
热重启配置
可水平扩容
遵守Mysql原生协议
无语言限制,mysqlclient,c,java等都可以使用
Heisenberg服务器通过管理命令可以查看,如连接数,线程池,结点等,并可以调整
采用velocity的分库分表脚本进行自定义分库表,相当的灵活
之前在组里有做过简单的分享,这段时间稍微轻松了点,先分享出来,看有没有更好的idea在这块有所提升
下面开始介绍heisenberg
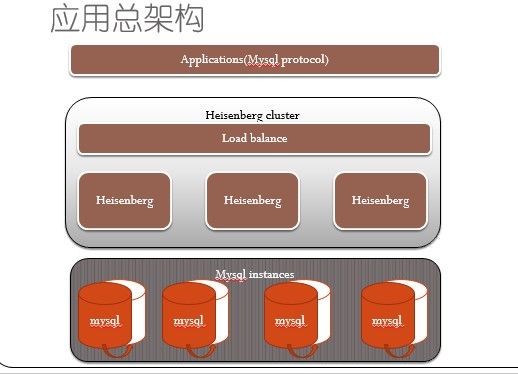
1.heisenberg总体架构
首先这块架构:
应用对于heisenberg集群来说就是mysql客户端,
而heisenberg也是集成了mysql的原生协议,所以对于应用来说,就相当于单库单表的数据源
无论是mysql客户端,c,jdbc驱动等都可以访问heisenberg服务器,由服务器把分库分表的工作给做掉了
访问heisenberg集群可以通过像lvs,F5等负载软件/设备解决,
其实一台heisenberg的性能是相当的赞了,我压力到2320TPS load 都还只有0.1-0.3左右(CPU 8core,16G),由于找不到mysql物理机器了,只得做罢
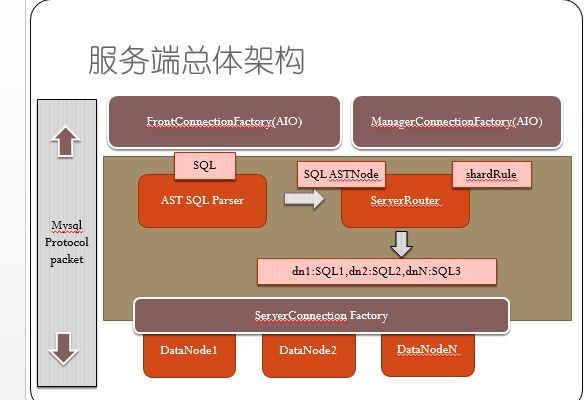
服务端内部结构:
其中FrontConnectionFactory为面向应用的连接管理,ManagerConnectionFactory为面向heisenberg服务器内部管理的一些连接管理,比如更改配置后热重启,关闭 某个连接等功能
mysql协议贯穿于应用程序与mysql服务器,最终解析为相关的mysql数据包, 授权包,注册包等
当heisenberg服务器接收到SQL语句后,通过AST语法解析 解析成 DML,DCL,DDL类型以及相关列名的值等等,然后通过ServerRouter这一层,经过分库分表的切分,最终将切分好的语句放入对应数据结点进行执行
分库分表的切分,为了满足各种通用性灵活性,使用了velocity和groovy 2种语法来支持,其中groovy是初始化表和库和映射关系的,只在加载时初始化一次;而velocity是用来渲染对应的分库和分表规则的。
OK,知道了原理,那么开始说明如何使用分库分表吧
2.heisenberg开发
Maven +JDK 部署好
svn checkout http://heisenberg.googlecode.com/svn/trunk/
下载到本地后,
Mvn package 之
在本地target里会生成一个heisenberg-server-1.0.0.zip 文件
解压之 unzip heisenberg-server-1.0.0.zip 这个版本以googlecode上的最新为主
进入conf目录
有下面几个目录
conf
---log4j.xml
---rule.xml
---schema.xml
---server.xml
log4j.xml就不介绍了
sql_route.log就是分库表切分的时间
sql_execute.log 为sql总执行时间
server.xml
| <system> <property name="serverPort">8166</property> <property name="managerPort">8266</property> <property name="initExecutor">16</property> <property name="timerExecutor">4</property> <property name="managerExecutor">4</property> <property name="processors">4</property> <property name="processorHandler">8</property> <property name="processorExecutor">8</property> <property name="clusterHeartbeatUser">_HEARTBEAT_USER_</property> <property name="clusterHeartbeatPass">_HEARTBEAT_PASS_</property> </system> |
serverPort为服务端口,即对上层应用的端口
managerPort为管理端口,即管理的监听端口,用于操作服务器一些配置等
initExecutor 为初始化的线程个数
timerExecutor 心跳执行线程个数
managerExecutor管理执行线程个数
processors应用接收处理器核数
processorHandler 应用接收处理类个数
processorExecutor 应用接收处理线程个数
clusterHeartbeatUser和clusterHeartbeatPass 不必改,用于集群的认证方式使用
| <user name="brucexx"> <property name="password">st0078</property> <property name="schemas">trans_shard</property> </user> |
Brucexx为自定义应用用户名,st0078为自定义应用密码
Schemas为自定义schema,具体见schema.xml中,
这里的schemas可为多个,以逗号分隔
白名单限制:
| <quarantine> <host name="1.2.3.4"> <property name="user">test</property> </host> </quarantine> |
schema.xml配置
mysql数据源
| <dataSource name="transDS" type="mysql"> <property name="location"> <location>10.58.49.14:8701/db$0-9</location> </property> <property name="user">root</property> <property name="password">st0078</property> <property name="sqlMode">STRICT_TRANS_TABLES</property> </dataSource> |
这里指定的mysql的数据源,后面$0-9是一种自定义的缩略写法
也可以在property里面定义多个location,比如:
| <property name="location"> <location>10.58.49.14:8701/db0</location> <location>10.58.49.14:8701/db1</location> <location>10.58.49.14:8701/db2</location> </property>
|
效果是一样的
Shard结点配置
Shard结点相当于一个逻辑结点,提供给外部相关的schema,对应于数据源有
主/备/灾,
| <dataNode name="transDN"> <property name="dataSource"> <!-- 主库 --> <dataSourceRef>transDS$0-9</dataSourceRef> <!-- 备库 --> <dataSourceRef>transSlaveDS$0-9</dataSourceRef> <!-- 灾库 --> <dataSourceRef>transSlaveDS$0-9</dataSourceRef> <!-- slave,暂无 --> <!-- dataSourceRef>ds_shard_slave$0-3</dataSourceRef --> </property> <property name="rwRule"><![CDATA[m:0,s:1]]></property> <property name="poolSize">256</property> <property name="heartbeatSQL">select user()</property> </dataNode> |
属性dataSource 第一个是主库,第二个备库,第三个灾库,需要多少配置多少个
读写分离规则rwRule,m和s代表读取的比例,表示主库读取为0,从库读取1,这样直接读写分离,如果是1:1的话相当读取各1:1的比例
池大小poolSize为到mysqlDB的连接数和心跳sql heartbeatSQL,无特殊需求保持不变
Schema配置
| <schema name="trans_shard">
<table name="trans_online, trans_content, trans_tb " dataNode="transDN$0-9" rule="rule1" /> </schema> |
trans_shard 提供的schema,对应于server.xml中的名字
下面会有多个需要分库的表,
<table name="trans_online" dataNode="transDN$0-9" rule="rule1" />
这里必须要把需要分库分表的内容写出来,当然,如果不分库表也是可以的
<table name=”tbxxx" dataNode="transDN0" ruleRequired=”false”/
rule.xml
分库分表规则配置,其中columns,dbRuleList,tbRuleList里面的列名要保持大写
首先先上一个整体配置
| <rule> <tableRule name="rule1"> <columns>TRANS_ID</columns> <dbRuleList> <dbRule><![CDATA[#set($start=$TRANS_ID.length() - 2)## #set($end=$TRANS_ID.length() - 1)## $stringUtil.substring($TRANS_ID,$start,$end)]]> </dbRule> </dbRuleList> <tbRuleList> <tbRule><![CDATA[#set($start=$TRANS_ID.length() - 2)## $stringUtil.substring($TRANS_ID,$start)]]></tbRule> </tbRuleList> <!-- 00-99 100个表,每个表属于哪个结点 Map<Integer,Set<String>> --> <tbPrefix> <![CDATA[ def map = [:]; for (int i=0; i<10; i++) { def list = []; for (int j=0; j<10; j++) { list.add(i+""+j); } map.put(i,list); }; return map; ]]> </tbPrefix> </tableRule> </rule> |
其中dbRuleList 为分库规则
| <dbRuleList> <dbRule><![CDATA[#set($start=$TRANS_ID.length() - 2)## #set($end=$TRANS_ID.length() - 1)## $stringUtil.substring($TRANS_ID,$start,$end)]]> </dbRule> </dbRuleList> |
分库规则dbRuleList可以有多个dbRule,当第一个不满足时,可以用第二个,当然这个效率不好,如果有规则区分,尽量再写一个rule,
dbRule 最后的结果是表的前缀
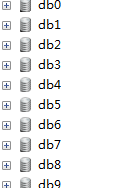
比如分库分表 库名为db0-db9,那么这个dbRule渲染时
取到TRANS_ID 这个为后,在脚本里计算出取倒数第2位为库后缀
比如上图的分库为
分表规则配置
| <tbRuleList> <tbRule><![CDATA[#set($start=$TRANS_ID.length() - 2)## $stringUtil.substring($TRANS_ID,$start)]]></tbRule> </tbRuleList> |
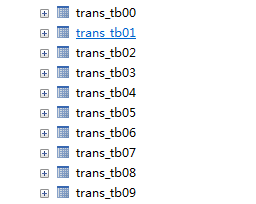
这个和上面分库一样了,以倒数1,2位为库的后缀
如下图:
有个潜规则就是
需要保证全局的表名不能重复
比如db0有个trans_tb00,db1就不能有叫trans_tb00的表
表初始化
| <!-- 00-99 100个表,每个表属于哪个结点 Map<Integer,Set<String>> --> <tbPrefix> <![CDATA[ def map = [:]; for (int i=0; i<10; i++) { def list = []; for (int j=0; j<10; j++) { list.add(i+""+j); } map.put(i,list); }; return map; ]]> </tbPrefix> |
需要初始化个表,其中key为db的下标索引,比如db0 的下标为0,
list为每个库里的表后缀名
目录是为了初始化定义这些库表
如何使用呢?
这里就不用讲了,wms_shard就是在server.xml里面配置的逻辑分库分表的数据源schema,应用只要访问这个就好了
show tables;也可以看到自己的一些表信息
ok.
mysql> select * from t_user_id_map;
+-----------+---------------------------+-----------+------------+---------------------+---------------------+
| F_uid | F_uname | F_enabled | F_user_id | F_create_time | F_modify_time |
+-----------+---------------------------+-----------+------------+---------------------+---------------------+
| 105001050 | @8230762802717b6a723fe9cd | 1 | 1287824017 | 2014-03-10 15:38:44 | 2014-03-10 15:38:44 |
| 62000 | | 1 | 533885000 | 2014-03-26 23:02:31 | 2014-03-26 23:02:31 |
| 86000 | | 1 | 237406000 | 2014-03-27 01:04:23 | 2014-03-27 01:04:23 |
| 96000 | | 1 | 767684000 | 2014-03-27 00:30:32 | 2014-03-27 00:30:32 |
| 130000 | | 1 | 506552000 | 2014-03-27 15:57:31 | 2014-03-27 15:57:31 |
| 149000 | | 1 | 868483000 | 2014-03-27 15:50:09 | 2014-03-27 15:50:09 |
| 179000 | | 1 | 245626000 | 2014-03-26 21:33:46 | 2014-03-26 21:33:46 |
当没有指定分库分表规则时,是进行的全表扫描,当然我们可以通过学习
mysql> explain select * from t_user_id_map;
+-----------+-----------------------------------
| DATA_NODE | SQL
+-----------+-----------------------------------
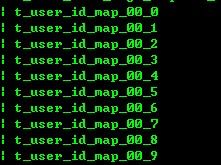
| wmsDN[0] | select * from t_user_id_map_00_0
| wmsDN[0] | select * from t_user_id_map_00_1
| wmsDN[0] | select * from t_user_id_map_00_2
| wmsDN[0] | select * from t_user_id_map_00_3
| wmsDN[0] | select * from t_user_id_map_00_4
| wmsDN[0] | select * from t_user_id_map_00_5
| wmsDN[0] | select * from t_user_id_map_00_6
| wmsDN[0] | select * from t_user_id_map_00_7
| wmsDN[0] | select * from t_user_id_map_00_8
| wmsDN[0] | select * from t_user_id_map_00_9
| wmsDN[1] | select * from t_user_id_map_01_0
| wmsDN[1] | select * from t_user_id_map_01_1
| wmsDN[1] | select * from t_user_id_map_01_2
| wmsDN[1] | select * from t_user_id_map_01_3
| wmsDN[1] | select * from t_user_id_map_01_4
| wmsDN[1] | select * from t_user_id_map_01_5
| wmsDN[1] | select * from t_user_id_map_01_6
| wmsDN[1] | select * from t_user_id_map_01_7
| wmsDN[1] | select * from t_user_id_map_01_8
| wmsDN[1] | select * from t_user_id_map_01_9
| wmsDN[2] | select * from t_user_id_map_02_0
....
这边表很多,其中dataNode是我们里面对应的结点
mysql> select * from t_user_id_map where f_uid=196606999;
+-----------+---------+-----------+-----------+---------------------+---------------------+
| F_uid | F_uname | F_enabled | F_user_id | F_create_time | F_modify_time |
+-----------+---------+-----------+-----------+---------------------+---------------------+
| 196606999 | | 1 | 749331999 | 2014-04-04 14:46:58 | 2014-04-04 14:46:58 |
+-----------+---------+-----------+-----------+---------------------+---------------------+
1 row in set (0.04 sec)
这边配置的是按F_uid最后三位分库分表的,dbRuleList配置的是倒数2,3位,
tbRuleList配置的是最后1位
我们看下是怎么路由的
mysql> explain select * from t_user_id_map where f_uid=196606999;
+-----------+---------------------------------------------------------+
| DATA_NODE | SQL |
+-----------+---------------------------------------------------------+
| wmsDN[99] | select * from t_user_id_map_99_9 where f_uid=196606999 |
+-----------+---------------------------------------------------------+
1 row in set (0.03 sec)
可以看到data_node --> wmsDN[99] ,分库位
t_user_id_map_99_9 对应的表
OK,先写到这里面,有什么问题随时欢迎交流!
