自定义View实现
在还没系统地了解自定义View之前,自定义概念对于小编而言就是定义一个继承某视图的类,之后通过LayoutInfant获取.xml执行内容实例化,并为其加上监听和接口回调,想想现在还乐在其中呢!
1.android控件框架

不知道对于初学者的小伙伴们看到以上View树结构是不是会有点难以理解呢,反正太抽象小编是不懂啦,但实际上在开发过程中我们却一直都有接触,其映射的其实是如下脚本内容。
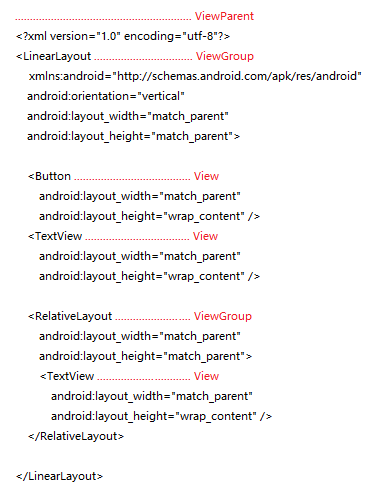
而在UI界面结构图上的DecorView为PhoneWindow上最顶层的View,且仅有一个子元素LinearLayout(含ActionBarFragment与ContentFragment两个部分),其标准的视图树如下。
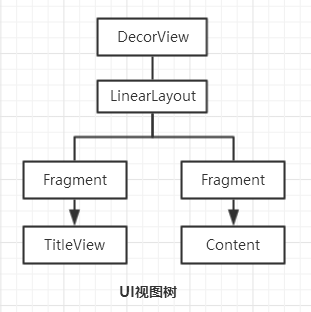
以上DecorView的绘制周期位于setContentView(R.layout.xx);之后ActivityManagerServer回调onResume()方法当中。所以如果需要禁用系统标题栏必须在setContentView()方法之前执行。其执行语句如下。
@Override
protected void onCreate(Bundle savedInstanceState) {
    super.onCreate(savedInstanceState);
    requestWindowFeature(Window.FEATURE_NO_TITLE);
    setContentView(R.layout.xx);
}
其中requestWindowFeature()方法可设置的值有
- DEFAULT_FEATURES:系统默认状态,一般不需要指定
- FEATURE_CONTEXT_MENU:启用ContextMenu,默认该项已启用,一般无需指定
- FEATURE_CUSTOM_TITLE:自定义标题。当需要自定义标题时必须指定。如:标题是一个按钮时
- FEATURE_INDETERMINATE_PROGRESS:不确定的进度
- FEATURE_LEFT_ICON:标题栏左侧的图标
- FEATURE_NO_TITLE:无标题
- FEATURE_OPTIONS_PANEL:启用“选项面板”功能,默认已启用。
- FEATURE_PROGRESS:进度指示器功能
- FEATURE_RIGHT_ICON:标题栏右侧的图标
2.View的测量
当控件在初始化绘制的时候,其会在onMeasure()当中通过MeasureSpace这个工具类获取View的测量模式以及大小,最终通过super.onMeasure(w,h);回调函数调用setMeasuredDeasure(int w,int h)方法依据测量的大小绘制View。
@Override
protected void onMeasure(int widthMeasureSpec, int heightMeasureSpec) {
    super.onMeasure(widthMeasureSpec, heightMeasureSpec);
}
那么如果希望更改自定义View的大小,即可在执行onMeasure()方法中调用上面所说的setMeasuredDeasure()方法。
@Override
protected void onMeasure(int widthMeasureSpec, int heightMeasureSpec) {
    setMeasuredDimension(measureLength(widthMeasureSpec, "指定默认水平大小"),measureLength(heightMeasureSpec, "指定默认垂直大小");
}
接下来看下view视图的具体测量,据相关文案参考测量模式可以分为以下三种:
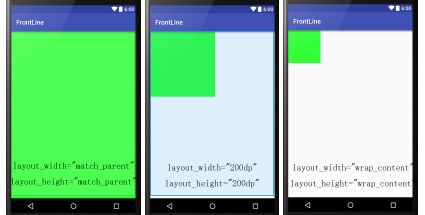
- EXACTLY,即精准值模式。譬如设置layout_width属性值为100dp或者match_parent(占据父View大小),系统将启用EXACTLY模式;
- AT_MOST,即最大值模式。譬如设置layout_width属性值为wrap_content(根据内容决定,只要不超过父View允许的大小);
- UNSPECIFIED,即不指定大小测量模式,一般仅在自定义View的时候才会使用;
/** * @param measureSpace 视图间距 * @param defaultSize 自定义大小 * @return 测量出理想的视图宽度/高度 */
public static int measureLength(int measureSpace, int defaultSize) {

    // 获取测量模式
    int spaceMode = View.MeasureSpec.getMode(measureSpace);
    // 获取测量大小
    int spaceSize = View.MeasureSpec.getSize(measureSpace);

    if (spaceMode == View.MeasureSpec.EXACTLY) {
        // 精确模式,返回指定大小
        return spaceSize;
    } else if (spaceMode == View.MeasureSpec.AT_MOST) {
        // 最大值模式,从指定大小与原大小当中取一个最小值
        return Math.min(defaultSize, spaceSize);
    } else {
        // 自定义模式,直接返回指定大小
        return defaultSize;
    }
}
3.View的绘制
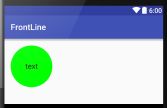
自定义类MyTextView继承TextView,重写onDraw()实现圆底效果
@Override
protected void onDraw(Canvas canvas) {

    Paint paint = new Paint();
    paint.setAntiAlias(true);
    paint.setColor(Color.GREEN);
    paint.setStyle(Paint.Style.FILL);

    canvas.drawCircle(100, 100, 100, paint);
    canvas.save();
    canvas.restore();

    super.onDraw(canvas);
}
在.xml布局文件当中引用
<MyTextView
    android:layout_width="100dp"
    android:layout_height="100dp"
    android:gravity="center"
    android:text="text"
    android:textSize="18sp"
    android:textColor="@color/baseBlack"/>
通过重写onDraw()方法重新绘制Canvas当中的内容,其中需要注意的一个是关于Canvas携带bitmap实现初始化new Canvas(bitmap);与直接new Canvas();的区别。据相关文案解释,可以简单的理解为携带bitmap的绘制其实是将draw出来的图形与bitmap直接关联起来,也就是改变bitmap的图层内容,操作结果是属于bitmap的。而单纯的new Canvas();所draw出来的图形其实就是绘制至初始化的canvas上。另外需要注意的是,draw结束后要记得canvas.save();保存绘制状态并执行canvas.restore();来释放资源噢。
4.自定义View
自定义View实际上可包括自绘控件,组合控件与继承控件。以上带圆底的文本框为继承TextView控件的重绘实现。相对而言组合控件也是很好理解的,定义一个包含多个控件体现出复合性的视图即是组合控件/复合控件。譬如ActionBar定义左右Button与中间位置的TextView组合并赋予事件监听便为项目开发重复使用,这样就能很好的提高开发效率了。刚开始可以开工设计点自己喜欢的样式属性。
<?xml version="1.0" encoding="utf-8"?>
<resources>
   <declare-styleable name="NormalTitleBar">
       <attr name="titleText" format="string"/>
       <attr name="titleTextColor" format="color"/>
       <attr name="titleTextSize" format="float"/>
       <attr name="leftText" format="string"/>
       <attr name="rightText" format="string"/>
       <attr name="leftImage" format="reference|color"/>
       <attr name="rightImage" format="reference|color"/>
       <attr name="focusBackground" format="reference"/>
   </declare-styleable>
</resources>
其中format格式包括以下几种:
- “reference” //引用
- “boolean” //布尔值
- “dimension” //尺寸值
- “float” //浮点值
- “string” //字符串
- “fraction” //百分数
设计完成后拿去显摆显摆,如下需要在最顶层容器上加上xmlns:myAttr=”http://schemas.android.com/apk/res-auto”申明引用UI模板,其中“myAttr”随喜欢命名,组要的一点是有部分引用将“res-auto”修改为项目包名。好似这种写法最终并没能成功获取到相应的自定义属性值,故还是乖乖的用回“res-auto”就好啦。
<?xml version="1.0" encoding="utf-8"?>
<com.self.gzj.laboratory.ui.NormalTitleBar  xmlns:android="http://schemas.android.com/apk/res/android" xmlns:myAttr="http://schemas.android.com/apk/res-auto" android:id="@+id/base_normal_title_bar" android:layout_width="match_parent" android:layout_height="50dp" android:background="@color/baseBlue" myAttr:leftText="Left" myAttr:rightText="Right" myAttr:titleText="title" myAttr:titleTextColor="@color/baseWhite" myAttr:titleTextSize="@dimen/base_word_title" myAttr:leftImage="@mipmap/ic_launcher" myAttr:rightImage="@mipmap/ic_launcher" myAttr:focusBackground="@drawable/base_color_transparent_focus"/>
将设计好的属性加入到.xml后还得在自定义View类当中将对应的值取出来,为组合控件的每个成员设置才行。下面通过TypedArray获取自定义的属性值,再将其赋值给相应的控件即可。
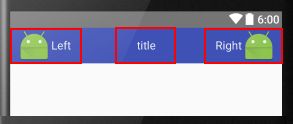
public class NormalTitleBar extends RelativeLayout {

    // 标题tv
    private TextView mTitleTv;
    // 文本按钮
    private TextView mLeftTv, mRightTv;
    // 图像按钮
    private ImageView mLeftIv, mRightIv;
    // 组合按钮
    public LinearLayout mTitlebarLeftLly, mTitlebarRightLly;

    // 布局设计
    private LayoutParams mParam, mLeftParam, mCenterParam, mRightParam;
    // 字体颜色
    private int mTextColor;
    // 字体大小
    private float mTextSize;
    // 间距大小
    private int mPadding;
    // 按钮文本内容
    private String mTitleText, mLeftText, mRightText;
    // 按钮图片资源
    private Drawable mLeftDraw, mRightDraw;
    // 按钮点击背景
    private Drawable mLeftFocus, mRightFocus;

    public NormalTitleBar(Context context) {
        super(context);
    }

    public NormalTitleBar(Context context, AttributeSet attrs) {
        super(context, attrs);

        // 获取在declare-styleable当中声明的属性
        TypedArray ta = context.obtainStyledAttributes(attrs, R.styleable.NormalTitleBar);

        // 获取自定义属性值
        mTextColor = ta.getColor(R.styleable.NormalTitleBar_titleTextColor, 0);
        mTextSize = ta.getDimension(R.styleable.NormalTitleBar_titleTextSize, 10);
        mTitleText = ta.getString(R.styleable.NormalTitleBar_titleText);
        mLeftText = ta.getString(R.styleable.NormalTitleBar_leftText);
        mRightText = ta.getString(R.styleable.NormalTitleBar_rightText);
        mLeftDraw = ta.getDrawable(R.styleable.NormalTitleBar_leftImage);
        mRightDraw = ta.getDrawable(R.styleable.NormalTitleBar_rightImage);
        mLeftFocus = ta.getDrawable(R.styleable.NormalTitleBar_focusBackground);
        mRightFocus = ta.getDrawable(R.styleable.NormalTitleBar_focusBackground);

        // 资源回收,避免重新创建产生错误
        ta.recycle();

        mParam = new LayoutParams(LayoutParams.WRAP_CONTENT, LayoutParams.MATCH_PARENT);
        mLeftParam = new LayoutParams(LayoutParams.WRAP_CONTENT, LayoutParams.MATCH_PARENT);
        mLeftParam.addRule(ALIGN_PARENT_LEFT);
        mCenterParam = new LayoutParams(LayoutParams.WRAP_CONTENT, LayoutParams.MATCH_PARENT);
        mCenterParam.addRule(CENTER_IN_PARENT);
        mRightParam = new LayoutParams(LayoutParams.WRAP_CONTENT, LayoutParams.MATCH_PARENT);
        mRightParam.addRule(ALIGN_PARENT_RIGHT);
        mPadding = DisplayUtil.dip2px(context, 10);

        // 左侧组合按钮
        mTitlebarLeftLly = new LinearLayout(context);
        mTitlebarLeftLly.setOrientation(LinearLayout.HORIZONTAL);
        mTitlebarLeftLly.setBackground(mLeftFocus);
        mTitlebarLeftLly.setPadding(mPadding, 0, mPadding, 0);

        // 初始化左侧图像按钮
        mLeftIv = new ImageView(context);
        mLeftIv.setImageDrawable(mLeftDraw);
        mLeftIv.setScaleType(ImageView.ScaleType.CENTER_INSIDE);
        mTitlebarLeftLly.addView(mLeftIv, mParam);

        // 初始左侧文本按钮
        mLeftTv = new TextView(context);
        mLeftTv.setText(mLeftText);
        mLeftTv.setTextSize(mTextSize);
        mLeftTv.setTextColor(mTextColor);
        mLeftTv.setGravity(Gravity.CENTER);
        mTitlebarLeftLly.addView(mLeftTv, mParam);
        mTitlebarLeftLly.setId(android.R.id.button1);

        this.addView(mTitlebarLeftLly, mLeftParam);

        // 初始标题文本
        mTitleTv = new TextView(context);
        mTitleTv.setText(mTitleText);
        mTitleTv.setTextColor(mTextColor);
        mTitleTv.setTextSize(mTextSize);
        mTitleTv.setGravity(Gravity.CENTER);

        addView(mTitleTv, mCenterParam);

        // 右侧组合按钮
        mTitlebarRightLly = new LinearLayout(context);
        mTitlebarRightLly.setOrientation(LinearLayout.HORIZONTAL);
        mTitlebarRightLly.setBackground(mRightFocus);
        mTitlebarRightLly.setPadding(mPadding, 0, mPadding, 0);
        mTitlebarRightLly.setId(android.R.id.button2);

        // 初始右侧文本按钮
        mRightTv = new TextView(context);
        mRightTv.setText(mRightText);
        mRightTv.setTextSize(mTextSize);
        mRightTv.setTextColor(mTextColor);
        mRightTv.setGravity(Gravity.CENTER);
        mTitlebarRightLly.addView(mRightTv, mParam);

        // 初始化右侧图像按钮
        mRightIv = new ImageView(context);
        mRightIv.setImageDrawable(mRightDraw);
        mRightIv.setBackground(null);
        mRightIv.setPadding(0, 0, 0, 0);
        mRightIv.setScaleType(ImageView.ScaleType.CENTER_INSIDE);
        mTitlebarRightLly.addView(mRightIv, mParam);

        this.addView(mTitlebarRightLly, mRightParam);
    }

    /** * @param title 标题 */
    public void setTitle(String title) {

        mTitleTv.setText(title);
    }

    /** * @param isLeftBtn true_左侧按钮 false_右侧按钮 * @param str 按钮文本 null_不设置文本 * @param src 按钮图片 0_不设置图片 */
    public void setTitleButton(boolean isLeftBtn, String str, int src) {

        if (isLeftBtn) {
            mLeftTv.setText(TextUtils.isEmpty(str) ? "" : str);
            mLeftIv.setImageDrawable(src != 0 ? getResources().getDrawable(src) : null);
            mTitlebarLeftLly.setVisibility(TextUtils.isEmpty(str) && src == 0 ? GONE : VISIBLE);
        } else {
            mRightTv.setText(TextUtils.isEmpty(str) ? "" : str);
            mRightIv.setImageDrawable(src != 0 ? getResources().getDrawable(src) : null);
            mTitlebarRightLly.setVisibility(TextUtils.isEmpty(str) && src == 0 ? GONE : VISIBLE);
        }
    }

    /** * 隐藏左侧按钮 * * @param isHide true_隐藏 false_显示 */
    public void hideLeftButton(boolean isHide) {
        mTitlebarLeftLly.setVisibility(isHide ? GONE : VISIBLE);
    }

    /** * 隐藏右侧按钮 * * @param isHide true_隐藏 false_显示 */
    public void hideRightButton(boolean isHide) {
        mTitlebarRightLly.setVisibility(isHide ? GONE : VISIBLE);
    }
}
从以上源码以及效果现实,相信都比较容易理解,其实为了方便小编将左侧的文本与图形作为一个组合按钮A,然后为该组合设置视图Id,为的是在引用该自定义控件的UI上直接获取到组合A的点击监听。相应的右边的文本域图形同理作为一个组合B。当然实际上可直接在该自定义组合控件内定义新的接口去实现监听,小编仅为方便实现,就这样一个简单的复合控件就是实现啦。其中可能有很多不足和需要优化的地方,后继根据能力提升完善跟进,内容仅供参考,小编仍需要亲们的吐槽帮助。
