使用Gridview绑定数据库中的图片(Image字段)
注:此系列记录在我实际开发中遇到的问题和收藏一些技巧文章。
我们都知道,在Gridview中不能直接去绑定数据库中的图片,我们可以利用HttpHandler很容易的完成这个任务,在这里我记录一下这个过程。
1.上传图片存储到数据库中
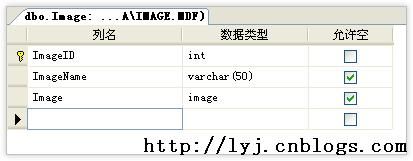
在数据库中创建一个表,添加一下3个字段:
步骤一:在Web页面中拖一个FileUpload 控件,一个文本框用于输入名称和提交上传按钮
<asp:FileUpload ID="fuImage" runat="server" /><br />
<asp:TextBox ID="txtImageName" runat="server"/><br />
<asp:Button ID="btnUpload" runat="server"
OnClick="btnUpload_Click" Text="Upload" />
步骤二:在Web.Config文件内配置连接字符串。
<add name="ConnectionString" connectionString="Data Source=./SQLEXPRESS;
AttachDbFilename=|DataDirectory|/Image.mdf;Integrated Security=True;
User Instance=True" providerName="System.Data.SqlClient"/>
步骤三:把下面的代码复制到上传按钮事件中。
protected void btnUpload_Click(object sender, EventArgs e)
{
    Stream imgStream = fuImage.PostedFile.InputStream;
    int imgLen = fuImage.PostedFile.ContentLength;
    string imgName = txtImageName.Text;
    byte[] imgBinaryData = new byte[imgLen];
    int n = imgStream.Read(imgBinaryData,0,imgLen);

    //use the web.config to store the connection string
    SqlConnection connection = new SqlConnection(ConfigurationManager.
    ConnectionStrings["connectionString"].ConnectionString);
    SqlCommand command = new SqlCommand(
     "INSERT INTO Image (imagename,image)
     VALUES ( @img_name, @img_data)", connection);

    SqlParameter param0 = new SqlParameter(
     "@img_name",SqlDbType.VarChar, 50);
    param0.Value = imgName;
    command.Parameters.Add(param0);

    SqlParameter param1 = new SqlParameter(
     "@img_data", SqlDbType.Image);
    param1.Value = imgBinaryData;
    command.Parameters.Add(param1);

    connection.Open();
    int numRowsAffected = command.ExecuteNonQuery();
    connection.Close();
}
2.利用HttpHandler从数据库中读取图片
创建一个名为ImageHandler.ashx的HttpHandler从数据库中读取图片,通过imageID这个参数调用其方法显示图片。像这样:ImageHandler.ashx?ImID=200
步骤四:书写ImageHandler.ashx文件代码如下:
public class ImageHandler : IHttpHandler
{
    public void ProcessRequest(HttpContext context)
    {
        string imageid = context.Request.QueryString["ImID"];
        SqlConnection connection =
             new SqlConnection(System.Configuration.ConfigurationManager.
            ConnectionStrings["connectionString"].ConnectionString);
        connection.Open();
        SqlCommand command = new SqlCommand(
            "select Image from Image where ImageID=" + imageid,
             connection);
        SqlDataReader dr = command.ExecuteReader();
        if (dr.Read())
            {
                if (!(dr[0]is DBNull))
                {

                context.Response.BinaryWrite((Byte[])dr[0]);
                connection.Close();
                context.Response.End();
                }
            }
        }
        public bool IsReusable
        {
            get
            {
                return false;
            }
        }
3.绑定Gridview控件
步骤五:拖一个Gridview控件到页面上,并将其命名为gvImages。用下面代码来绑定数据。
SqlConnection connection = new SqlConnection(ConfigurationManager.
ConnectionStrings["connectionString"].ConnectionString);
SqlCommand command = new SqlCommand("SELECT imagename,ImageID
from [Image]", connection);
SqlDataAdapter ada = new SqlDataAdapter(command);
DataTable dt = new DataTable();
ada.Fill(dt);
gvImages.DataSource = dt;
gvImages.DataBind();
步骤六:设置Gridview控件的绑定列,其HTML代码如下:
<asp:GridView Width="500px" ID="gvImages" runat="server"
               AutoGenerateColumns="False" >
    <Columns>
        <asp:BoundField HeaderText = "Image Name"
                         DataField="imagename" />
        <asp:TemplateField HeaderText="Image">
         <ItemTemplate>
            <asp:Image ID="Image1" runat="server"  Height="80px" Width="80px"
            ImageUrl='<%# "ImageHandler.ashx?ImID="+ Eval("ImageID")
                       %>'/>
         </ItemTemplate>
    </asp:TemplateField>
    </Columns>
</asp:GridView>
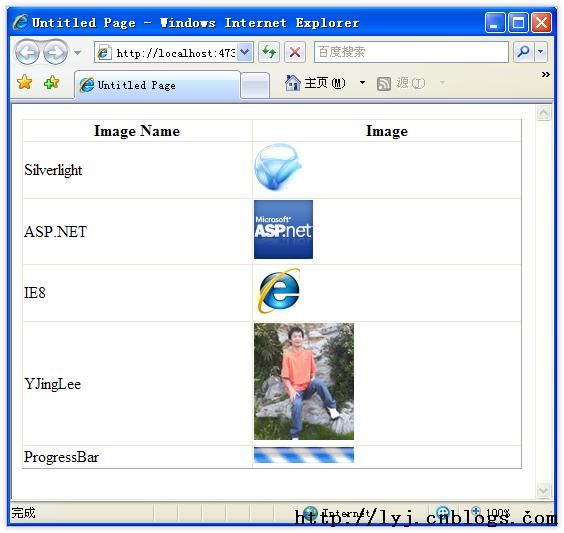
4.上传图片,并显示
OK!测试通过!还有其它一些显示图片的方法。但是我认为这个比较简单

