Spring 4 MVC hello world 教程-完全基于XML(带项目源码)【超赞】
原文地址:http://websystique.com/springmvc/spring-4-mvc-helloworld-tutorial-full-example/
【本系列其他教程正在陆续翻译中,点击分类:spring 4 mvc 进行查看】
【翻译 by 明明如月 QQ 605283073】
上一篇文章:Spring MVC 4 系列教程[ 总述]
下一篇文章:
Spring 4 MVC HelloWorld 纯注解方式(带源码)
#项目下载地址:http://websystique.com/?smd_process_download=1&download_id=1714#。
本节介绍Spring MVC 4接触,使用典型的hello world 但是没有忽略任何步骤。
下一节 将讲述完全基于JAVA注解的hello world例子。
----------------------------
本例使用了以下技术:
- Spring 4.0.6.RELEASE
- Maven 3
- JDK 1.6
- Eclipse JUNO Service Release 2
- M2Eclipse plugin (Optional)
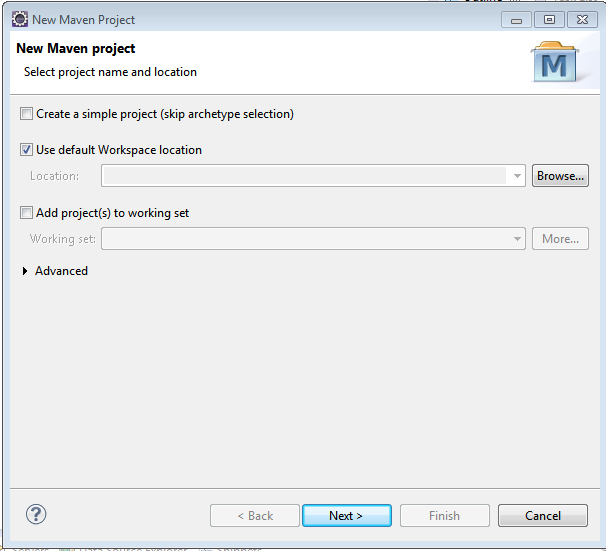
第1步 :在eclipse中创建 Maven webapp 项目
如果你想在其他文件夹创建项目 不要选择“Use default Workspace location”
点击下一步
选择maven web app archetyp,然后点击next
填入 Group Id, Artifact Id 以及版本。然后点击Finish
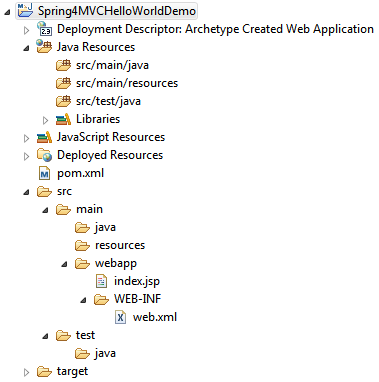
将会得到如下结构:
注意: 如果你没有看向项目结构里的 src/main/java 和 src/test/java 文件夹, 点击Project>Properties>Java BuildPath>Libraries, 选择或者切换java版本, 点击 ok, 那就可以看到上面的项目结构了.
注意:在Eclipse 最新的几个版本中你不再需要使用 mvn eclise:eclipse,这个方法在m2e eclipse 插件默认帮我们执行了.
第2步:在Maven pom.xml文件中添加Spring 依赖
<project
    xsi:schemaLocation="http://maven.apache.org/POM/4.0.0 http://maven.apache.org/xsd/maven-4.0.0.xsd"
    xmlns="http://maven.apache.org/POM/4.0.0" xmlns:xsi="http://www.w3.org/2001/XMLSchema-instance">

    <modelVersion>4.0.0</modelVersion>
    <groupId>com.websystique.springmvc</groupId>
    <artifactId>Spring4MVCHelloWorldDemo</artifactId>
    <packaging>war</packaging>
    <version>1.0.0</version>
    <name>Spring4MVCHelloWorldDemo Maven Webapp</name>

    <properties>
        <springframework.version>4.0.6.RELEASE</springframework.version>
    </properties>

    <dependencies>
        <dependency>
            <groupId>org.springframework</groupId>
            <artifactId>spring-webmvc</artifactId>
            <version>${springframework.version}</version>
        </dependency>

        <!-- Below declared dependencies are included for the servers who may complain about servlet/jstl missing dependency -->
        <dependency>
            <groupId>javax.servlet</groupId>
            <artifactId>javax.servlet-api</artifactId>
            <version>3.1.0</version>
        </dependency>
        <dependency>
            <groupId>javax.servlet.jsp</groupId>
            <artifactId>javax.servlet.jsp-api</artifactId>
            <version>2.3.1</version>
        </dependency>
        <dependency>
            <groupId>javax.servlet</groupId>
            <artifactId>jstl</artifactId>
            <version>1.2</version>
        </dependency>
    </dependencies>

    <build>
        <pluginManagement>
            <plugins>
                <plugin>
                    <groupId>org.apache.maven.plugins</groupId>
                    <artifactId>maven-compiler-plugin</artifactId>
                    <version>3.2</version>
                    <configuration>
                        <source>1.6</source>
                        <target>1.6</target>
                    </configuration>
                </plugin>
            </plugins>
        </pluginManagement>
        <finalName>Spring4MVCHelloWorldDemo</finalName>
    </build>
</project>
maven maven-compiler-plugin 插件也被添加进来,并且指明我们使用的java版本。注意这也迫使eclipse编译本项目时参考我们配置的版本。如果没有配置的话,eclipse 会自动的使用jdk 1.5版本。所以最好添加上去。
第3步: 添加Controller(控制器) 和 View(视图)
package com.websystique.springmvc.controller;

import org.springframework.stereotype.Controller;
import org.springframework.ui.ModelMap;
import org.springframework.web.bind.annotation.RequestMapping;
import org.springframework.web.bind.annotation.RequestMethod;

@Controller
@RequestMapping("/")
public class HelloWorldController {

    @RequestMapping(method = RequestMethod.GET)
    public String sayHello(ModelMap model) {
        model.addAttribute("greeting", "Hello World from Spring 4 MVC");
        return "welcome";
    }

    @RequestMapping(value="/helloagain", method = RequestMethod.GET)
    public String sayHelloAgain(ModelMap model) {
        model.addAttribute("greeting", "Hello World Again, from Spring 4 MVC");
        return "welcome";
    }

}
@Controller annotation marks this class as spring bean which may handle different HTTP requests based on mapping specified on class or individual controller methods.
@RequestMapping 注解用来映射web请求到指定的处理器类或者处理方法。 在本例中,我们在类级别也用了它,就是说此类是所有http“/”请求的默认处理器, @RequestMapping 也有很多属性 [value,method,params,..]能给用来更加详细的进行映射。
第一个方法,没有进行任何url映射声明,因此它将会继承类上面的映射声明,左右http Get请求的默认处理方法。
第二个方法(添加了带value的映射声明),它将用来处理带/helloagain 的请求。method 属性是用来指明此方法处理的http请求类型。
如果@RequestMapping 里面没有指明 method 则它将处理映射url的所有类型(GET POST等)的请求。
ModelMap 是一个Map 的实现类,它的目的是取代以前的 request.getAttribute/ request.setAttribute方法,
它提供一种 从request或者session中设置 或者获取属性的方式。
留意一下这些方法的返回值。这些值将是view resolver(看下面的 spring-servlet.xml) 的前缀或者后缀,来产生视图文件的真是名称。
在WEB-INF中创建views文件夹,在里面创建jsp页面如( WEB-INF/views/welcome.jsp) 。
在我们的例子中,只是简单的访问控制器发送来的模型值。
<%@ page language="java" contentType="text/html; charset=ISO-8859-1"
    pageEncoding="ISO-8859-1"%>
<!DOCTYPE html PUBLIC "-//W3C//DTD HTML 4.01 Transitional//EN" "http://www.w3.org/TR/html4/loose.dtd">
<html>
<head>
<meta http-equiv="Content-Type" content="text/html; charset=ISO-8859-1">
<title>HelloWorld page</title>
</head>
<body>
    Greeting : ${greeting}
</body>
</html>
第4步:创建Spring配置文件
spring-servlet.xml
的配置文件。
<beans xmlns="http://www.springframework.org/schema/beans"
    xmlns:context="http://www.springframework.org/schema/context"
    xmlns:mvc="http://www.springframework.org/schema/mvc"
    xmlns:xsi="http://www.w3.org/2001/XMLSchema-instance"
    xsi:schemaLocation="http://www.springframework.org/schema/beans http://www.springframework.org/schema/beans/spring-beans-4.0.xsd
    http://www.springframework.org/schema/mvc http://www.springframework.org/schema/mvc/spring-mvc-4.0.xsd
    http://www.springframework.org/schema/context http://www.springframework.org/schema/context/spring-context-4.0.xsd">

    <context:component-scan base-package="com.websystique.springmvc" />

    <mvc:annotation-driven />

    <bean
        class="org.springframework.web.servlet.view.InternalResourceViewResolver">
        <property name="prefix">
            <value>/WEB-INF/views/</value>
        </property>
        <property name="suffix">
            <value>.jsp</value>
        </property>
    </bean>

</beans>
<mvc:annotation-driven /> 意思是说我们可以不在xml中声明该bean,
或者实现一个借口或者继承一个bean类或者其他类的情况下定义bean的依赖。
配置bean,spring就会知道我们带了此注解的类包含响应http请求的处理器。
<context:component-scan base-package="com.websystique.springmvc" />意思是说
spring 自动扫描此包下面的组件 base-package [com.websystique.springmvc],
看看它们有没有带 [@Controller, @Service,@Repository, @Component, 等等]这些注解。
如果有这些注解spring将自动的将它们在bean 工厂里面注册,和在xml中配置bean效果是一样的。
通过上面我们声明了一个view resolver,帮助控制器(controller)代理响应到正确的视图(view).
第4步: 配置(web.xml) 文件
<web-app id="WebApp_ID" version="2.4"
    xmlns="http://java.sun.com/xml/ns/j2ee"
    xmlns:xsi="http://www.w3.org/2001/XMLSchema-instance"
    xsi:schemaLocation="http://java.sun.com/xml/ns/j2ee

http://java.sun.com/xml/ns/j2ee/web-app_2_4.xsd">

 <display-name>Spring4MVCHelloWorldDemo Web Application</display-name>

 <servlet>
    <servlet-name>dispatcher</servlet-name>
    <servlet-class>
        org.springframework.web.servlet.DispatcherServlet
    </servlet-class>
    <init-param>
        <param-name>contextConfigLocation</param-name>
        <param-value>/WEB-INF/spring-servlet.xml</param-value>
    </init-param>
    <load-on-startup>1</load-on-startup>
 </servlet>

 <servlet-mapping>
    <servlet-name>dispatcher</servlet-name>
    <url-pattern>/</url-pattern>
 </servlet-mapping>

</web-app>
配合主要从 DispatcherServlet & contextConfigLocation.DispatcherServlet 这个是前置控制器,来接收每个请求(看url pattern) 然后引导请求到对应的控制器(controller).同时也负责引导controller中的响应到对应的是视图。
仔细看看 contextConfigLocation的 init-param. 多亏了这个参数,你可以在项目的任何位置存放配置文件也可以随意命名,而且你甚至都可以配置多个配置文件。 In absence of this parameter, you are obliged to name the file as ABC-servlet.xml where ABC is the dispatcher servlet name.
如果没有这个参数,你就不得不以ABC-servlet.xml 形式命名此配置文件,这里的ABC就是你的 dispatcher servlet name。
你将得到下面的项目文件结构:
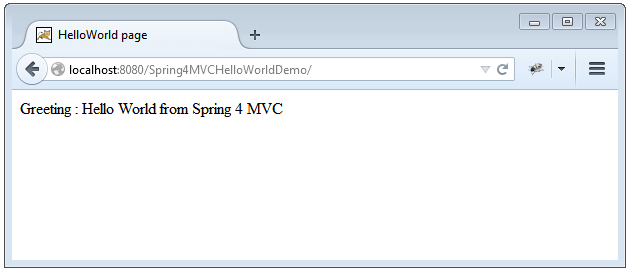
第6步:部署 &运行你的应用
打开浏览器
本文结束。下一篇文章 将讲述 Sping 4 MVC 完全基于注解的hello world教程。


