基于采样的快速找图以及实现方式
-
按键精灵是很多人都用过的东西,但是毕竟它只是VB脚本,功能很有限,开发和调试都是一大头疼事,于是我就想自己弄一套按键精灵的复刻版类库以便自己能够在C#里面试用,再加上VS的强大调试功能和众多.NET运行库,比使用脚本不知道强了多少倍。
相信不少人用过按键精灵的 找图 的功能,实现它的方式也有很多种,但我们最注重的一个东西就是效率。因为找图的瓶颈当然就在于效率了。我也研究了几天的找图的功能,今天早上重新翻相关的内容的时候终于因为一个看过N次的帖子的老兄的一句话而茅塞顿开,于是就有了下面的内容。
下面我就直入主题了。
首先理论:
因为找图的时候按照每一个像素点来判断的话效率是非常非常低的,遍历大图的次数决定了关键效率,当然其中也有截图的消耗。基于采样的算法最低只需要遍历一次大图就可以完成查找,当然为了保证正确性,也可以遍历多次,但这是可以掌控的。
我们首先在小图中记录下一些特征点的颜色值,然后就可以进行匹配了,但这里有一个最摸不着头脑的问题,从哪里开始找起?仔细想的话有点像是爱因斯坦的相对论的感觉。所以啊,我们就需要一个绝对的点来作为参照。假设,这个点是可以在大图中找到的,那么定位其他的采样点就容易得多啦,我们只需要遍历一次大图,判断每一个像素是否是参照点,如果是,就判断采样点的颜色值,如果采样点的颜色值都相同,那么我们就可以认为是找到小图了。有些人可能有疑问了,如果小图中白色底色,就一个黑色的汉字,那么正确性是不是会降低呢?答案肯定是会,这样,你就需要增加采样点的个数或者取一些特征点来判断了。这一切都是基于参照点的位置的,如果连参照点都没有找到,那么说其他的,也就是白扯,所以参照点就显得至关重要了,为了保证参照点的正确性,我们可以使用多个参照点来保证找图的正确性和稳定性。 理论就这么一点点,这根本也不是什么高深的东西,对吧www.it165.net?
代码开整:
我要实现的目标是按键精灵 区域找图(FindPic)这个函数,首先列出我们要实现的函数的原型
FindPic(IntPrt hwnd,Rectangle rect,Image serchImg,float h,Point[] points)
参数:
hwnd:要找图的窗口句柄,如果为0则表示获取的是桌面截图,这里需要用这个hwnd来截图
rect:需要在大图找的区域和大小
serchImg:小图
h:相似度,取值范围为0-1 1为完全相同
points:采样点
这里最重要的参数就是采样点,采样点的意思就是,在小图里面取一些个别的点,如果这些个别的点匹配成功,那么就可以认为是找到了serchImg的位置
为了保证正确性,采样点可以使用百分比的方式或者试用指定个数的方式来随机获取,至于使用百分比或者指定点的个数由你来定。个人认为百分比的方式比较稳定,因为采样点的个数不会太影响性能,至少不是影响性能的首要因素。
01./// <summary>02./// 随机生成采样点03./// </summary>04./// <param name="img">图片</param>05./// <param name="h">采样比率,范围为0-1,决定图片像素的采样百分比,大于等于1为采样点个数</param>06./// <returns></returns>07.publicstaticPoint[] GetImgTestPoints(Image img,floath)08.{09.Random random =newRandom(DateTime.Now.Second);10.11.intwidth_max = img.Width;12.intheight_max = img.Height;13.14.intcount = 1;15.if(h > 1)16.{17.count = (int)h;18.}19.else20.{21.count = (int)(width_max * height_max * h);//采样点的个数22.}23.24.List<Point> points =newList<Point>();//采样点的集合25.26.for(inti = 0; i < count; i++)27.{28.Point point =newPoint();29.point.X = random.Next(width_max);30.point.Y = random.Next(height_max);31.32.points.Add(point);33.}34.returnpoints.ToArray();35.}
好了,FindPic的所有参数都解决了。剩下就是这个方法的实现了。
FindPic需要使用EqImage EqTestColor 和一个叫做EqualsRGB的扩展函数接下来我会一个个讲解这三个函数
首先是 EqualsRGB
01./// <summary>02./// 扩展函数,比较图片的 RGB 是否相同03./// </summary>04./// <param name="color1"></param>05./// <param name="color2"></param>06./// <returns></returns>07.publicstaticboolEqualsRGB(thisColor color1, Color color2)08.{09.if(color1.R == color2.R && color1.B == color2.B && color1.G == color2.G)10.{11.returntrue;12.}13.else14.{15.returnfalse;16.}17.}
大家可能要问了,这个函数不是可有可无的吗? 其实不是。因为试用 BitBlt(WIN32 API)截图后是没有Alpha 通道的,所以啊,我就写了这么一个函数来对比颜色值是否相同了,大家也能够理解了吧?
EqTestColor :这个方法是来判断采样点的
01./// <summary>02./// 给定一个原点,判断采样点的颜色和小图片的颜色是否相同03./// </summary>04./// <param name="bigImg">大图片</param>05./// <param name="centerPoint">小图片的原点</param>06./// <param name="getCenterPoint">搜索到的原点</param>07./// <param name="points">采样点集合</param>08./// <param name="pointsColors">采样点颜色集合</param>09./// <param name="h">相似度</param>10./// <returns></returns>11.privatestaticboolEqTestColor(Bitmap bigImg, Point centerPoint, Point getCenterPoint, Point[] points, List<Color> pointsColors,floath)12.{13.boolresult =false;14.intcount = 0;15.16.for(inti = 0; i < points.Length; i++)17.{18.Point testPoint = points[i];19.//距离GetCenterPoint的相对距离20.testPoint.X = testPoint.X - centerPoint.X + getCenterPoint.X;21.testPoint.Y = testPoint.Y - centerPoint.Y + getCenterPoint.Y;22.23.if(testPoint.X < 0 || testPoint.Y < 0 ||24.testPoint.X >= bigImg.Width || testPoint.Y >= bigImg.Height)25.{26.break;27.}28.29.//获取颜色比较30.Color bigColor = bigImg.GetPixel(testPoint.X, testPoint.Y);31.Color smailColor = pointsColors[i];32.33.if(bigColor.EqualsRGB(smailColor) ==true)34.{35.count++;36.}37.}38.39.if(((float)count / (float)points.Length) >= h)40.{41.result =true;42.}43.else44.{45.result =false;46.}47.48.returnresult;49.}
这个方法也很容易理解,我就不多说了。
接下来是EqImage :
01./// <summary>02./// 比较2张图片是否相等03./// </summary>04./// <param name="bigImg">bigImg</param>05./// <param name="smailImg">smailImg</param>06./// <param name="h">相似度</param>07./// <param name="centerPoint">采样原点</param>08./// <param name="points">所有采样点</param>09./// <returns></returns>10.publicstaticboolEqImage(Bitmap bigImg, Bitmap smailImg,floath, Point centerPoint, Point[] points,outPoint point)11.{12.boolresult =false;13.14.point =newPoint(-1, -1);15.16.intx = 0;17.inty = 0;18.intmax_x = bigImg.Width;19.intmax_y = bigImg.Height;20.21.//原点的颜色22.Color centerPointColor = smailImg.GetPixel(centerPoint.X, centerPoint.Y);23.//采样点的颜色集合24.List<Color> pointsColors =newList<Color>();25.//获取采样点的颜色26.for(inti = 0; i < points.Length; i++)27.{28.pointsColors.Add(smailImg.GetPixel(points[i].X, points[i].Y));29.}30.31.for(x = 0; x < max_x; x++)32.{33.for(y = 0; y < max_y; y++)34.{35.Point getCenterPoint =newPoint(x, y);36.Color getCenterPointColor = bigImg.GetPixel(x, y);37.38.//判断原点是否相同39.if(centerPointColor.EqualsRGB(getCenterPointColor) ==true)40.{41.//判断采样点颜色42.if(EqTestColor(bigImg, centerPoint, getCenterPoint, points, pointsColors, h) ==true)43.{//如果相同就跳出44.result =true;45.46.//计算相对于参照点的0点47.point.X = x - centerPoint.X;48.point.Y = y - centerPoint.Y;49.50.break;51.}52.}53.}54.if(result ==true)55.{56.break;57.}58.}59.60.returnresult;61.}
这里的centerPoint就是我们设定的参照点,方法中先找到参照点的位置,然后调用EqTestColor 方法来判断参照点是否相同,如果相同就返回是否找到,并用一个输出参数来返回找到的位置。
最后就是FindPic了
01./// <summary>02./// 区域找图03./// </summary>04./// <param name="hwnd">要找的窗口句柄</param>05./// <param name="rect">大图的区域</param>06./// <param name="serchBmp">小图</param>07./// <param name="h">相似度</param>08./// <returns></returns>09.publicstaticPoint FindPic(IntPtr hwnd, Rectangle rect, Bitmap serchBmp,floath, Point[] points)10.{11.Point point =newPoint(-1, -1);12.13.Bitmap bmp = GetWindowPic(hwnd, rect);//截图14.15.//采样点集合16.Point[] centerPoints = GetImgTestPoints(serchBmp, 5,false);17.18.for(inti = 0; i < centerPoints.Length; i++)19.{20.Point centerPoint = centerPoints[i];21.22.//根据原点判断采样点的颜色值是否相同23.if(EqImage(bmp, serchBmp, h, centerPoint, points,outpoint) ==true)24.{25.break;26.}27.}28.29.//合成相对于窗口的坐标30.if(point.X >= 0 && point.Y >= 0)31.{32.point.X += rect.X;33.point.Y += rect.Y;34.}35.36.serchBmp.Dispose();37.returnpoint;38.}
FindPic里面我做了一个循环,用来判断多个参照点,以便增加正确性。获得0点位置后,记住啊,这个0点是相对于区域的位置,我们需要把它转换成相对于窗口的位置。
最后提一下 GetWindowPic 是我自己定义的截图函数,我就不贴了。
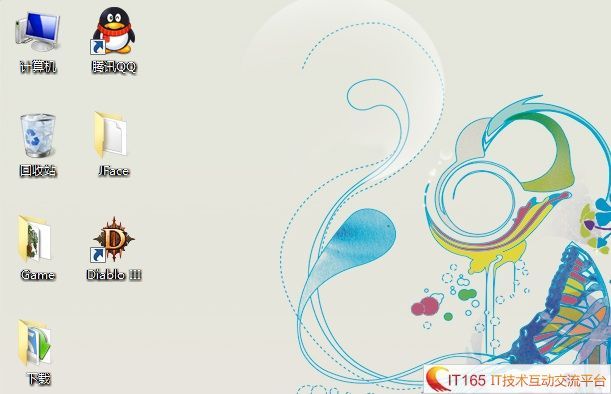
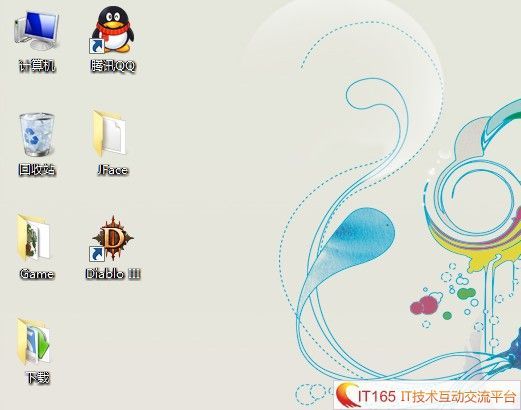
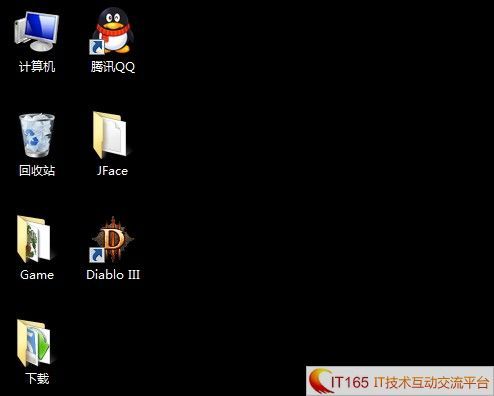
需要注意的地方:Win7下截图有个毛病,不知道大家清楚不,就是截取桌面的时候是有Alpha 通道的,也就是能正确截取,但按照窗口句柄截图会出现Alpha 通道消失的情况,也就是如果截图桌面,背景会是纯黑色,我给出下面2张对比图,大家一看便知
正常桌面:
按桌面截图:
按照句柄截图:
这是win7中的需要注意的地方,当然也可能只是我自己截图有问题,大家可以修改我的代码试用自己的截图函数。
修改FindPic中 这句就可以了。
?Bitmap bmp = GetWindowPic(hwnd, rect);//截图<BR><BR><BR>
不知道我说的够不够清楚?大家赶紧自己试试吧. ^Y^
有错误或者有疏漏或者有改进的意见欢迎指出。


