Android四大组件之Broadcast
Android四大组件之Broadcast
在android中,Broadcast是一种广泛运用的在应用程序之间传输信息的机制。而BroadcastReceiver是对发送出来的Broadcast进行过滤接收并响应的一类组件。可以使用BroadcastReceiver来让应用对一个外部的事件作出响应。这是非常有意思的,例如,当电话呼入这个外部事件到来的时候,可以利用BroadcastReceiver进行处理。又如,当下载一个程序成功完成的时候,仍然可以利用BroadcastReceiver进行处理。BroadcastReceiver不能生成UI,因此用户看不到响应的界面。
BroadcastReceiver通过NotificationManager来通知用户这些事情发生了。BroadcastReceiver既可以在AndroidManifest.xml中注册,也可以在运行时的代码中使用Context.registerReceiver()进行注册。只要是注册了,当事件来临的时候,即使程序没有启动,系统也会在需要的时候启动程序。各种应用还可以通过使用Context.sendBroadcast()将它们的intent broadcast广播给其它应用程序。
注册BroadcastReceiver有两种方式。
- 在AndroidManifest.xml进行注册。这种方式有一个特点,即使你的应用程序已经关闭了,但这个BroadcastReceiver依然会接受广播出来的对象,也就是说无论这个应用程序是开还是关,都属于活动状态,都可以接收到广播的事件。
- 在代码中注册广播。
第一种俗称静态注册,第二种俗称动态注册,这两种中蹙额BroadcastReceiver的区别是:
动态注册较静态注册灵活。实验证明,当静态注册一个BroadcastReceiver时,不论应用程序启动与否,都可以接受对应的广播。动态注册的时候,如果不执行unregisterReceiver()方法取消注册,跟静态是一样的。但是如果执行该方法,当执行过以后,就不能接受广播了。
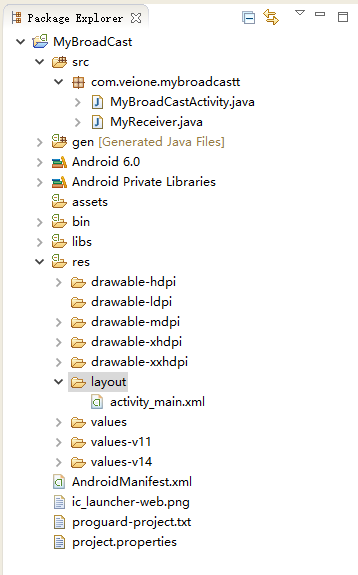
下面我们看一下静态绑定广播的一个小例子,项目结构如图所示。
MyBroadCast目录结构
如下所示,我们在MyBroadcastActivity中为按钮设置监听器,当点击这个按钮的时候,将会发送一个广播,这个广播的对象由Intent的内容来决定,我们设置这个Intent对应的action为com.veione.receiver.myreceiver,这个action的名字要和我们在AndroidManifest.xml中声明的名字保持一致。
public class MyBroadCastActivity extends Activity {

	@Override
	protected void onCreate(Bundle savedInstanceState) {
		super.onCreate(savedInstanceState);
		setContentView(R.layout.activity_main);
		// 发送广播按钮
		Button btnSend = (Button) findViewById(R.id.btnSend);
		// 设置发送广播对应的Intent
		final Intent intent = new Intent("com.veione.receiver.myreceiver");
		btnSend.setOnClickListener(new View.OnClickListener() {

			@Override
			public void onClick(View v) {
				// 发送广播
				sendBroadcast(intent);
			}
		});
	}
}
同样我们新建一个广播接收器-MyReceiver,代码如下所示,我们在接收器的onReceiver()函数中使用一个Toast来显示一条信息,表明我们接收到了相应的广播。
public class MyReceiver extends BroadcastReceiver {


	@Override
	public void onReceive(Context context, Intent intent) {
		Toast.makeText(context, "成功接收广播!", Toast.LENGTH_LONG).show();
	}
}
<?xml version="1.0" encoding="utf-8"?>
<LinearLayout xmlns:android="http://schemas.android.com/apk/res/android"
    android:layout_width="match_parent"
    android:layout_height="match_parent"
    android:orientation="vertical" >

    <TextView
        android:layout_width="match_parent"
        android:layout_height="wrap_content"
        android:text="@string/hello" />

    <Button
        android:id="@+id/btnSend"
        android:layout_width="wrap_content"
        android:layout_height="wrap_content"
        android:text="@string/sendBroadcast" />

</LinearLayout>
最后,很重要的一点,就是AndroidManifest.xml中声明这个receiver,并将action设置为我们前面的com.veione.receiver.myreceiver。这样,我们这个receiver就能正确匹配到前面设置的Intent。
<manifest xmlns:android="http://schemas.android.com/apk/res/android"
    package="com.veione.mybroadcast"
    android:versionCode="1"
    android:versionName="1.0" >

    <uses-sdk
        android:minSdkVersion="9"
        android:targetSdkVersion="21" />

    <application
        android:allowBackup="true"
        android:icon="@drawable/ic_launcher"
        android:label="@string/app_name"
        android:theme="@style/AppTheme" >
        <activity android:name="com.veione.mybroadcastt.MyBroadCastActivity" >
            <intent-filter>
                <action android:name="android.intent.action.MAIN" />

                <category android:name="android.intent.category.LAUNCHER" />
            </intent-filter>
        </activity>
        <!-- 声明receiver -->
        <receiver android:name="com.veione.mybroadcastt.MyReceiver" >
            <intent-filter>
                <action android:name="com.veione.receiver.myreceiver" />
            </intent-filter>
        </receiver>
    </application>

</manifest>
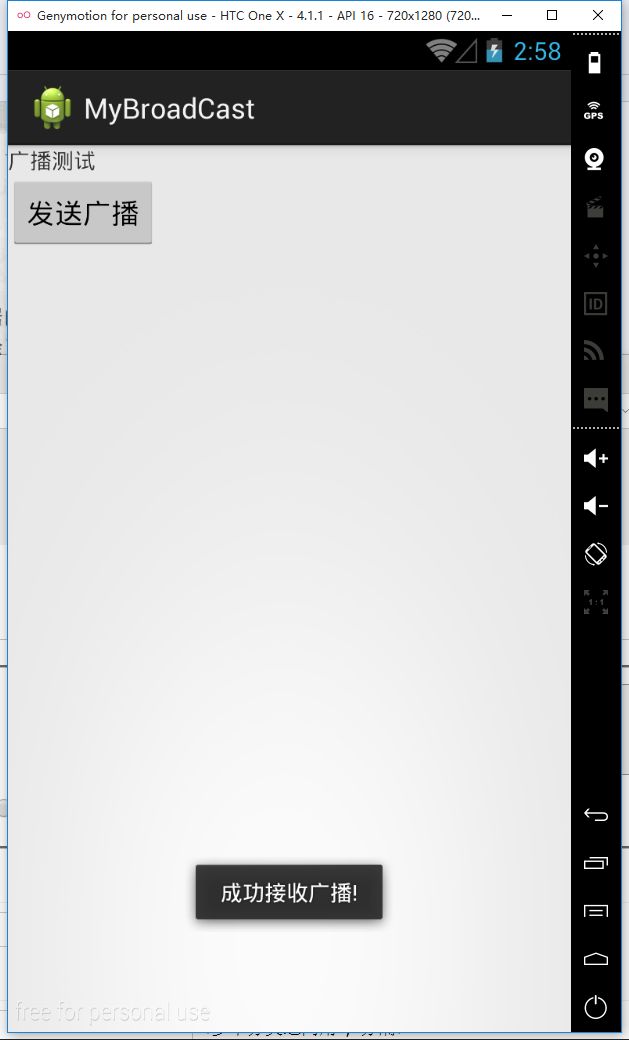
接下里我们在模拟器中运行该程序,单击“发送广播”,可以看到如下所示。

