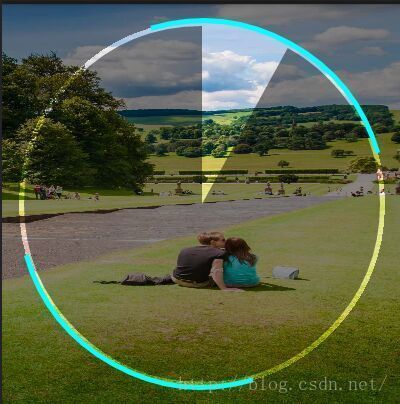
酷炫的下载的进度动画2
废话不说,线上效果图
接下来说下思路:
-- 这个跟上一篇其实看起来差不多,但是用的方法确实不一样的,主要用到了canvas的clip的方法来实现镂空的效果
1.首先画一个全透明的圆
                //save和restore是为了剪切操作不影响画布的其它元素
		canvas.save();
		mPath.reset();
		canvas.clipPath(mPath); // makes the clip empty
		mPath.addCircle(getWidth()/2, getWidth()/2, getWidth()/3+getWidth()/8, Path.Direction.CCW);

		// 设置抗锯齿
		PaintFlagsDrawFilter pfd = new PaintFlagsDrawFilter(0, Paint.ANTI_ALIAS_FLAG | Paint.FILTER_BITMAP_FLAG);
		canvas.setDrawFilter(pfd);
		canvas.clipPath(mPath, Region.Op.UNION);
2.画一个半透明的正方形,使用canvase.clipRect的属性方法REVERSE_DIFFERENCE(基于第二次的区域,把不同于第一次的部分显示出来),得到一个中间被镂空的正方形
<span style="white-space:pre">		</span>canvas.clipRect(0, 0, getWidth(), getWidth(),Region.Op.REVERSE_DIFFERENCE);
		canvas.drawColor(context1.getResources().getColor(R.color.dark_color));
		canvas.restore();
3.再画一个加载的圆形在中间被镂空的位置实现圆形加载的效果
//进度条显示
		RectF localRectF2 = new RectF();
		localRectF2.left = (getWidth()/2-getWidth()/3-getWidth()/8+ px2dip(context1,10));
		localRectF2.top = (getWidth()/2-getWidth()/3-getWidth()/8+px2dip(context1,10));
		localRectF2.right = (getWidth()/2+getWidth()/3+getWidth()/8-px2dip(context1,10));
		localRectF2.bottom = (getWidth()/2+getWidth()/3+getWidth()/8-px2dip(context1,10));
		canvas.drawArc(localRectF2, -90.0F, -(float)(3.6D * pregress), true, mProgressRingPaint);
4.在圆弧上加上2条蓝色的边,根据进度改变而转动
//在圆环上的两条蓝色
		this.mProgressRingPaint2.setStrokeWidth(px2dip(context1,10));
		//圆环上的两个蓝边
		RectF localRectF3 = new RectF();
		localRectF3.left = (getWidth()/2-getWidth()/3-getWidth()/8);
		localRectF3.top = (getWidth()/2-getWidth()/3-getWidth()/8);
		localRectF3.right = (getWidth()/2+getWidth()/3+getWidth()/8);
		localRectF3.bottom = (getWidth()/2+getWidth()/3+getWidth()/8);
		canvas.drawArc(localRectF3, -((float)(3.6D * this.pregress) - 45.0F), 90.0F, false, this.mProgressRingPaint2);
		canvas.drawArc(localRectF3, -(135.0F + (float)(3.6D * this.pregress)), 90.0F, false, this.mProgressRingPaint2);
5.开放一个方法让外面调用设置加载的进度
public void setProgress(int i) {
		pregress=100-i;
		invalidate();
	}
6.外部的类设置加载进度(模拟实现)
public class MainActivity extends Activity {

	private CoolImageView coolImageView;
    private int progress=0;
	private Handler mhandler=new Handler(){
		public void dispatchMessage(android.os.Message msg) {
			if(msg.what==1){
				if(progress<100){
					coolImageView.setProgress(++progress);
					mhandler.sendEmptyMessageDelayed(1, 1000);
				}
			}
		};
	};
	@Override
	protected void onCreate(Bundle savedInstanceState) {
		super.onCreate(savedInstanceState);
		setContentView(R.layout.activity_main);
		coolImageView = (CoolImageView) findViewById(R.id.coolprogress);
		coolImageView.setProgress(100);
		mhandler.sendEmptyMessage(1);
	}

}
源码地址:http://download.csdn.net/detail/iblue007/9518084
参考博文:http://www.jcodecraeer.com/a/anzhuokaifa/androidkaifa/2014/1120/2019.html
http://blog.csdn.net/herbert5069/article/details/28406695


