android UI进阶之弹窗的使用(2)--实现通讯录的弹窗效果
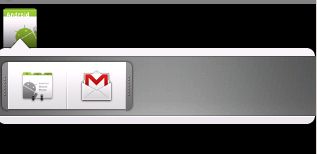
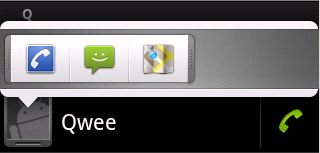
相信大家都体验过android通讯录中的弹窗效果。如图所示:
android中提供了QuickContactBadge来实现这一效果。这里简单演示下。
首先创建布局文件:
- <?xml version="1.0" encoding="utf-8"?>
- <LinearLayout xmlns:android="http://schemas.android.com/apk/res/android"
- android:orientation="vertical"
- android:layout_width="fill_parent"
- android:layout_height="fill_parent"
- >
- <QuickContactBadge
- android:id="@+id/badge"
- android:layout_width="wrap_content"
- android:layout_height="wrap_content"
- android:src="@drawable/icon">
- </QuickContactBadge>
- </LinearLayout>
很简单,在布局中添加一个QuickContactBadge组件即可。
在Activity中配置:
- public class QuickcontactActivity extends Activity {
- /** Called when the activity is first created. */
- @Override
- public void onCreate(Bundle savedInstanceState) {
- super.onCreate(savedInstanceState);
- setContentView(R.layout.main);
- QuickContactBadge smallBadge = (QuickContactBadge) findViewById(R.id.badge);
- // 从email关联一个contact
- smallBadge.assignContactFromEmail("[email protected]", true);
- // 设置窗口模式
- smallBadge.setMode(ContactsContract.QuickContact.MODE_SMALL);
- }
- }
注意加入读通讯录的权限
<uses-permission android:name="android.permission.READ_CONTACTS"></uses-permission>
实现效果如图:

但是这个组件局限性很大,弹出窗口中只能是一些contact操作。但是仔细一想,这样的操作并不难,不就是一个带动画的弹窗么。下面就来我们自己实现一个。
实现一个带动画的弹窗并不难,在我的之前一篇博客中有讲过弹窗PopupWindow的使用,不清楚弹窗的朋友可以去看下。在这里实现的难点主要有这些:
1.判断基准view在屏幕中的位置,从而确定弹窗弹出的位置以及动画。这是非常重要的一点,或许基准在屏幕上方,那么就要向下弹出。
2.动态的添加弹窗中的按钮,并实现点击
3.箭头位置的控制。箭头应该保持在基准的下方。
4.动画的匹配。里面有两种动画。一种是PopupWindow弹出动画,我们通过设置弹窗的style来实现(style的用法可以参考我之前的博客)。另一种是弹窗中间的布局的动画。
了解了难点以后,写起来就方便了。
首先实现弹窗的布局:
- <?xml version="1.0" encoding="utf-8"?>
- <RelativeLayout xmlns:android="http://schemas.android.com/apk/res/android"
- android:layout_width="wrap_content"
- android:layout_height="wrap_content">
- <FrameLayout
- android:layout_marginTop="10dip"
- android:id="@+id/header2"
- android:layout_width="fill_parent"
- android:layout_height="wrap_content"
- android:background="@drawable/quickcontact_top_frame"/>
- <ImageView
- android:id="@+id/arrow_up"
- android:layout_width="wrap_content"
- android:layout_height="wrap_content"
- android:src="@drawable/quickcontact_arrow_up" />
- <HorizontalScrollView
- android:id="@+id/scroll"
- android:layout_width="fill_parent"
- android:layout_height="wrap_content"
- android:fadingEdgeLength="0dip"
- android:layout_below="@id/header2"
- android:background="@drawable/quickcontact_slider_background"
- android:scrollbars="none">
- <LinearLayout
- android:id="@+id/tracks"
- android:layout_width="wrap_content"
- android:layout_height="wrap_content"
- android:paddingTop="4dip"
- android:paddingBottom="4dip"
- android:orientation="horizontal">
- <ImageView
- android:layout_width="wrap_content"
- android:layout_height="wrap_content"
- android:src="@drawable/quickcontact_slider_grip_left" />
- <ImageView
- android:layout_width="wrap_content"
- android:layout_height="wrap_content"
- android:src="@drawable/quickcontact_slider_grip_right" />
- </LinearLayout>
- </HorizontalScrollView>
- <FrameLayout
- android:id="@+id/footer"
- android:layout_width="fill_parent"
- android:layout_height="wrap_content"
- android:layout_below="@id/scroll"
- android:background="@drawable/quickcontact_bottom_frame" />
- <ImageView
- android:id="@+id/arrow_down"
- android:layout_width="wrap_content"
- android:layout_height="wrap_content"
- android:layout_marginTop="-1dip"
- android:layout_below="@id/footer"
- android:src="@drawable/quickcontact_arrow_down" />
- </RelativeLayout>
窗体内部使用一个HorizontalScrollView可以实现一个滑动效果。我们可以动态的在这个布局中添加按钮,我们称作Actionitem。
写一个ActionItem类,使得我们可以用一个ArrayList做容器,动态的添加这些actionitem。这些都是服务于第二个难点。
- package com.notice.quickaction;
- import android.graphics.drawable.Drawable;
- import android.view.View.OnClickListener;
- /**
- * Action item, 每个item里面都有一个ImageView和一个TextView
- */
- public class ActionItem {
- private Drawable icon;
- private String title;
- private OnClickListener listener;
- /**
- * 构造器
- */
- public ActionItem() {
- }
- /**
- * 带Drawable参数的构造器
- */
- public ActionItem(Drawable icon) {
- this.icon = icon;
- }
- /**
- * 设置标题
- */
- public void setTitle(String title) {
- this.title = title;
- }
- /**
- * 获得标题
- *
- * @return action title
- */
- public String getTitle() {
- return this.title;
- }
- /**
- * 设置图标
- */
- public void setIcon(Drawable icon) {
- this.icon = icon;
- }
- /**
- * 获得图标
- */
- public Drawable getIcon() {
- return this.icon;
- }
- /**
- * 绑定监听器
- */
- public void setOnClickListener(OnClickListener listener) {
- this.listener = listener;
- }
- /**
- * 获得监听器
- */
- public OnClickListener getListener() {
- return this.listener;
- }
- }
接下来就是这个弹窗的实现了,我们继承PopupWindow类。在这个类中我们需要实现通过位置设置动画及弹出位置,并且给出一个方法供实现类调用,来动态添加item和设置动画效果。
代码如下:
- /**
- * 继承弹窗,构造我们需要的弹窗
- */
- public class QuickActions extends PopupWindow {
- private final View root;
- private final ImageView mArrowUp;
- private final ImageView mArrowDown;
- private final Animation mTrackAnim;
- private final LayoutInflater inflater;
- private final Context context;
- protected final View anchor;
- protected final PopupWindow window;
- private Drawable background = null;
- protected final WindowManager windowManager;
- protected static final int ANIM_GROW_FROM_LEFT = 1;
- protected static final int ANIM_GROW_FROM_RIGHT = 2;
- protected static final int ANIM_GROW_FROM_CENTER = 3;
- protected static final int ANIM_AUTO = 4;
- private int animStyle;
- private boolean animateTrack;
- private ViewGroup mTrack;
- private ArrayList<ActionItem> actionList;
- /**
- * 构造器,在这里初始化一些内容
- *
- * @param anchor 像我之前博客所说的理解成一个基准 弹窗以此为基准弹出
- */
- public QuickActions(View anchor) {
- super(anchor);
- this.anchor = anchor;
- this.window = new PopupWindow(anchor.getContext());
- // 在popwindow外点击即关闭该window
- window.setTouchInterceptor(new OnTouchListener() {
- @Override
- public boolean onTouch(View v, MotionEvent event) {
- if (event.getAction() == MotionEvent.ACTION_OUTSIDE) {
- QuickActions.this.window.dismiss();
- return true;
- }
- return false;
- }
- });
- // 得到一个windowManager对象,用来得到窗口的一些属性
- windowManager = (WindowManager) anchor.getContext().getSystemService(Context.WINDOW_SERVICE);
- actionList = new ArrayList<ActionItem>();
- context = anchor.getContext();
- inflater = (LayoutInflater) context.getSystemService(Context.LAYOUT_INFLATER_SERVICE);
- // 装载布局,root即为弹出窗口的布局
- root = (ViewGroup) inflater.inflate(R.layout.quickaction, null);
- // 得到上下两个箭头
- mArrowDown = (ImageView) root.findViewById(R.id.arrow_down);
- mArrowUp = (ImageView) root.findViewById(R.id.arrow_up);
- setContentView(root);
- mTrackAnim = AnimationUtils.loadAnimation(anchor.getContext(), R.anim.rail);
- // 设置动画的加速效果
- mTrackAnim.setInterpolator(new Interpolator() {
- public float getInterpolation(float t) {
- final float inner = (t * 1.55f) - 1.1f;
- return 1.2f - inner * inner;
- }
- });
- // 这个是弹出窗口内的水平布局
- mTrack = (ViewGroup) root.findViewById(R.id.tracks);
- animStyle = ANIM_AUTO;// 设置动画风格
- animateTrack = true;
- }
- /**
- * 设置一个flag来标识动画显示
- */
- public void animateTrack(boolean animateTrack) {
- this.animateTrack = animateTrack;
- }
- /**
- * 设置动画风格
- */
- public void setAnimStyle(int animStyle) {
- this.animStyle = animStyle;
- }
- /**
- * 增加一个action
- */
- public void addActionItem(ActionItem action) {
- actionList.add(action);
- }
- /**
- * 弹出弹窗
- */
- public void show() {
- // 预处理,设置window
- preShow();
- int[] location = new int[2];
- // 得到anchor的位置
- anchor.getLocationOnScreen(location);
- // 以anchor的位置构造一个矩形
- Rect anchorRect = new Rect(location[0], location[1], location[0] + anchor.getWidth(), location[1]
- + anchor.getHeight());
- root.setLayoutParams(new LayoutParams(LayoutParams.WRAP_CONTENT, LayoutParams.WRAP_CONTENT));
- root.measure(LayoutParams.WRAP_CONTENT, LayoutParams.WRAP_CONTENT);
- int rootWidth = root.getMeasuredWidth();
- int rootHeight = root.getMeasuredHeight();
- // 得到屏幕的宽
- int screenWidth = windowManager.getDefaultDisplay().getWidth();
- // 设置弹窗弹出的位置的x/y
- int xPos = (screenWidth - rootWidth) / 2;
- int yPos = anchorRect.top - rootHeight;
- boolean onTop = true;
- // 在底部弹出
- if (rootHeight > anchorRect.top) {
- yPos = anchorRect.bottom;
- onTop = false;
- }
- // 根据弹出位置,设置不同方向箭头图片
- showArrow(((onTop) ? R.id.arrow_down : R.id.arrow_up), anchorRect.centerX());
- // 设置弹出动画风格
- setAnimationStyle(screenWidth, anchorRect.centerX(), onTop);
- // 创建action list
- createActionList();
- // 在指定位置弹出弹窗
- window.showAtLocation(this.anchor, Gravity.NO_GRAVITY, xPos, yPos);
- // 设置弹窗内部的水平布局的动画
- if (animateTrack) mTrack.startAnimation(mTrackAnim);
- }
- /**
- * 预处理窗口
- */
- protected void preShow() {
- if (root == null) {
- throw new IllegalStateException("需要为弹窗设置布局");
- }
- // 背景是唯一能确定popupwindow宽高的元素,这里使用root的背景,但是需要给popupwindow设置一个空的BitmapDrawable
- if (background == null) {
- window.setBackgroundDrawable(new BitmapDrawable());
- } else {
- window.setBackgroundDrawable(background);
- }
- window.setWidth(WindowManager.LayoutParams.WRAP_CONTENT);
- window.setHeight(WindowManager.LayoutParams.WRAP_CONTENT);
- window.setTouchable(true);
- window.setFocusable(true);
- window.setOutsideTouchable(true);
- // 指定布局
- window.setContentView(root);
- }
- /**
- * 设置动画风格
- *
- * @param screenWidth 屏幕宽底
- * @param requestedX 距离屏幕左边的距离
- * @param onTop 一个flag用来标识窗口的显示位置,如果为true则显示在anchor的顶部
- */
- private void setAnimationStyle(int screenWidth, int requestedX, boolean onTop) {
- // 取得屏幕左边到箭头中心的位置
- int arrowPos = requestedX - mArrowUp.getMeasuredWidth() / 2;
- // 根据animStyle设置相应动画风格
- switch (animStyle) {
- case ANIM_GROW_FROM_LEFT:
- window.setAnimationStyle((onTop) ? R.style.Animations_PopUpMenu_Left : R.style.Animations_PopDownMenu_Left);
- break;
- case ANIM_GROW_FROM_RIGHT:
- window.setAnimationStyle((onTop) ? R.style.Animations_PopUpMenu_Right : R.style.Animations_PopDownMenu_Right);
- break;
- case ANIM_GROW_FROM_CENTER:
- window.setAnimationStyle((onTop) ? R.style.Animations_PopUpMenu_Center : R.style.Animations_PopDownMenu_Center);
- break;
- case ANIM_AUTO:
- if (arrowPos <= screenWidth / 4) {
- window.setAnimationStyle((onTop) ? R.style.Animations_PopUpMenu_Left : R.style.Animations_PopDownMenu_Left);
- } else if (arrowPos > screenWidth / 4 && arrowPos < 3 * (screenWidth / 4)) {
- window.setAnimationStyle((onTop) ? R.style.Animations_PopUpMenu_Center : R.style.Animations_PopDownMenu_Center);
- } else {
- window.setAnimationStyle((onTop) ? R.style.Animations_PopDownMenu_Right : R.style.Animations_PopDownMenu_Right);
- }
- break;
- }
- }
- /**
- * 创建action list
- */
- private void createActionList() {
- View view;
- String title;
- Drawable icon;
- OnClickListener listener;
- int index = 1;
- for (int i = 0; i < actionList.size(); i++) {
- title = actionList.get(i).getTitle();
- icon = actionList.get(i).getIcon();
- listener = actionList.get(i).getListener();
- // 得到action item
- view = getActionItem(title, icon, listener);
- view.setFocusable(true);
- view.setClickable(true);
- // 将其加入布局
- mTrack.addView(view, index);
- index++;
- }
- }
- /**
- * 获得 action item
- *
- * @param title action的标题
- * @param icon action的图标
- * @param listener action的点击事件监听器
- * @return action的item
- */
- private View getActionItem(String title, Drawable icon, OnClickListener listener) {
- // 装载action布局
- LinearLayout container = (LinearLayout) inflater.inflate(R.layout.action_item, null);
- ImageView img = (ImageView) container.findViewById(R.id.icon);
- TextView text = (TextView) container.findViewById(R.id.title);
- if (icon != null) {
- img.setImageDrawable(icon);
- } else {
- img.setVisibility(View.GONE);
- }
- if (title != null) {
- text.setText(title);
- } else {
- text.setVisibility(View.GONE);
- }
- if (listener != null) {
- container.setOnClickListener(listener);
- }
- return container;
- }
- /**
- * 显示箭头
- *
- * @param 箭头资源id
- * @param 距离屏幕左边的距离
- */
- private void showArrow(int whichArrow, int requestedX) {
- final View showArrow = (whichArrow == R.id.arrow_up) ? mArrowUp : mArrowDown;
- final View hideArrow = (whichArrow == R.id.arrow_up) ? mArrowDown : mArrowUp;
- final int arrowWidth = mArrowUp.getMeasuredWidth();
- showArrow.setVisibility(View.VISIBLE);
- ViewGroup.MarginLayoutParams param = (ViewGroup.MarginLayoutParams) showArrow.getLayoutParams();
- // 以此设置距离左边的距离
- param.leftMargin = requestedX - arrowWidth / 2;
- hideArrow.setVisibility(View.INVISIBLE);
- }
- }
有点长,不过注释都写的很清楚了。show()方法完成窗口的弹出。里面调用其他方法设置了窗口弹出的位置,设置了相应的动画弹出风格和箭头朝向以及位置,创建了action item。大家可以从这个方法里开始看,看每个的实现。
最后写个测试类。放一个Button在屏幕顶部,一个在屏幕底部。点击弹出弹窗。
- package com.notice.quickaction;
- import android.app.Activity;
- import android.os.Bundle;
- import android.view.View;
- import android.view.View.OnClickListener;
- import android.widget.Button;
- import android.widget.Toast;
- /**
- * 实现activity
- */
- public class MyQuick extends Activity {
- @Override
- public void onCreate(Bundle savedInstanceState) {
- super.onCreate(savedInstanceState);
- setContentView(R.layout.main);
- // 得到一个actionItem对象
- final ActionItem chart = new ActionItem();
- // 设置标题,图标,点击事件
- chart.setTitle("Chart");
- chart.setIcon(getResources().getDrawable(R.drawable.chart));
- chart.setOnClickListener(new OnClickListener() {
- @Override
- public void onClick(View v) {
- Toast.makeText(MyQuick.this, "Chart selected", Toast.LENGTH_SHORT).show();
- }
- });
- final ActionItem production = new ActionItem();
- production.setTitle("Products");
- production.setIcon(getResources().getDrawable(R.drawable.production));
- production.setOnClickListener(new OnClickListener() {
- @Override
- public void onClick(View v) {
- Toast.makeText(MyQuick.this, "Products selected", Toast.LENGTH_SHORT).show();
- }
- });
- Button btn1 = (Button) this.findViewById(R.id.btn1);
- // 点击按钮弹出
- btn1.setOnClickListener(new View.OnClickListener() {
- @Override
- public void onClick(View v) {
- // 初始化一个QuickActions
- QuickActions qa = new QuickActions(v);
- // 为他添加actionitem
- qa.addActionItem(chart);
- qa.addActionItem(production);
- qa.addActionItem(production);
- qa.addActionItem(production);
- // 设置动画风格
- qa.setAnimStyle(QuickActions.ANIM_AUTO);
- qa.show();
- }
- });
- final ActionItem dashboard = new ActionItem();
- dashboard.setIcon(getResources().getDrawable(R.drawable.dashboard));
- dashboard.setOnClickListener(new OnClickListener() {
- @Override
- public void onClick(View v) {
- Toast.makeText(MyQuick.this, "dashboard selected", Toast.LENGTH_SHORT).show();
- }
- });
- final ActionItem users = new ActionItem();
- users.setIcon(getResources().getDrawable(R.drawable.users));
- users.setOnClickListener(new OnClickListener() {
- @Override
- public void onClick(View v) {
- Toast.makeText(MyQuick.this, "Products selected", Toast.LENGTH_SHORT).show();
- }
- });
- Button btn2 = (Button) this.findViewById(R.id.btn2);
- btn2.setOnClickListener(new OnClickListener() {
- @Override
- public void onClick(View v) {
- QuickActions qa = new QuickActions(v);
- qa.addActionItem(dashboard);
- qa.addActionItem(users);
- qa.setAnimStyle(QuickActions.ANIM_GROW_FROM_CENTER);
- qa.show();
- }
- });
- }
- }
再讲下PopupWindow的风格的实现。其中一个风格代码如下:
- <style name="Animations.PopDownMenu.Left">
- <item name="@android:windowEnterAnimation">@anim/grow_from_topleft_to_bottomright</item>
- <item name="@android:windowExitAnimation">@anim/shrink_from_bottomright_to_topleft</item>
- </style>
- <?xml version="1.0" encoding="utf-8"?>
- <set xmlns:android="http://schemas.android.com/apk/res/android">
- <scale
- android:fromXScale="0.3" android:toXScale="1.0"
- android:fromYScale="0.3" android:toYScale="1.0"
- android:pivotX="50%" android:pivotY="100%"
- android:duration="@android:integer/config_shortAnimTime"
- />
- <alpha
- android:interpolator="@android:anim/decelerate_interpolator"
- android:fromAlpha="0.0" android:toAlpha="1.0"
- android:duration="@android:integer/config_shortAnimTime"
- />
- </set>
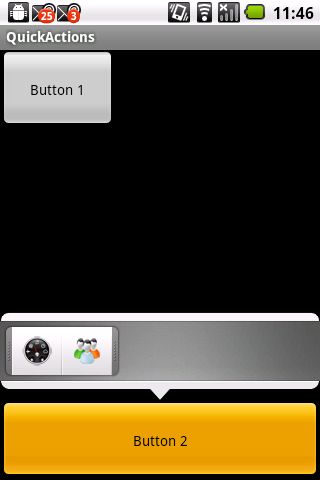
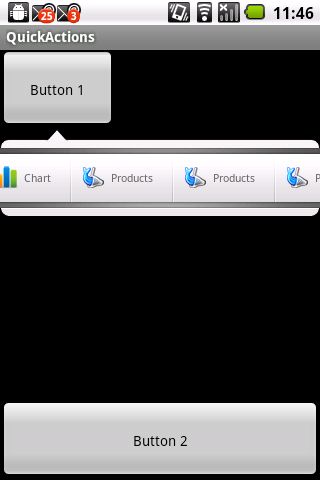
最后来看看实现效果:
好了 希望大家喜欢 有问题可以留言交流~
欢迎转载,转载请注明出处!否则将追究法律责任!http://blog.csdn.net/notice520


