SpiderMonkey学习笔记(2)--封装JSAPI
上一篇文章搭建好了一个简单的SpiderMonkey测试环境,并且把JSAPI User Guide里的样板代码直接拷贝到了工程里。在这篇文章里,我将对JSAPI做一个简单的封装,以方便后续的学习和试验。
1)添加一个C++类,名字估且就叫JsEngine吧
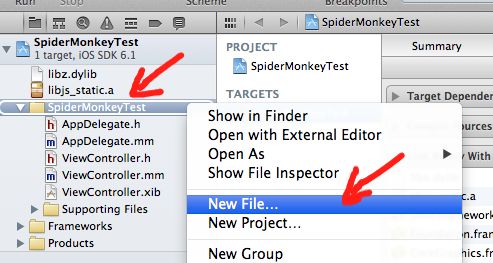
右键点击SpiderMonkeyTest Group,在弹出菜单中点击New Files... 菜单项:
选择iOS -> C and C++ -> C++ Class,然后点Next:
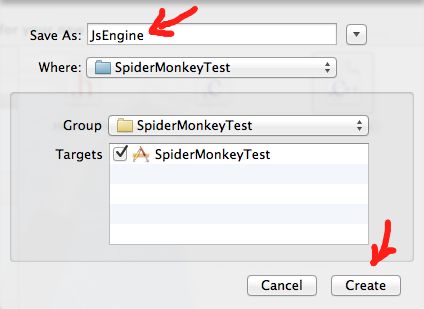
填上JsEngine,然后按Create按钮:
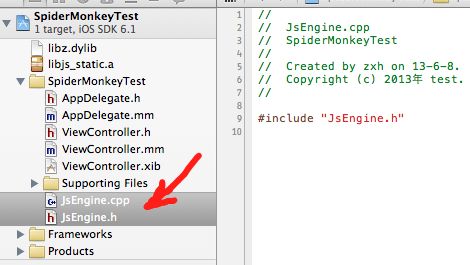
这样一个空白的类就创建好了:
2)设计JsEngine类
我们的JsEngine设计的很简单,除了构造和析构函数,只有一个execJS(...)方法用来执行一段JS脚本:
#include <string>
#include "jsapi.h"

class JsEngine {
public:
    JsEngine();
    virtual ~JsEngine();

    void execJS(const std::string& script);
protected:
    /* JS variables. */
    JSRuntime *rt;
    JSContext *cx;
    JSObject *global;
};
如果不明白JSRuntime、JSContext以及JSObject是什么,建议再看一下JSAPI User Guide,里面讲的很清楚。
3)JsEngine构造函数:初始化SpiderMonkey
#include "JsEngine.h"

// =============================================================================
// global_class & reportError
// =============================================================================

/* The class of the global object. */
static JSClass global_class = {
    "global",
    JSCLASS_GLOBAL_FLAGS,
    JS_PropertyStub,
    JS_PropertyStub,
    JS_PropertyStub,
    JS_StrictPropertyStub,
    JS_EnumerateStub,
    JS_ResolveStub,
    JS_ConvertStub,
    NULL,
    JSCLASS_NO_OPTIONAL_MEMBERS
};

/* The error reporter callback. */
static void reportError(JSContext *cx, const char *message, JSErrorReport *report) {
    fprintf(stderr, "%s:%u:%s\n",
            report->filename ? report->filename : "<no filename="">",
            (unsigned int) report->lineno,
            message);
}

// =============================================================================
// JsEngine impl
// =============================================================================

JsEngine::JsEngine() {
    /* Create a JS runtime. */
    rt = JS_NewRuntime(8L * 1024L * 1024L);
    if (rt == NULL)
        return;

    /* Create a context. */
    cx = JS_NewContext(rt, 8192);
    if (cx == NULL)
        return;
    JS_SetOptions(cx, JSOPTION_VAROBJFIX | JSOPTION_METHODJIT);
    JS_SetVersion(cx, JSVERSION_LATEST);
    JS_SetErrorReporter(cx, reportError);

    /* Create the global object in a new compartment. */
    global = JS_NewGlobalObject(cx, &global_class, NULL);
    if (global == NULL)
        return;

    /* Populate the global object with the standard globals,
     like Object and Array. */
    if (!JS_InitStandardClasses(cx, global))
        return;
}
代码稍微有点长(基本上也是从JSAPI User Guide里抄过来的),但实际上并不难理解。先是创建了一个JSRuntime的实例(为其分配了8m内存),然后创建JSContext实例,并告诉它,当脚本解释执行遇到问题的时候,调用reportError函数报告错误。紧接着创建出JS Global Object,然后初始化标准的JS类和函数。
4)JsEngine析构函数:清理SpiderMonkey
析构函数比较简单,销毁JSContext和JSRuntime,然后关掉SpiderMonkey引擎:
JsEngine::~JsEngine() {
    JS_DestroyContext(cx);
    JS_DestroyRuntime(rt);
    JS_ShutDown();
}
5)execJS方法
void JsEngine::execJS(const std::string& script) {
    jsval rval;
    /*JSBool ok = */
    JS_EvaluateScript(cx, global, script.c_str(), script.size(),
                      "script", 1, &rval);
}
这个方法也没什么好说的,关于JS_EvaluateScript的详细说明,请看 这里。
6)修改ViewController.mm
最后让我们修改ViewController.mm,测试一下新鲜出炉的JsEngine类:
#import "ViewController.h"
#import "JsEngine.h"

@interface ViewController ()

@end

@implementation ViewController

- (void)viewDidLoad
{
    [super viewDidLoad];
	// Do any additional setup after loading the view, typically from a nib.
    JsEngine engine;
    engine.execJS("alert('Hello World!');");
}

- (void)didReceiveMemoryWarning
{
    [super didReceiveMemoryWarning];
    // Dispose of any resources that can be recreated.
}

@end
7)测试JsEngine
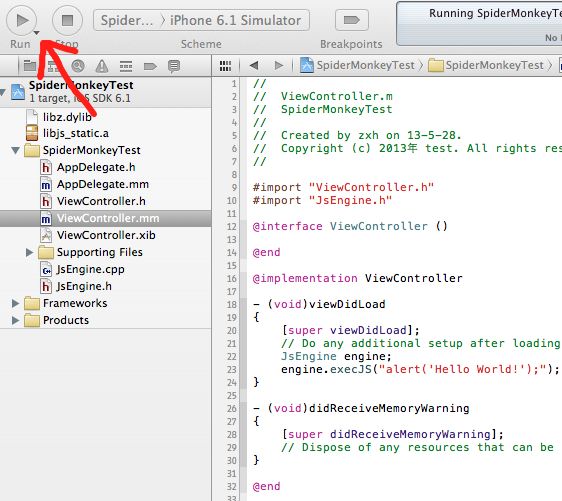
点击Run,在模拟器里运行程序:
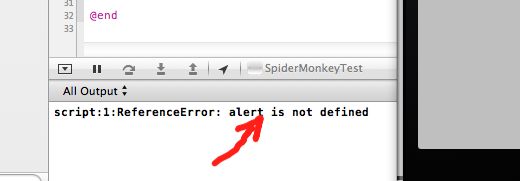
看起来一切正常,但是输出窗口中输出了这句话:
不要担心,因为alert()并不是标准的JavaScript函数,只在浏览器环境中才有。而我们的JsEngine并没有实现这个函数,所以,SpiderMonkey报了错。看到这个输出就证明SpiderMonkey顺利解释并执行了我们的HelloWorld脚本。
好吧,先到此为止了,下一篇文章中我们再来看一下怎样实现alert()函数。
