Android_基本组件-dialog
Dialog的作用就是用户可以用它来做一个决定(取消,确定),或者是输入一些信息(付款密码等。。),他不应该占满整个屏幕,因为他仅仅是一个提示用户的界面。
这里设置一个String数组来作为单选项的值,注意这里使用.setMessage()后,setItems()就不会起作用,可以调用setPositiveButton等按钮,但并无意义,因为,点击单个item后,dialog会自己消失,可以在监听事件里监听用户选择的那个item。
和上一个单选差不多,这里多了一个参数,作用就是设置默认是选中还是没选中,点击每个item后,dialog不会消失,所以增加了一个按钮。有了监听事件了,取选中的值也就不难了。
好了,现在布局文件和主题都有了,就到了加载这些文件的时间了。
通过new Dialog()加载主题,然后通过setContentView()来加载布局,通过dialog.findViewById()找到组件,进行监听。
这样就可以加载不同的布局。
1.普通alertdialog
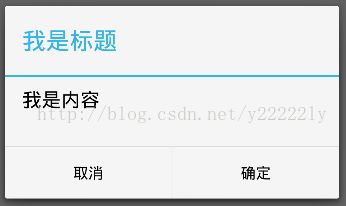
现在看一个简单的alertdialog
代码:
//注意:这里传入getApplicationContext()会报错,必须传入this(不知道为什么)
				AlertDialog.Builder builder = new AlertDialog.Builder(
						MainActivity.this);

				AlertDialog dialog = builder.setTitle("我是标题").setMessage("我是消息内容")
						.setPositiveButton("确定", new DialogInterface.OnClickListener() {

							@Override
							public void onClick(DialogInterface dialog, int which) {


							}
						}).setNegativeButton("取消", new DialogInterface.OnClickListener() {

							@Override
							public void onClick(DialogInterface dialog, int which) {

							}
						})
						.create();
				dialog.show();
通过builder设置好标题,消息,按钮即可,是不是很简单,就是不知道为什么构造函数不能传入getApplicationContext()。要取消dialog时,只需要要用dialog.dismiss()方法即可。
2.单选dialog
代码:
final String[] arrayStrings = new String[] { "张飞", "关羽", "曹操" };
AlertDialog dialog = builder
						.setTitle("我是标题")
						.setItems(arrayStrings,
								new DialogInterface.OnClickListener() {

									@Override
									public void onClick(DialogInterface dialog,
											int which) {
										Toast.makeText(getApplicationContext(),
												arrayStrings[which],
												Toast.LENGTH_SHORT).show();

									}

			}).create();
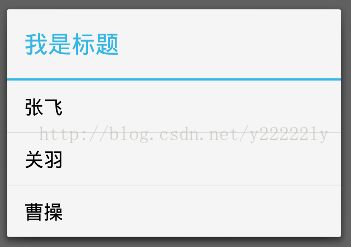
这里设置一个String数组来作为单选项的值,注意这里使用.setMessage()后,setItems()就不会起作用,可以调用setPositiveButton等按钮,但并无意义,因为,点击单个item后,dialog会自己消失,可以在监听事件里监听用户选择的那个item。
3.多选dialog
代码:
				AlertDialog dialog = builder
						.setTitle("我是标题")
						// 设置多选项组:参数:数据数组,默认选中?,监听器
						.setMultiChoiceItems(arrayStrings,
								new boolean[] { false, true, false },
								new OnMultiChoiceClickListener() {

									@Override
									public void onClick(DialogInterface dialog,
											int which, boolean isChecked) {
										String str = isChecked ? "ischecked"
												: "cancel";
										// 打印每个item状态
										Toast.makeText(getApplicationContext(),
												arrayStrings[which] + str,
												Toast.LENGTH_SHORT).show();
									}
								}).setPositiveButton("sure", null).create();
和上一个单选差不多,这里多了一个参数,作用就是设置默认是选中还是没选中,点击每个item后,dialog不会消失,所以增加了一个按钮。有了监听事件了,取选中的值也就不难了。
4.自定义View的dialog:
准确的说是alertdialog,等下,我会讲怎么完全自定义一个dialog;
代码:
				//加载布局文件
				View view = LayoutInflater.from(getApplicationContext())
						.inflate(R.layout.alertdialog, null);
				//获得用户名组件
				final EditText username = (EditText) view.findViewById(R.id.username);
				AlertDialog.Builder builder = new AlertDialog.Builder(
						MainActivity.this);
				AlertDialog dialog = builder.setView(view)
						.setNegativeButton("取消", null)
						.setPositiveButton("确定", new DialogInterface.OnClickListener() {

							@Override
							public void onClick(DialogInterface dialog, int which) {
								//打印username输入的信息
								Toast.makeText(getApplicationContext(),
										username.getText().toString(),
										Toast.LENGTH_SHORT).show();

							}
						}).create();
				dialog.show();
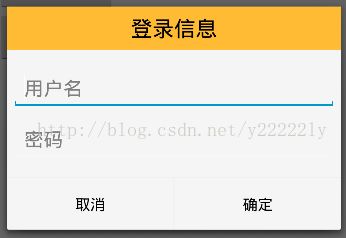
自定义dialog,就是给他设置一个布局文件,前面先通过布局加载器加载好一个view后,如果要监听里面的组件,就获取里面的组件就行了,和使用activity布局文件一样,通过findViewById()就能找到,同时依然可以使用setNegativeButton()和setPositiveButton()方法。
xml文件代码:
<?xml version="1.0" encoding="utf-8"?>
<LinearLayout xmlns:android="http://schemas.android.com/apk/res/android"
    android:orientation="vertical"
    android:layout_width="180dp"
    android:layout_height="wrap_content">
    <TextView
        android:layout_width="match_parent"
        android:layout_height="40dp"
        android:gravity="center"
        android:textColor="#000"
        android:textSize="20sp"
        android:text="登录信息"
        android:background="#FFFFBB33" />
    <EditText
        android:id="@+id/username"
        android:inputType="textEmailAddress"
        android:layout_width="match_parent"
        android:layout_height="wrap_content"
        android:textColor="#000"
        android:layout_marginTop="16dp"
        android:layout_marginLeft="4dp"
        android:layout_marginRight="4dp"
        android:layout_marginBottom="4dp"
        android:hint="用户名" />
    <EditText
        android:id="@+id/password"
        android:inputType="textPassword"
        android:layout_width="match_parent"
        android:layout_height="wrap_content"
        android:textColor="#000"
        android:layout_marginTop="4dp"
        android:layout_marginLeft="4dp"
        android:layout_marginRight="4dp"
        android:layout_marginBottom="16dp"
        android:fontFamily="sans-serif"
        android:hint="密码"/>
</LinearLayout>
5.完全自定义一个dialog
我们不通过alertdialog.builder来加载一个dialog了.
首先在资源文件夹下styles.xml文件中添加下面代码:
    <style name="dialog" parent="@android:style/Theme.Dialog">
        <item name="android:windowFrame">@null</item>
        <item name="android:windowIsFloating">true</item>
        <item name="android:windowIsTranslucent">true</item>
        <item name="android:windowNoTitle">true</item>
        <item name="android:backgroundDimEnabled">true</item>
        <item name="android:windowContentOverlay">@null</item>
        <!-- 背景 -->
        <item name="android:background">@null</item>
    </style>
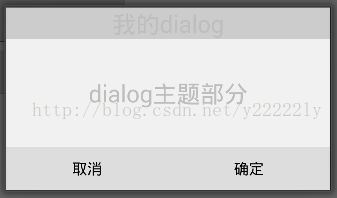
我们这里继承了系统的dialog主题,自定义了一个没有标题,背景等的一个什么都没有的dialog主题
然后在layout下面添加一个布局文件代码:
<?xml version="1.0" encoding="utf-8"?>
<LinearLayout xmlns:android="http://schemas.android.com/apk/res/android"
    android:layout_width="300dp"
    android:layout_height="wrap_content"
    android:orientation="vertical" >

    <TextView
        android:layout_width="match_parent"
        android:layout_height="wrap_content"
        android:background="#cccccc"
        android:gravity="center"
        android:text="我的dialog"
        android:textSize="22sp" />

    <TextView
        android:layout_width="match_parent"
        android:layout_height="100dp"
        android:background="#f1f1f1"
        android:gravity="center"
        android:text="dialog主题部分"
        android:textSize="22sp" />

    <LinearLayout
        android:layout_width="match_parent"
        android:layout_height="wrap_content"
        android:background="#dddddd"
        android:orientation="horizontal" >

        <Button
            android:id="@+id/cancel"
            android:layout_width="0dp"
            android:layout_height="wrap_content"
            android:layout_weight="1"
            android:background="#ddd"
            android:text="取消" />

        <Button
            android:id="@+id/ok"
            android:layout_width="0dp"
            android:layout_height="wrap_content"
            android:layout_weight="1"
            android:background="#ddd"
            android:text="确定" />
    </LinearLayout>

</LinearLayout>
好了,现在布局文件和主题都有了,就到了加载这些文件的时间了。
关键代码:
	/*
	 * 自定义的dialog
	 */
	Dialog myDialog;
	/*
	 * 自定义dialog下面的2个按钮
	 */
	Button dialogButton1;
	Button dialogButton2;
	private void showMydialog() {
		// 初始化dialog主题
		myDialog = new Dialog(this, R.style.dialog);
		// 给dialog设置布局文件
		myDialog.setContentView(R.layout.mydialog);
		// 设置dialog点击其他地方不可取消
		myDialog.setCancelable(true);
		// 得到布局中的组件
		dialogButton1 = (Button) myDialog.findViewById(R.id.cancel);
		dialogButton2 = (Button) myDialog.findViewById(R.id.ok);
		// 监听组件
		dialogButton1.setOnClickListener(new OnClickListener() {

			@Override
			public void onClick(View v) {
				// 这里要手动调用取消
				myDialog.dismiss();
			}
		});
		dialogButton2.setOnClickListener(new OnClickListener() {

			@Override
			public void onClick(View v) {
				// TODO Auto-generated method stub
				Toast.makeText(getApplicationContext(), "ok",
						Toast.LENGTH_SHORT).show();
				// 这里要手动调用取消
				myDialog.dismiss();
			}
		});
		myDialog.show();
	}
通过new Dialog()加载主题,然后通过setContentView()来加载布局,通过dialog.findViewById()找到组件,进行监听。
好了,齐活,后面就是要在使用该dialog的地方调用一下这个方法就行了。
其实,可以封装一个静态方法,专门用于加载dialog:
	/**
	 * 加载dialog模板
	 *
	 * @param context
	 * @param layout
	 * @return
	 */
	public static Dialog loadDialog(Context context, int layout) {
		Dialog dialog = new Dialog(context, R.style.dialog);
		dialog.setContentView(layout);
		dialog.setCancelable(true);
		dialog.setCanceledOnTouchOutside(true);
		return dialog;
	}
这样就可以加载不同的布局。
源码奉上:点我下载源码


