springMVC(2)------springMVC配置实例(注解)
这里用spring4.1.8版本做springMVC输出HelloWorld的实例。
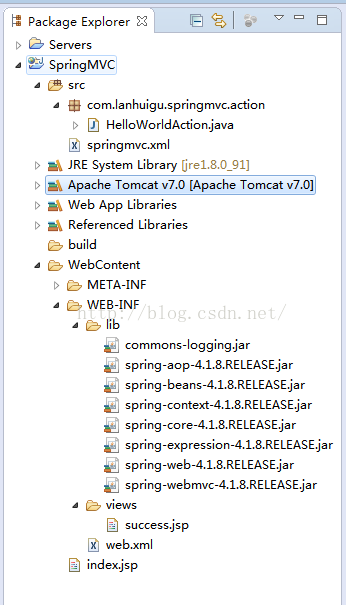
1.需要jar包
commons-logging.jar
spring-aop-4.1.8.RELEASE.jar
spring-beans-4.1.8.RELEASE.jar
spring-context-4.1.8.RELEASE.jar
spring-core-4.1.8.RELEASE.jar
spring-expression-4.1.8.RELEASE.jar
spring-web-4.1.8.RELEASE.jar
spring-webmvc-4.1.8.RELEASE.jar
2.项目结构
3.web.xml配置
配置一个名字为springDeipatcherServlet的servlet,load-on-startup指定在加载web应用时创建servlet,而不是在发送第一次请求时创建servlet.
<?xml version="1.0" encoding="UTF-8"?>
<web-app xmlns:xsi="http://www.w3.org/2001/XMLSchema-instance"
		xmlns="http://java.sun.com/xml/ns/j2ee"
		xmlns:javaee="http://java.sun.com/xml/ns/javaee"
		xmlns:web="http://java.sun.com/xml/ns/javaee/web-app_2_5.xsd"
		xsi:schemaLocation="http://java.sun.com/xml/ns/j2ee
		http://java.sun.com/xml/ns/j2ee/web-app_2_4.xsd"
		id="WebApp_ID" version="2.4">
  <!-- 配置DisptatcherServlet -->
  <servlet>
  	<servlet-name>springDispatcherServlet</servlet-name>
  	<servlet-class>org.springframework.web.servlet.DispatcherServlet</servlet-class>
  	<!-- 配置DispatcherServlet的初始化参数 -->
  	<init-param>
  		<param-name>contextConfigLocation</param-name>
  		<param-value>classpath:springmvc.xml</param-value>
  	</init-param>
  	<!-- web应用被加载的时候创建servlet -->
  	<load-on-startup>1</load-on-startup>
  </servlet>

  <servlet-mapping>
  	<servlet-name>springDispatcherServlet</servlet-name>
  	<url-pattern>/</url-pattern>
  </servlet-mapping>


  <welcome-file-list>
    <welcome-file>index.jsp</welcome-file>
  </welcome-file-list>
</web-app>
4.springmvc.xml配置
context:component-scan指定从什么文件下扫描包,是使用注解的前提;
InternalResourceViewResolver配置视图解析器,通过它解析控制器处理完后跳转到哪个视图,指定方式:
前缀(prefix)+返回值(returnVal)+后缀(suffix)得到视图,通过转发器转发操作,比如这个实例解析的实际视图路径如下:
/WEB-INF/views/success.jsp
<?xml version="1.0" encoding="UTF-8"?>
<beans xmlns="http://www.springframework.org/schema/beans"
       xmlns:xsi="http://www.w3.org/2001/XMLSchema-instance"
       xmlns:mvc="http://www.springframework.org/schema/mvc"
       xmlns:p="http://www.springframework.org/schema/p"
       xmlns:context="http://www.springframework.org/schema/context"
       xmlns:aop="http://www.springframework.org/schema/aop"
       xmlns:tx="http://www.springframework.org/schema/tx"
       xsi:schemaLocation="http://www.springframework.org/schema/beans
            http://www.springframework.org/schema/beans/spring-beans-4.1.xsd
            http://www.springframework.org/schema/context
            http://www.springframework.org/schema/context/spring-context-4.1.xsd
            http://www.springframework.org/schema/aop
            http://www.springframework.org/schema/aop/spring-aop-4.1.xsd
            http://www.springframework.org/schema/tx
            http://www.springframework.org/schema/tx/spring-tx-4.1.xsd
            http://www.springframework.org/schema/mvc
            http://www.springframework.org/schema/mvc/spring-mvc-4.1.xsd
            http://www.springframework.org/schema/context
            http://www.springframework.org/schema/context/spring-context-4.1.xsd">
    <!--  配置自动扫描的包  -->
    <context:component-scan base-package="com.lanhuigu.springmvc"/>
	<!-- 视图解析器 -->
    <bean id="viewResolver"
          class="org.springframework.web.servlet.view.InternalResourceViewResolver">
          <!-- 配置前缀 -->
          <property name="prefix" value="/WEB-INF/views/"/>
          <!-- 配置后缀 -->
          <property name="suffix" value=".jsp"/>
    </bean>
</beans>
5.Controller配置(HelloWorldAction)
通过@Controller注解说明该类非普通类,而是一个控制器类。
@RequestMapping("/helloworld")注解映射请求地址
package com.lanhuigu.springmvc.action;

import org.springframework.stereotype.Controller;
import org.springframework.web.bind.annotation.RequestMapping;
/**
 * 通过@Controller指定该类为控制器类
 */
@Controller
public class HelloWorldAction {
	/**
	 *1.通过RequestMapping注解映射请求URL
	 *2.返回值通过InternalResourceViewResolver解析到实际的视图,解析方式:
	 *前缀(prefix)+返回值(returnVal)+后缀(suffix)得到视图,通过转发器转发操作
	 *比如这个实例解析的实际视图路径如下:
	 * /WEB-INF/views/success.jsp
	 */
	@RequestMapping("/helloworld")
	public String hello() {
		System.out.println("hello world!");
		return "success";
	}
}
6.视图配置(success.jsp)
<%@ page language="java" import="java.util.*" pageEncoding="utf-8"%>
<%
    String path = request.getContextPath();
    String basePath = request.getScheme()+"://"+request.getServerName()+":"+request.getServerPort()+path+"/";
 %>
 <!DOCTYPE HTML PUBLIC "-//W3C//DTD HTML 4.01 Transitional//EN">
 <html>
    <head>
      <title>spring MVC实例初体验</title>
    </head>

    <body>
      <h1>test success</h1>
    </body>
</html>
7.启服务,浏览器访问
浏览器输入地址:http://localhost:9000/SpringMVC/helloworld(注意,根据自己tomcat的端口号)
浏览器页面可以看到test Success字样,eclipse控制台可以看到打印的hello world字样,说明springMVC实例创建成功。
总结:
(1)在上面的实例中,我们可以看到springmvc.xml关于springMVC的配置文件位于src下,在web.xml中通过参数初始化的形式加载:
<init-param>
<param-name>contextConfigLocation</param-name>
<param-value>classpath:springmvc.xml</param-value>
</init-param>
使用这种方式加载springmvc.xml是主动进攻方式,可以使用springMVC默认的方式加载文件。
将web.xml中的初始化参数部分去掉:
<?xml version="1.0" encoding="UTF-8"?>
<web-app xmlns:xsi="http://www.w3.org/2001/XMLSchema-instance"
		xmlns="http://java.sun.com/xml/ns/j2ee"
		xmlns:javaee="http://java.sun.com/xml/ns/javaee"
		xmlns:web="http://java.sun.com/xml/ns/javaee/web-app_2_5.xsd"
		xsi:schemaLocation="http://java.sun.com/xml/ns/j2ee
		http://java.sun.com/xml/ns/j2ee/web-app_2_4.xsd"
		id="WebApp_ID" version="2.4">
  <!-- 配置DisptatcherServlet -->
  <servlet>
  	<servlet-name>springDispatcherServlet</servlet-name>
  	<servlet-class>org.springframework.web.servlet.DispatcherServlet</servlet-class>
  	<!-- 配置DispatcherServlet的初始化参数 -->
  	<!-- <init-param>
  		<param-name>contextConfigLocation</param-name>
  		<param-value>classpath:springmvc.xml</param-value>
  	</init-param> -->
  	<!-- web应用被加载的时候创建servlet -->
  	<load-on-startup>1</load-on-startup>
  </servlet>

  <servlet-mapping>
  	<servlet-name>springDispatcherServlet</servlet-name>
  	<url-pattern>/</url-pattern>
  </servlet-mapping>


  <welcome-file-list>
    <welcome-file>index.jsp</welcome-file>
  </welcome-file-list>
</web-app>
同时,将src下的springmvc.xml移到WEB-INF下,改名字为springDispatcherServlet-servlet.xml,如图:
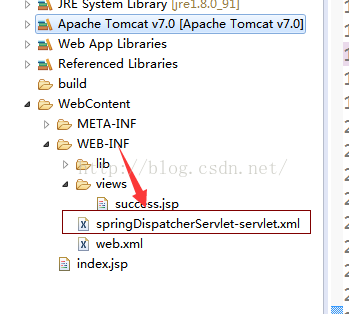
名字命名格式:<servlet-name>springDispatcherServlet</servlet-name>中的springDispatcherServlet+servlet.xml
如果<servlet-name>为别的比如dispatcher,则名字就为dispatcher-servlet.xml,格式为<servelt-name>-servlet.xml。
别的不需要动,重新输入helloworld的请求地址测试,效果一样。