arcgis api for flex之四、使用BlazeDS与Flash Builder4.5整合Java EE应用
前言
写这篇文章的目的是对于一个完全不懂的新手,也能快速step by step创建Flex与Java EE的整合应用,开启java与flex的企业级应用开发的第一页。
开发环境及工具
windows 7
JAVA SDK 1.6.0_17
Flash Builder 4.5
SpringSource Tool Suite IDE
BlazeDS
之所以选用SpringSource Tool Suite IDE是因为常用的插件已经帮我们集成好,而且对于Spring的操作支持等自然不必说。
step by step create the demo
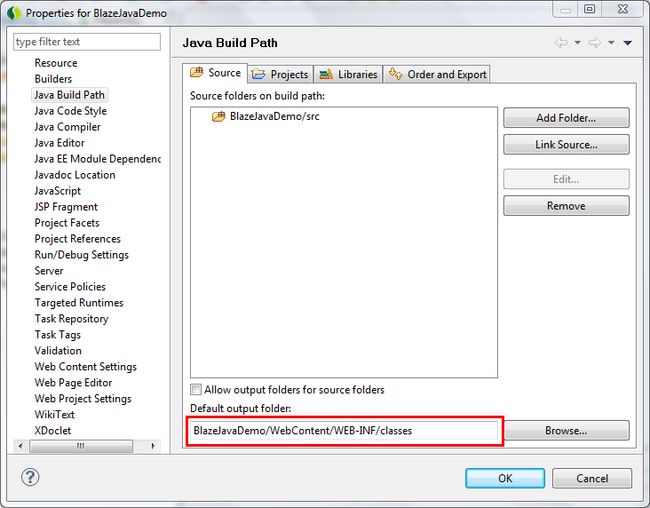
1. 首先使用SpringSource Tool Suite 创建我们的Dynamic Web Project项目命名为 BlazeJavaDemo。创建完成后更改默认的output folder为“BlazeJavaDemo/WebContent/WEB-INF/classes”
2. 解压我们下载的BlazeDS turnkey包在根目录上我们会看到一系列目录以及文件包含doc,resource samples等,这里就不做详细介绍。我只需要blazeds.war
3. 把blazeds.war放到我们的tomcat webapps目录下,并启动tomcat 熟悉java的都知道这就是一个发布包。ok 定位到我们的blazeds\WEB-INF文件夹下,
大家会看到以下内容:
4. 把此所有内容copy到我们java项目\WEB-INF下并覆盖其所有原文件。
BlazeDS是java与flex通信的一个中间件,使用的是Adobe自家的AMF二进制传输协议,是开源的针对不同的开发语言都有其实现,其优点就是超高的传输速率以及效率,这也是为什么企业级应用经常使用的原因。利用他我们可以非常方便的在flex中直接访问java对象,他的功能很强大更多资料请查看Adobe官网。下面我们简单写一个java class并且通过blazeDS暴露给flex,完成我们第一个简单的demo.
5. 很简单的一个java class 他的作用就是接受flex端的参数,并且响应信息给flex端。
- /**
- *
- */
- package com.swq.services;
- /**
- * @author Administrator
- *
- */
- public class DemoService {
- /**
- *
- */
- public DemoService() {
- // TODO Auto-generated constructor stub
- }
- /**
- * 接收参数name并响应信息到flex端
- * @param name
- * @return
- */
- public String sayHello(String name){
- return "Hello "+name;
- }
- }
- <destination id="demoservice">
- <properties>
- <source>com.swq.services.DemoService</source>
- </properties>
- </destination>
7. 完成了java端,接下来我们看下使用Flash Builder4.5是怎样建立与BlazeDS通信项目的
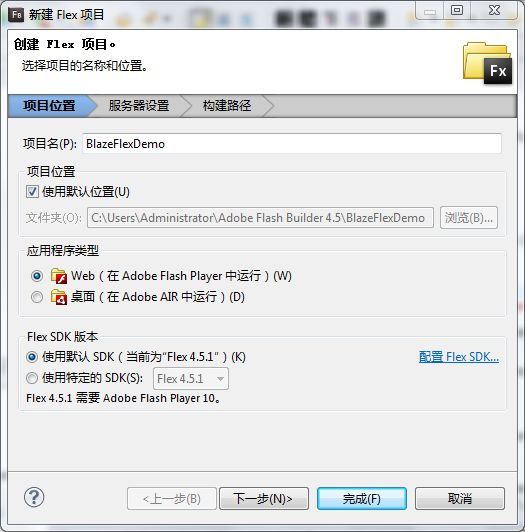
(1)建立名为BlazeFlexDemo的项目
(2)填写正确的路径之后验证配置,无误之后下一步完成flex项目的创建。
此处可能会报URL错误路径错误或者无效,只需要运行一下:http://localhost:8080/BlazeJavaDemo/messagebroker/amf
原因可能是需要生成路径:**webapps\flexdemo\javaflex-debug
8. 完成了flex项目的创建接下来我们看下代码,非常简单的代码。这里要说明的是:在声明RemoteObject组件的destination属性一定要和remoting-config.xml中的destination对应,flex就是根据这个进行对应的,然后我们就可以通过其id属性直接访问我们java端的方法了。endpoint属性指定我们的终端位置,当我们java端发布之后大家可以测试下http://localhost:8080/BlazeJavaDemo/messagebroker/amf如果正确说明我们的项目没有问题。
- <?xml version="1.0" encoding="utf-8"?>
- <s:Application xmlns:fx="http://ns.adobe.com/mxml/2009"
- xmlns:s="library://ns.adobe.com/flex/spark"
- xmlns:mx="library://ns.adobe.com/flex/mx" minWidth="955" minHeight="600">
- <fx:Script>
- <![CDATA[
- import mx.controls.Alert;
- import mx.rpc.events.FaultEvent;
- import mx.rpc.events.ResultEvent;
- [Bindable]
- public var tempString:String = "";
- protected function button1_clickHandler(event:MouseEvent):void
- {
- myService.sayHello(input.text);
- }
- protected function myService_resultHandler(event:ResultEvent):void
- {
- tempString += event.result +"\n";
- outPut.text = tempString;
- }
- protected function myService_faultHandler(event:FaultEvent):void
- {
- Alert.show(event.fault.message);
- }
- ]]>
- </fx:Script>
- <fx:Declarations>
- <!-- Place non-visual elements (e.g., services, value objects) here -->
- <s:RemoteObject id="myService" destination="demoservice"
- endpoint="http://localhost:8080/BlazeJavaDemo/messagebroker/amf"
- result="myService_resultHandler(event)"
- fault="myService_faultHandler(event)"
- showBusyCursor="true"/>
- </fx:Declarations>
- <s:VGroup>
- <s:HGroup>
- <s:TextInput id="input"/>
- <s:Button label="Send" click="button1_clickHandler(event)"/>
- </s:HGroup>
- <s:TextArea id="outPut" width="100%">
- </s:TextArea>
- </s:VGroup>
- </s:Application>
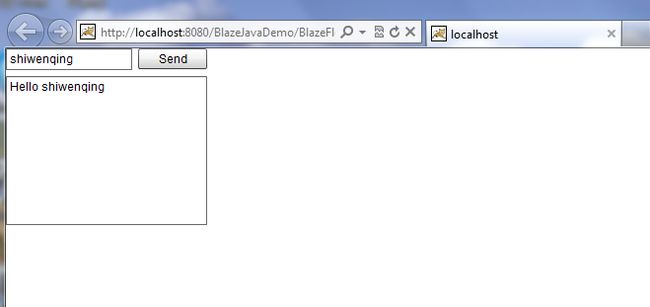
9. 上一张运行成功的页面
总结:很简单的代码,很简单的配置就完成了flex通过BlazeDS与Java通信,这方面的资料网上也有很多Google下一大堆,但是看到很多文章都不是很详细。如果对于是完全的新手来说还是有一点难度所以就写了这篇文章,如果你是个新手能通过本篇文章成功完成通信。那还是值得的。更多详细的学习资源请访问Adobe官网。善于思考,善于学习,善于模仿。这就是程序猿必备的东西。
原文地址:http://blog.csdn.net/shiwenqing/article/details/6726775


